
はじめに
Alexa-Hostedスキルを公開すると、運用中にエラーが発生していないか気になります。もしエラーが発生したときは、そのことをシステムから通知してくれると、素早く対応できて安心できます。本記事では、Alexa-Hostedスキルから自前のCloudWatchにログを出力し、そのログを監視してエラーの発生時に開発者にEメールで通知するソリューションを紹介します。
本記事は以下の二部作となっています。
- 前編: 自前のCloudWatchへの出力
- 後編: エラー監視とメール通知
全体構成
構築するソリューションの全体構成を下記に示します。前編では自前のCloudWatchのMyLogGroupにログを書き込むとろこまでを構築します。
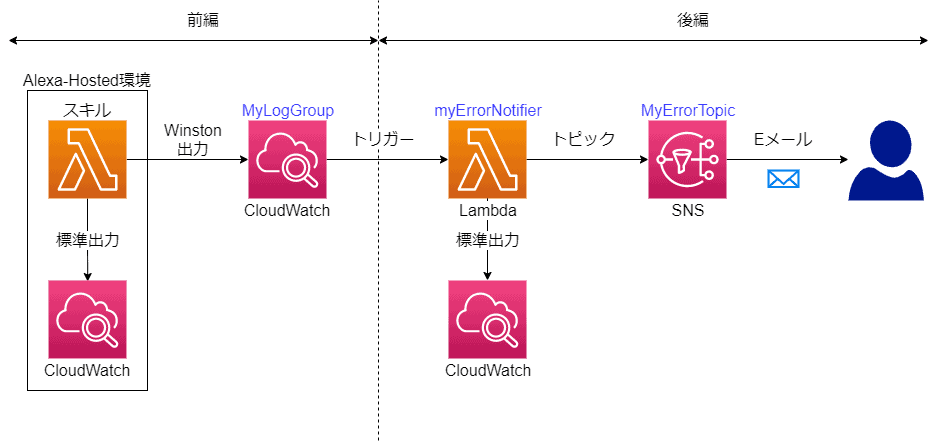
スキルからのログ出力
Alexa-HostedスキルはLambda環境で実行されます。Lambda環境では、console.log()など標準出力に出力されたものは、デフォルトのCloudWatchに書き込まれます。
このデフォルトのCloudWatchは、Alexa-Hosted環境の一部として提供されているもので、開発者コンソールからアクセスできます。ただしスキル開発者にはログの読み込みや削除など、限られた権限のみが付与されています。このためエラーログの検出やEメールによる通知といった、ここで目指しているソリューションを構築することができません。
この制約を回避するために、ログの書き込み先を自前のCloudWatchに変更します。一番簡単なのは、Lambda環境に紐付いているCloudWatchそのものを変更することですが、この方法は見つけられませんでした (デプロイ時のテンプレートに指定できるようですが、Alexa-Hosted環境では、テンプレートの変更は開発者には許可されていません)。
このためログの出力方法を変更して、ログの書き込み先を変更することにしました。
Winstonの利用
本記事ではログ出力のためにWinstonを使います。Winstonはロギングライブラリのひとつで、ログの出力先やフォーマットを管理できるものです。このWinston経由でログを出力することで、自前のCloudWatchにログを書き込むようにします。
Winstonはトランスポート (transport) というモジュールを組み込むことで、ログの出力先を変更できるようになっています。標準で幾つかのトランスポートが提供されており、例えばコンソールへの出力を行う場合は、下記のようにコンソール向けのトランスポート(winston.transports.Console)を組み込めます。
const logger = winston.createLogger({
    level: 'info',
    format: format.combine(
        format.timestamp(),
        format.simple()
    ),
    transports: [
        new winston.transports.Console()
    ]
});
同様にCloudWatchに対してログを出力するトランスポートも用意されています。
- winston-aws-cloudwatch
このトランスポートを使って自前のCloudWatchにログを出力します。
事前準備
事前準備として下記の作業を行います。
- ログ書き込み用ユーザーの作成
- Winstonのインストール
ログ書き込み用ユーザーの作成
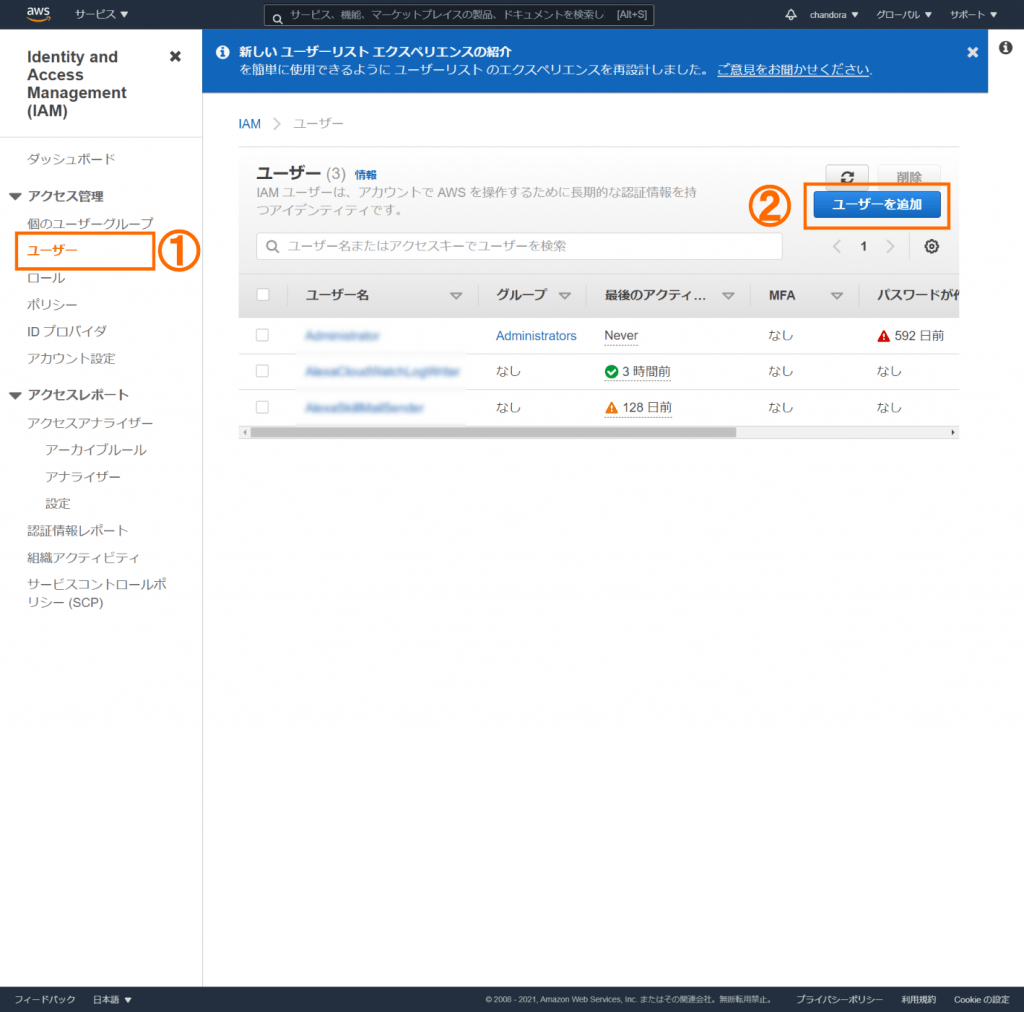
スキルからCloudWatchにログを書き込むためのユーザーを作成し、必要な権限を付与します。
AWSコンソールからIAM (Identify and Access Management) サービスのコンソールを表示します。
- 左メニューから①
ユーザーを選択します - ②
ユーザーを追加をクリックします
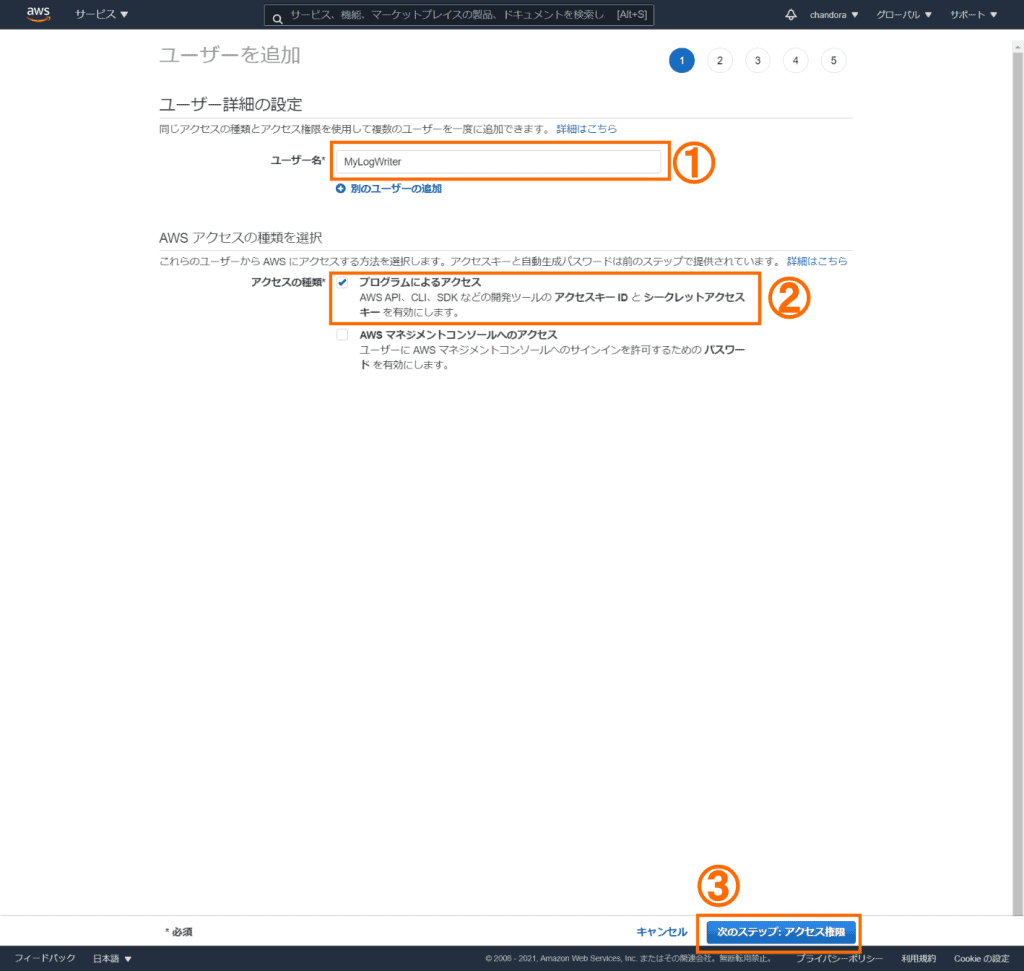
- ユーザー名①
MyLogWriterを入力します - アクセスの種類から②
プログラムによるアクセスを選択します。 - ③
次のステップ: アクセス権限をクリックします
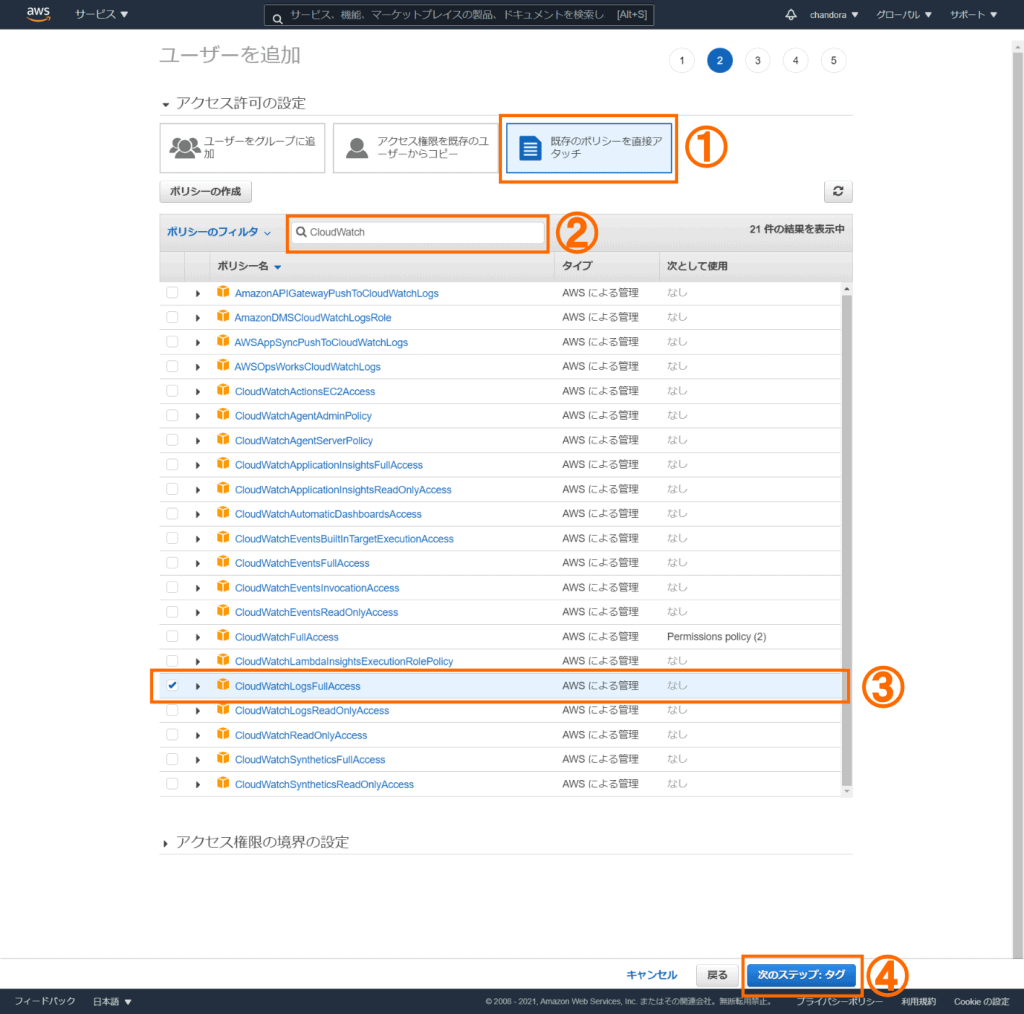
- アクセス許可の設定から①
既存のポリシーを直接アタッチを選択します - ポリシーのフィルタに②
CouldWatchと入力します - ポリシーリストから③
CloudWatchLogFullAccessを選択します - ④
次のステップ: タグをクリックします
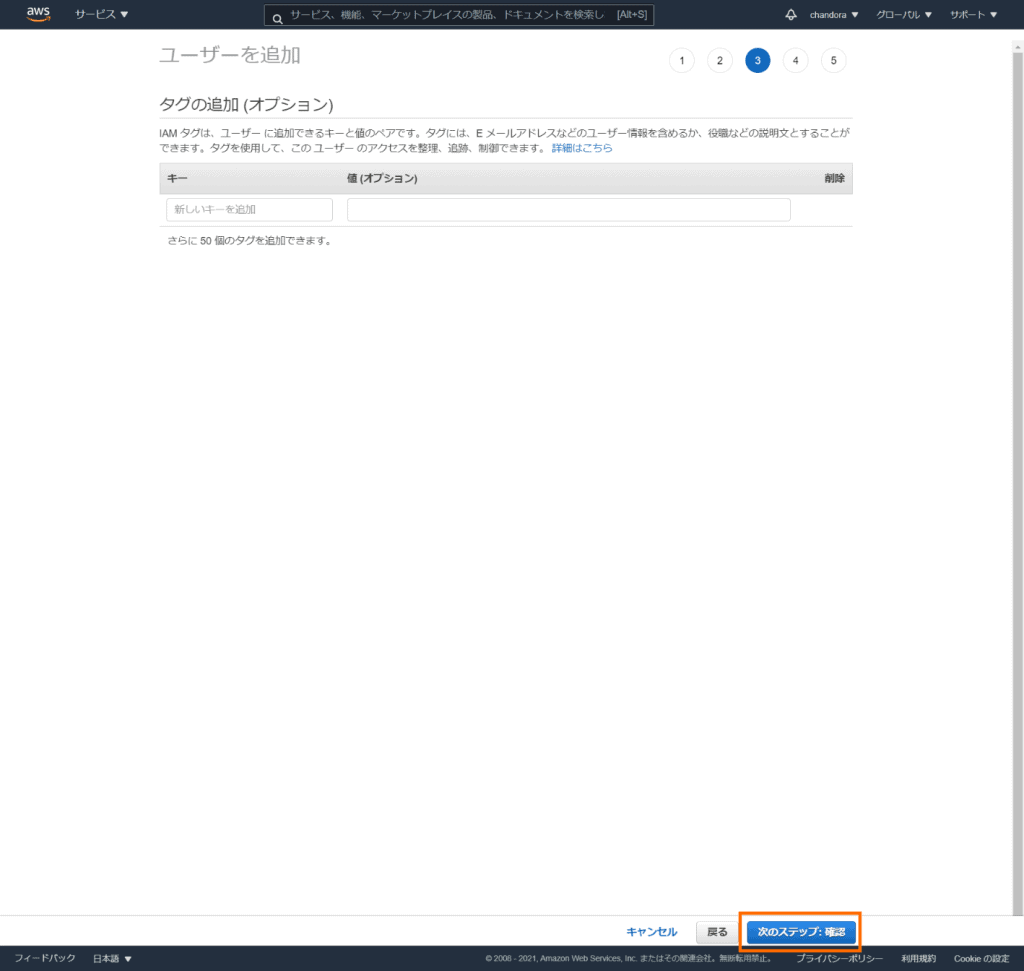
タグはレポートなどで関連するリソースをまとめる際に使います。ここでは指定してもしなくても良いです。
次のステップ: 確認をクリックします。
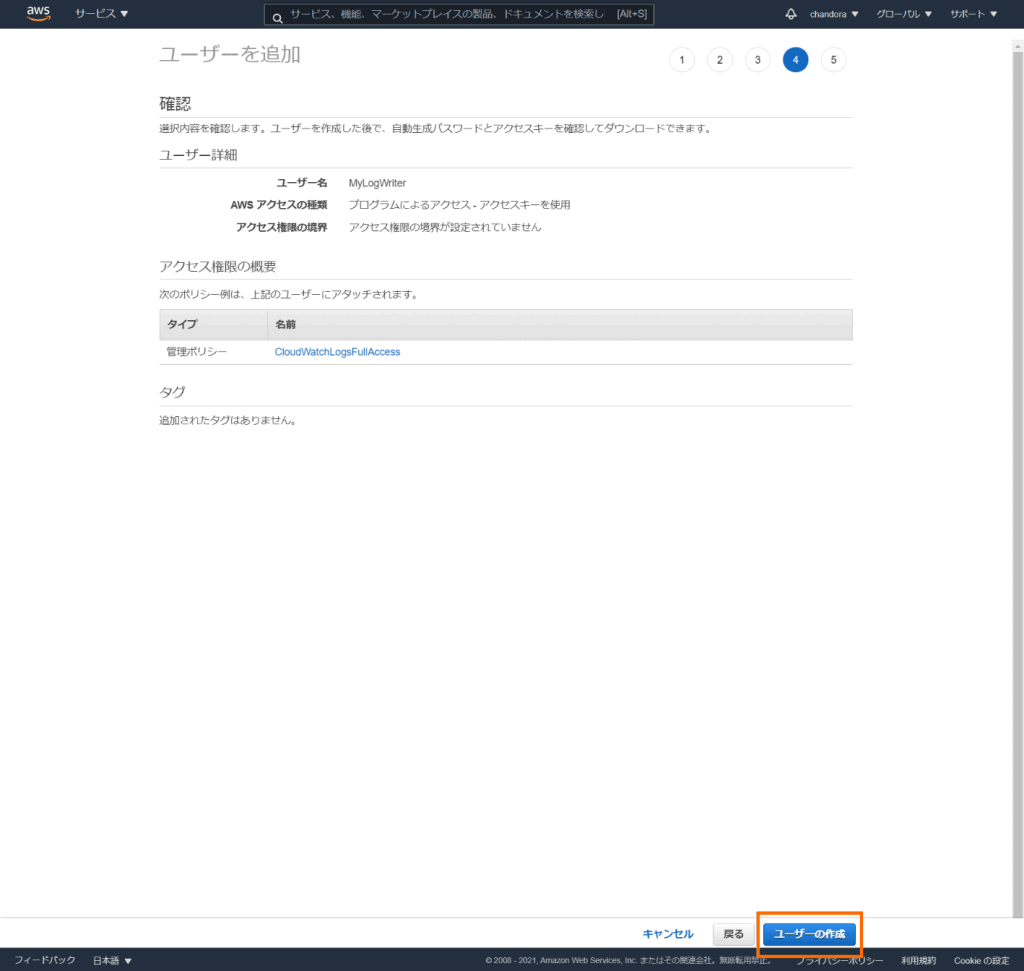
ユーザーの作成をクリックします。
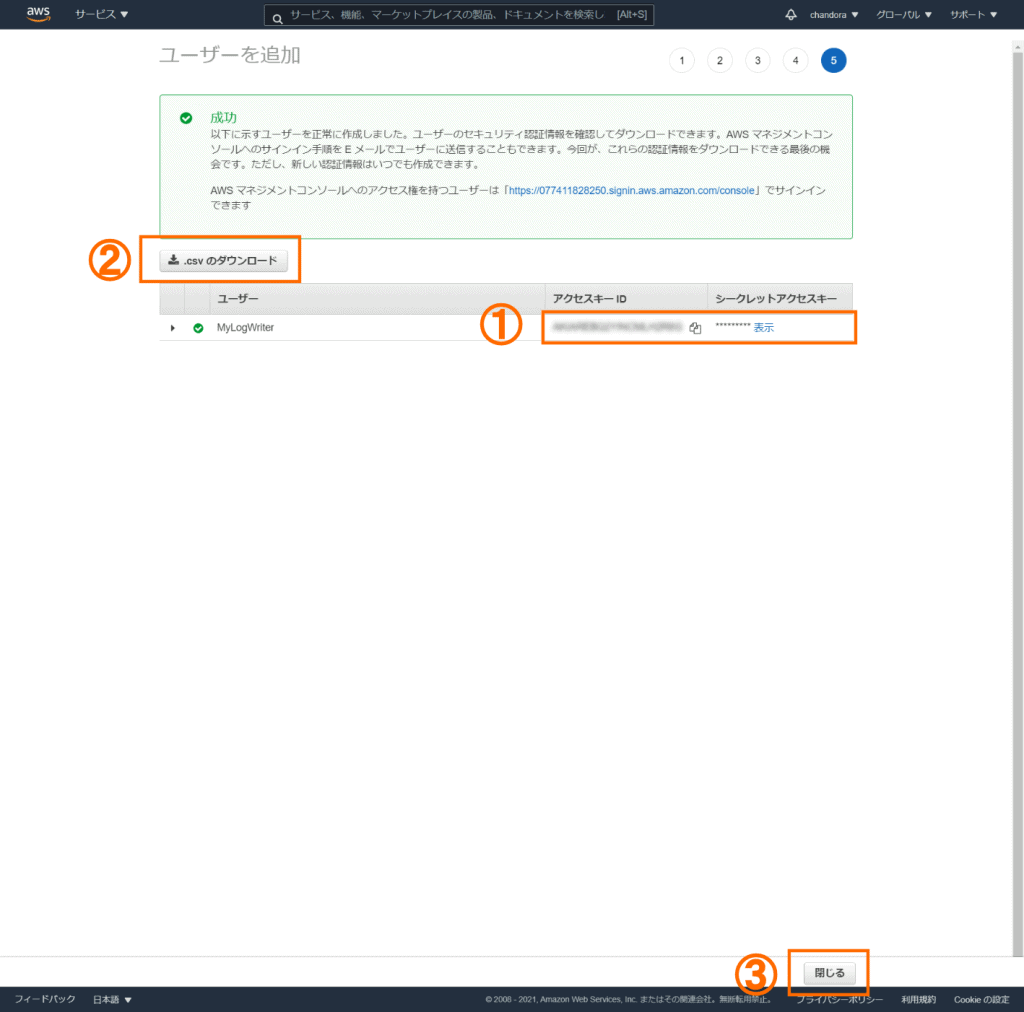
ユーザーが作成され、①アクセスキーIDとシークレットアクセスキーが表示されます。これらを後で使うので、②CSVでダウンロードしておきます。
③閉じるをクリックします。
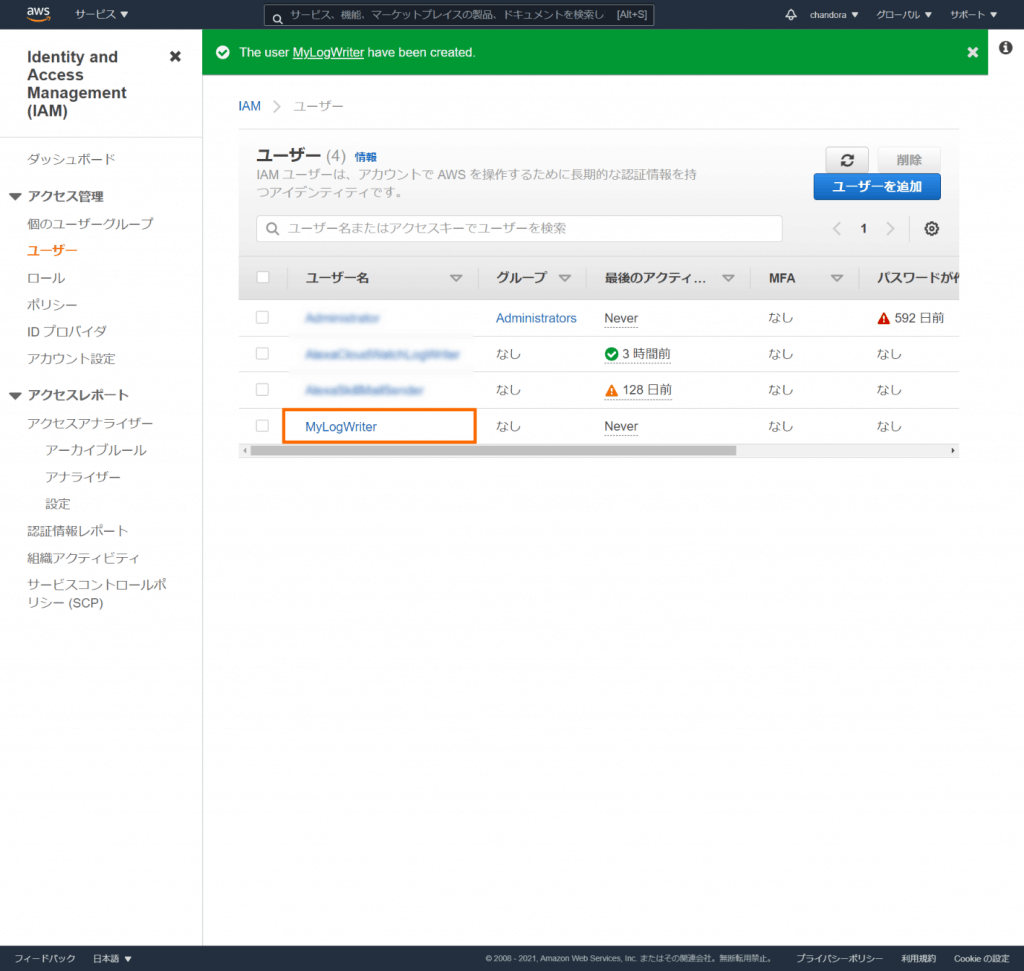
一覧にMyLogWriterが追加されます。
ログ書き込みの認証情報について
スキルから自前のCloudWatchにログを書き込むための認証情報の取得には2つの方法があります。
- ログ書き込み権限を持つユーザーを作成し、その認証情報を使用する (ここで紹介した方法)
- Security Token Service (STS) を使って、認証情報を取得する
セキュリティの観点からSTSを使う方法が望ましいようです。ただSTSによる認証情報の取得は、非同期処理になるため、スキルのコードがロードされてからログの書き込みが可能になるまで、タイムラグが発生します。このタイムラグに対応するため工夫が必要になります。今回は簡易版としてユーザーを作成する方法を選びました。
Winstonのインストール
npmから下記の2つのモジュールをインストールします。
npm i winston
npm i winston-aws-cloudwatch
以上で事前準備の完了です。
ロガーの構成
Winstonを使ってロガーを構成します。筆者の場合、スキルのソースコードを複数のファイルに分割しています。それぞれでロガーを使うため、ロガー自体も別ファイルにして、それを複数のファイルでインポートしています。
下記にロガーのソースコードを示します。
const Winston = require('winston');
const CloudWatchTransport = require('winston-aws-cloudwatch');

const LogLevel = 'debug';
const LogGroupName = 'MyLogGroup';
const LogStreamName = process.env.AWS_LAMBDA_LOG_STREAM_NAME || 'logstream' + Date.now();
const LogWriterAccessKeyId = '...';
const LogWriterSecretAccessKey = '...';
const LogRegion = '...';

const logger = Winston.createLogger({
    level: LogLevel,
});

const transport = new CloudWatchTransport({
    logGroupName: LogGroupName,
    logStreamName: LogStreamName,
    createLogGroup: true,
    createLogStream: true,
    submissionInterval: 50,
    submissionRetryCount: 1,
    batchSize: 20,
    awsConfig: {
        accessKeyId: LogWriterAccessKeyId,
        secretAccessKey: LogWriterSecretAccessKey,
        region: LogRegion
    },
    formatLog: item =>
        `${item.level}: ${item.message}`
});

logger.add(transport);

exports.logger = logger;
各種設定値の説明です。
| 項目 | 内容 |
| LogLevel | ログに出力するレベルを指定します。 ‘debug’だと全てのログレベルが出力されます。 設定可能なログレベルについては、Winstonの説明を確認してください。 https://github.com/winstonjs/winston#logging-levels |
| LogGroupName | ロググループの名前 (MyLogGroup) を指定します。 |
| LogStreamName | 書き込み先のログストリームの名前を指定します。Lamda環境では、環境変数にストリーム名が定義されているので、これを使っています。Lamda関数のインスタンスIDに紐付いた名前になります。 |
| LogWriterAccessKeyId | 先程作成したログ書き込み用ユーザーのアクセスキーIDを指定します。 |
| LogWriterSecretAccessKey | 先程作成したログ書き込み用ユーザーのシークレットアクセスキーを指定します。 |
| Region | ロググループを作成したCloudWatchがホストされているリージョンを指定します。 |
| createLogGroup | ロググループが存在しない場合に新規に作成するかどうかを指定します。ここではトランスポートに自動で作成させるために、trueを指定しています。ロググループ名は固定なので、事前に手動で作成しておくこともできます。 |
| createLogStream | ログストリームが存在しない場合に新規に作成するかどうかを指定します。ログストリーム名がインスタンスに紐付いて動的に変化することから、その都度ログストリームを作成する必要があります。このためtrueを指定しています。 |
| submissionInterval | ログの書き込みインターバルを指定します。取り敢えず50 (ms) を指定しています。大量のログ出力があった場合に、過負荷にならないように書き込み間隔を調整するためのものと思われますが、最適値については不明です。 |
| batchSize | 一度のログ書き込みにまとめることのできるログの数を指定します。CloudWatchへの書き込みは非同期処理になるため、その処理中に複数のログ出力がキューに貯まる場合があります。これをまとめて書き込みます。取り敢えず20としています。(筆者の開発しているスキルの場合は、2-3個まとめられることがある程度です) |
注意: 認証情報は、セキュリティの観点からは定期的にローテーションする方がよく、そのため別ファイルに定義するべきとされています。ここでは簡略化のために直接記載しています。
ロガーの利用
Alexa-HostedスキルのサンプルスキルのひとつであるHello Worldスキルを例に、ロガーの利用方法を説明します。
ソースコード (index.js) の最初で、logger.jsファイルからloggerをインポートしています。
const logger = require('./logger').logger;その直後にサンプルとしてloggerの出力を各レベルごとに行っています。
logger.debug('message for debug');
logger.info('message for infomation');
logger.warn('message for warning');
logger.error('message for error');
また各ハンドラの中で、ハンドラ名を出力しています。
    handle(handlerInput) {
        logger.info('LaunchRequest');
        ...
    }
ソースコードの全体を下記に示します。少し長いですが、上述の変更点以外は、オリジナルのままです。
スキルのソースコード (index.js)
/* *
 * */
const Alexa = require('ask-sdk-core');

const logger = require('./logger').logger;
logger.debug('message for debug');
logger.info('message for infomation');
logger.warn('message for warning');
logger.error('message for error');

const LaunchRequestHandler = {
    canHandle(handlerInput) {
        return Alexa.getRequestType(handlerInput.requestEnvelope) === 'LaunchRequest';
    },
    handle(handlerInput) {
        logger.info('LaunchRequest');

        const speakOutput = 'Welcome, you can say Hello or Help. Which would you like to try?';

        return handlerInput.responseBuilder
            .speak(speakOutput)
            .reprompt(speakOutput)
            .getResponse();
    }
};

const HelloWorldIntentHandler = {
    canHandle(handlerInput) {
        return Alexa.getRequestType(handlerInput.requestEnvelope) === 'IntentRequest'
            && Alexa.getIntentName(handlerInput.requestEnvelope) === 'HelloWorldIntent';
    },
    handle(handlerInput) {
        logger.info('HelloWrold');
        const speakOutput = 'Hello World!';

        return handlerInput.responseBuilder
            .speak(speakOutput)
            //.reprompt('add a reprompt if you want to keep the session open for the user to respond')
            .getResponse();
    }
};

const HelpIntentHandler = {
    canHandle(handlerInput) {
        return Alexa.getRequestType(handlerInput.requestEnvelope) === 'IntentRequest'
            && Alexa.getIntentName(handlerInput.requestEnvelope) === 'AMAZON.HelpIntent';
    },
    handle(handlerInput) {
        logger.info('Help');
        const speakOutput = 'You can say hello to me! How can I help?';

        return handlerInput.responseBuilder
            .speak(speakOutput)
            .reprompt(speakOutput)
            .getResponse();
    }
};

const CancelAndStopIntentHandler = {
    canHandle(handlerInput) {
        return Alexa.getRequestType(handlerInput.requestEnvelope) === 'IntentRequest'
            && (Alexa.getIntentName(handlerInput.requestEnvelope) === 'AMAZON.CancelIntent'
                || Alexa.getIntentName(handlerInput.requestEnvelope) === 'AMAZON.StopIntent');
    },
    handle(handlerInput) {
        logger.info('CancelAndStop');
        const speakOutput = 'Goodbye!';

        return handlerInput.responseBuilder
            .speak(speakOutput)
            .getResponse();
    }
};
/* *
 * FallbackIntent triggers when a customer says something that doesn’t map to any intents in your skill
 * It must also be defined in the language model (if the locale supports it)
 * This handler can be safely added but will be ingnored in locales that do not support it yet
 * */
const FallbackIntentHandler = {
    canHandle(handlerInput) {
        return Alexa.getRequestType(handlerInput.requestEnvelope) === 'IntentRequest'
            && Alexa.getIntentName(handlerInput.requestEnvelope) === 'AMAZON.FallbackIntent';
    },
    handle(handlerInput) {
        logger.info('Fallback');
        const speakOutput = 'Sorry, I don\'t know about that. Please try again.';

        return handlerInput.responseBuilder
            .speak(speakOutput)
            .reprompt(speakOutput)
            .getResponse();
    }
};
/* *
 * SessionEndedRequest notifies that a session was ended. This handler will be triggered when a currently open
 * session is closed for one of the following reasons: 1) The user says "exit" or "quit". 2) The user does not
 * respond or says something that does not match an intent defined in your voice model. 3) An error occurs
 * */
const SessionEndedRequestHandler = {
    canHandle(handlerInput) {
        return Alexa.getRequestType(handlerInput.requestEnvelope) === 'SessionEndedRequest';
    },
    handle(handlerInput) {
        logger.info('SessionEnded');
        console.log(`~~~~ Session ended: ${JSON.stringify(handlerInput.requestEnvelope)}`);
        // Any cleanup logic goes here.
        return handlerInput.responseBuilder.getResponse(); // notice we send an empty response
    }
};
/* *
 * The intent reflector is used for interaction model testing and debugging.
 * It will simply repeat the intent the user said. You can create custom handlers for your intents
 * by defining them above, then also adding them to the request handler chain below
 * */
const IntentReflectorHandler = {
    canHandle(handlerInput) {
        return Alexa.getRequestType(handlerInput.requestEnvelope) === 'IntentRequest';
    },
    handle(handlerInput) {
        logger.info('IntentReflection');
        const intentName = Alexa.getIntentName(handlerInput.requestEnvelope);
        const speakOutput = `You just triggered ${intentName}`;

        return handlerInput.responseBuilder
            .speak(speakOutput)
            //.reprompt('add a reprompt if you want to keep the session open for the user to respond')
            .getResponse();
    }
};
/**
 * Generic error handling to capture any syntax or routing errors. If you receive an error
 * stating the request handler chain is not found, you have not implemented a handler for
 * the intent being invoked or included it in the skill builder below
 * */
const ErrorHandler = {
    canHandle() {
        return true;
    },
    handle(handlerInput, error) {
        logger.error(`${JSON.stringify(error)}`);
        const speakOutput = 'Sorry, I had trouble doing what you asked. Please try again.';
        console.log(`~~~~ Error handled: ${JSON.stringify(error)}`);

        return handlerInput.responseBuilder
            .speak(speakOutput)
            .reprompt(speakOutput)
            .getResponse();
    }
};

/**
 * This handler acts as the entry point for your skill, routing all request and response
 * payloads to the handlers above. Make sure any new handlers or interceptors you've
 * defined are included below. The order matters - they're processed top to bottom
 * */
exports.handler = Alexa.SkillBuilders.custom()
    .addRequestHandlers(
        LaunchRequestHandler,
        HelloWorldIntentHandler,
        HelpIntentHandler,
        CancelAndStopIntentHandler,
        FallbackIntentHandler,
        SessionEndedRequestHandler,
        IntentReflectorHandler)
    .addErrorHandlers(
        ErrorHandler)
    .withCustomUserAgent('sample/hello-world/v1.2')
    .lambda();
スキルの実行
スキルをデプロイしたら、下記の会話を実行します。英語は苦手という方は、開発者コンソールのテストシミュレータからキー入力しても良いでしょう。(筆者は何度かAmazon Musicで’Hello World’という曲を聴かされました)
U: Alexa, open hello world
A: Welcome, you can say Hello or Help. Which would you like to try?
U: Hello
A: Hello World!
U: ユーザー、A: アレクサ
これでスキルが実行され、ロガーからログメッセージがCloudWatchに書き込まれます。
ログの確認
CloudWatchに書き込まれたログを確認します。
AWSコンソールから、CloudWatchサービスのコンソールを表示します。
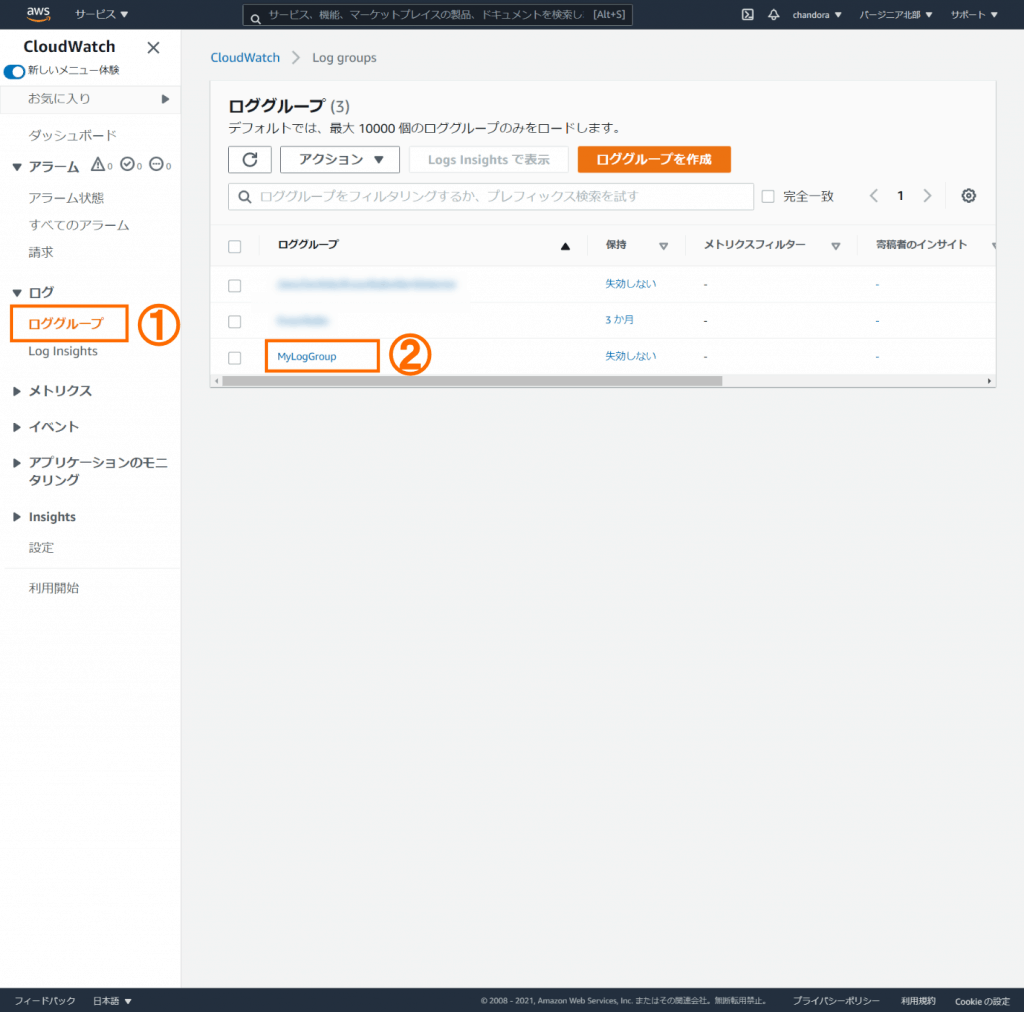
- 左メニューから①
ロググループを選択します - ログの一覧から②
MyLogGroupをクリックします
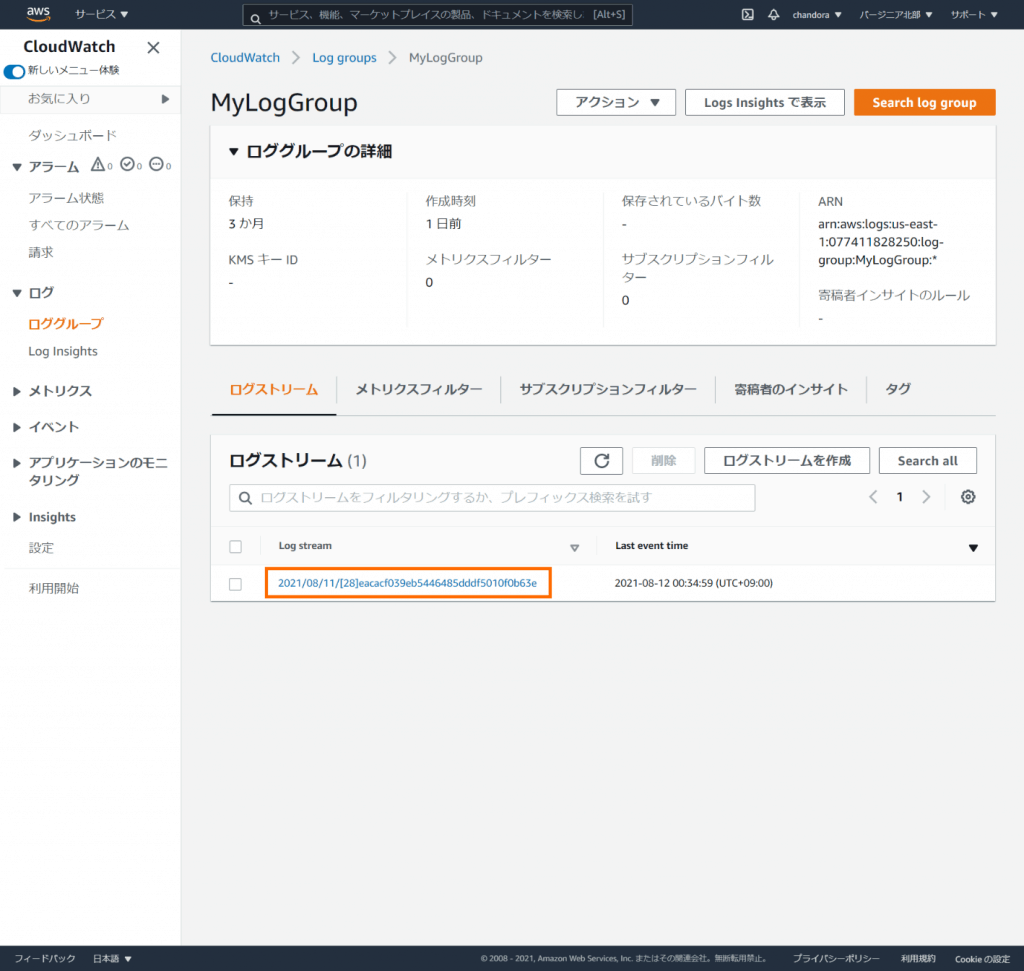
ログストリームの一覧が表示されるので、最新のログストリームをクリックします。
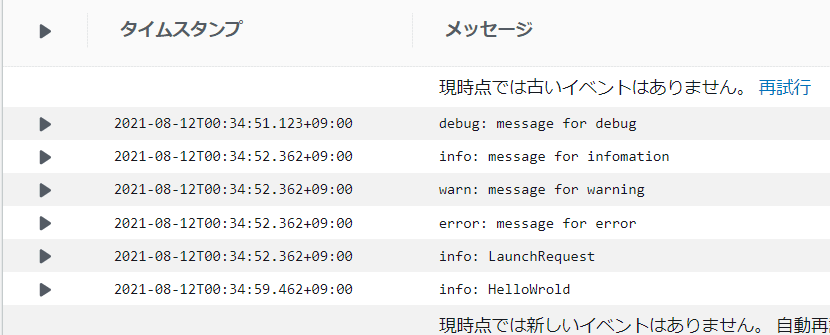
ログストリームに書き込まれたログを下記に示します。ソースコードに埋め込んだロガーからのログが出力されていることが分かります。
Alexa-Hosted環境のCloudWatchも確認してみましょう。開発者コンソールのコードエディタタブから、CloudWatch Logsを開きます。すると下記のようなログが書き込まれていることが分かります。
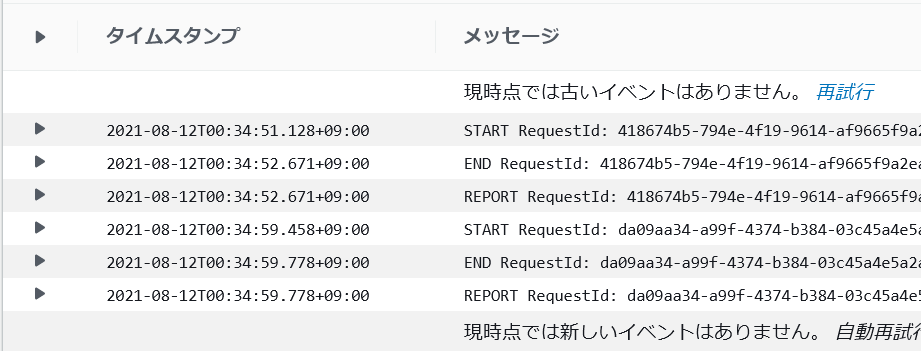
これらのログは、スキルではなくLambda環境から出力されたものです。スキルのLambda関数の開始・終了と実行時間などが出力されています。本来はこれらのログも、自前のCloudWatchに出力したいところですが、スキル開発者に付与されている権限では、そのような設定はできないようです。
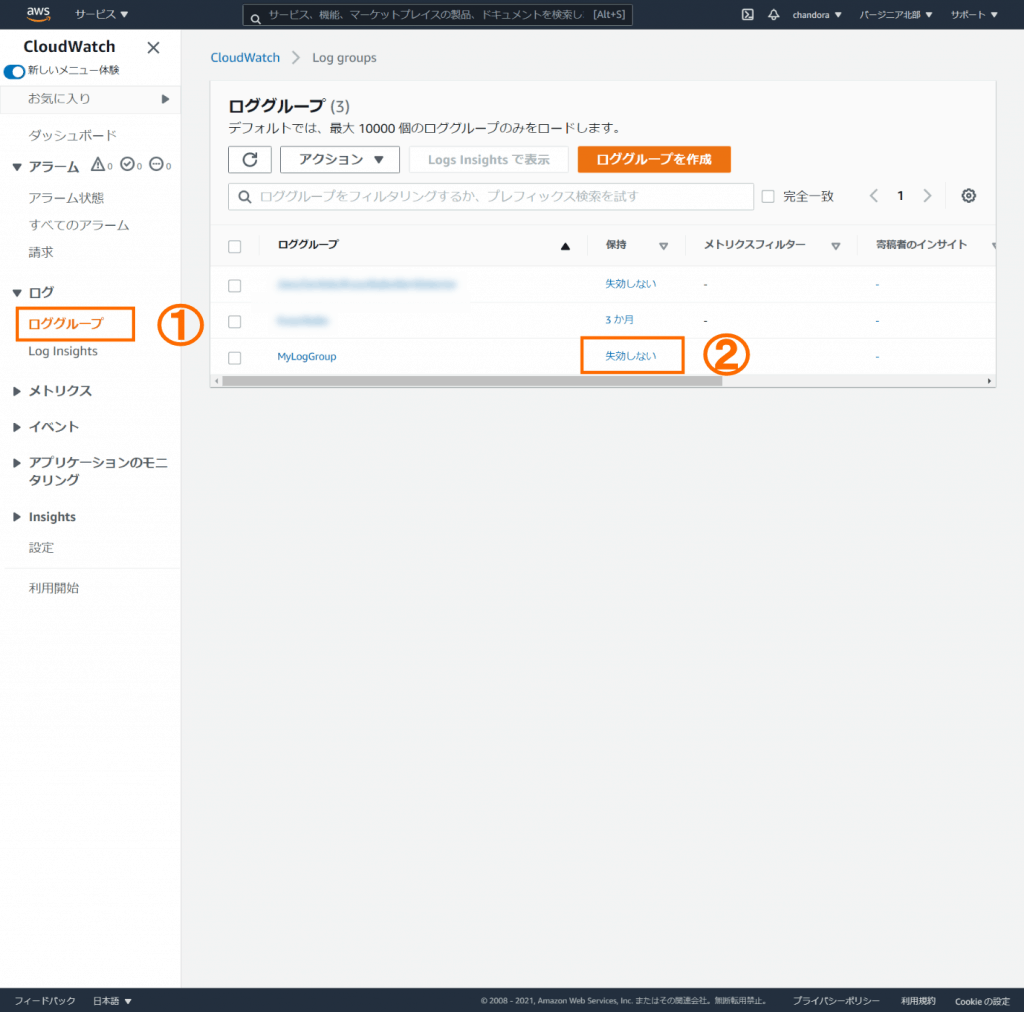
ログの保持期間の変更
作成されたロググループの保持期間は「失効しない」となっています。この保持期間を変更して、一定期間が過ぎたものを自動的に消し込むこともできます。
- 左メニューから①
ロググループを選択します - 保持期間の②
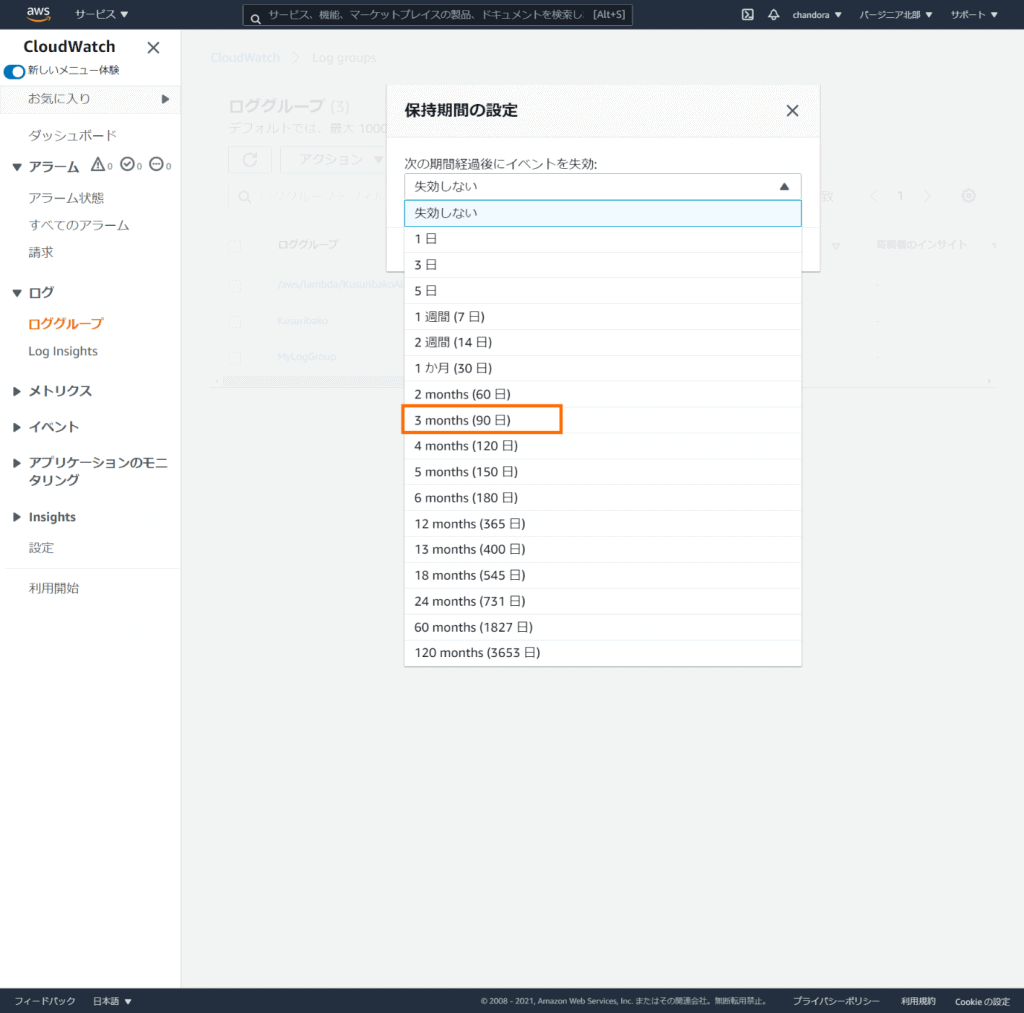
失効しないをクリックします
保持期間から適当な期間 (例えば3ヶ月) を選択します。
おわりに
Alexa-Hostedスキルから自前のCloudWatchにログを出力するまでを紹介しました。
後編では、CloudWatchを監視してエラーがログされたら、開発者にメールする方法を紹介します。
変更履歴
| 日付 | 内容 |
| 2021/09/16 | 全体構成を追加 |
| 2021/08/22 | ロググループの作成をトランスポートで行うことにして、手動でのロググープ作成の手順を削除 |
| 2021/08/12 | 初版リリース |

