
Introduction
In this article, I will explain how to install Redmine 4.2/5.0 with Ruby 2.7 on Ubuntu step-by-step. You can easily follow the process in a copy-and-paste manner.
If you are looking for the installation procedure for Redmine 5.0 and Ruby 3.1, please refer to the following article:
Step-by-Step: Install Redmine 5.0 with Ruby 3.1 on Ubuntu
If you are interested in improving the Redmine user experience for your project members, please check the following:
RedSync – A Trello Power-Up to Integrate Redmine to Trello
You can use Trello as a front end of Redmine and enjoy Trello’s excellent user interface and capabilities, such as a checklist on a card, kanban boards, automated workflow, etc.
In addition to the standard Redmine functions, you can edit the schedule on the Gantt chart and collaborate with outside partners who do not have Redmine accounts on your system.
Environment
- OS: Ubuntu 20.04 LTS / 22.04 LTS
- Redmine: 4.2, 5.0
- Ruby: 2.7
- Rails: 5.2, 6.1 (included in Redmine)
- MySQL: 8.0
The above combination of versions is the latest (except for Ubuntu) at the time of writing. Please check the newest prerequisite software versions for Redmine.
Installation Steps
- Setup Ubuntu
- Setup MySQL
- Setup Ruby
- Setup Redmine
Setup Ubuntu
Install Ubuntu
Follow the official guide applicable to your environment.
Create User
Create a user for Redmine operations.
sudo adduser redmineEnable the user as a sudoer.
sudo gpasswd -a redmine sudoHereafter, log in as redmine.
Install Library
Update the package list and upgrade the installed modules.
sudo apt updatesudo apt upgrade -yInstall the library required for the subsequent operations.
sudo apt install -y build-essentialSetup MySQL
Install MySQL
Check available MySQL versions from the Community Edition page and identify the suitable version for Redmine 5.0. (as of writing, 0.8.22-1_all)
Obtain the package URL, download it with wget and add it to the repository.
cd ~
wget https://dev.mysql.com/get/mysql-apt-config_0.8.22-1_all.deb
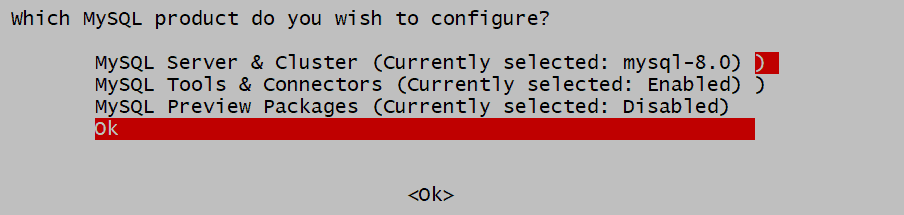
sudo dpkg -i mysql-apt-config_0.8.22-1_all.debPackage Manager (dpkg) asks you which MySQL product you wish to configure. Accept the default and click OK.
Update the package list and install MySQL with a library.
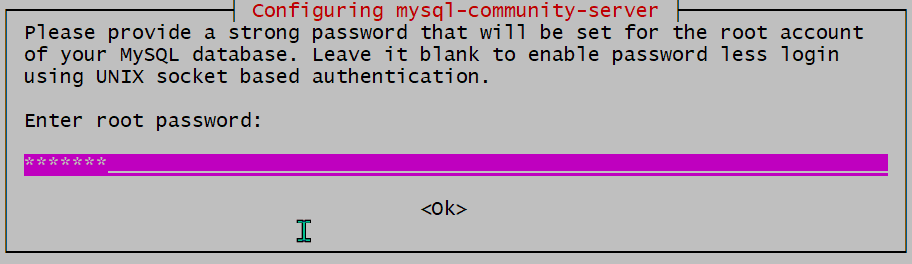
sudo apt updatesudo apt install -y mysql-server libmysqlclient-devSet the root password.
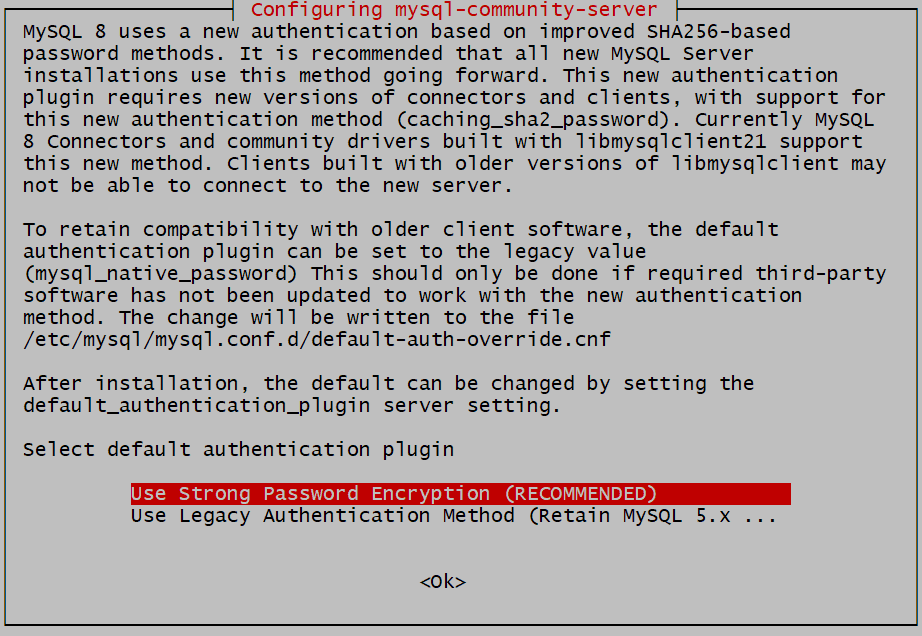
Select “Use Strong Password Encryption.”
Confirm that MySQL is running.
systemctl status mysqlYou will see the following output. Active: active means MySQL is running.
● mysql.service - MySQL Community Server
     Loaded: loaded (/lib/systemd/system/mysql.service; enabled; vendor preset: enabled)
     Active: active (running) since Fri 2022-06-17 06:53:26 UTC; 16s ago
       Docs: man:mysqld(8)
             http://dev.mysql.com/doc/refman/en/using-systemd.html
   Main PID: 26378 (mysqld)
     Status: "Server is operational"
      Tasks: 38 (limit: 4575)
     Memory: 359.0M
     CGroup: /system.slice/mysql.service
             └─26378 /usr/sbin/mysqld
New versions of MySQL may not allow you to set up the root password during the installation described above. In that case, you should alter the password with a command.
Start the MySQL command shell as follows:
sudo mysql -u rootIn the MySQL command shell, enter the following command. You need to change <password> to your own choice.
ALTER USER 'root'@'localhost' IDENTIFIED WITH mysql_native_password by '<password>';Change the default settings for safety.
sudo mysql_secure_installationExample: (No specific requirement for this installation)
redmine@redmine-test:~$ sudo mysql_secure_installation

Securing the MySQL server deployment.

Enter password for user root:

VALIDATE PASSWORD COMPONENT can be used to test passwords
and improve security. It checks the strength of password
and allows the users to set only those passwords which are
secure enough. Would you like to setup VALIDATE PASSWORD component?

Press y|Y for Yes, any other key for No: N
Using existing password for root.
Change the password for root ? ((Press y|Y for Yes, any other key for No) : N

 ... skipping.
By default, a MySQL installation has an anonymous user,
allowing anyone to log into MySQL without having to have
a user account created for them. This is intended only for
testing, and to make the installation go a bit smoother.
You should remove them before moving into a production
environment.

Remove anonymous users? (Press y|Y for Yes, any other key for No) : Y
Success.


Normally, root should only be allowed to connect from
'localhost'. This ensures that someone cannot guess at
the root password from the network.

Disallow root login remotely? (Press y|Y for Yes, any other key for No) : Y
Success.

By default, MySQL comes with a database named 'test' that
anyone can access. This is also intended only for testing,
and should be removed before moving into a production
environment.


Remove test database and access to it? (Press y|Y for Yes, any other key for No) : Y
 - Dropping test database...
Success.

 - Removing privileges on test database...
Success.

Reloading the privilege tables will ensure that all changes
made so far will take effect immediately.

Reload privilege tables now? (Press y|Y for Yes, any other key for No) : Y
Success.
Create Database and User
Start MySQL shell.
mysql -u root -pCreate a database and user. Change the my_password as appropriate.
CREATE DATABASE redmine CHARACTER SET utf8mb4;
CREATE USER 'redmine'@'localhost' IDENTIFIED BY 'my_password';
Grant privileges on the database to the user.
GRANT ALL PRIVILEGES ON redmine.* TO 'redmine'@'localhost';
FLUSH PRIVILEGES;
Setup Ruby
Install rbenv
We use rbenv as a version management tool for Ruby.
sudo apt install -y rbenvInitialize it.
rbenv initIt displays the following message.
# Load rbenv automatically by appending
# the following to ~/.bashrc:
eval "$(rbenv init -)"
Add the above content to the .bashrc file. Bash will configure PATH etc., at starting.
cd ~
vim .bashrc
Apply the change to the current session.
source .bashrcInstall ruby-build
We use ruby-build with rbenv to install Ruby.
cd ~
mkdir -p "$(rbenv root)"/plugins
git clone https://github.com/rbenv/ruby-build.git "$(rbenv root)"/plugins/ruby-build
curl -fsSL https://github.com/rbenv/rbenv-installer/raw/main/bin/rbenv-doctor | bash
The last command displays the following diagnostic result:
Checking for `rbenv' in PATH: /usr/bin/rbenv
Checking for rbenv shims in PATH: OK
Checking `rbenv install' support: /home/redmine/.rbenv/plugins/ruby-build/bin/rbenv-install (ruby-build 20211203)
Counting installed Ruby versions: none
  ...
Checking RubyGems settings: OK
Auditing installed plugins: OK
Now you are ready to start the Ruby installation.
Install Ruby
Confirm the installable Ruby versions.
rbenv install --listInstall the latest version of 2.7 (as of writing, 2.7.6) for Redmine 4.2 and 5.0.
rbenv install 2.7.6
rbenv global 2.7.6
You can specify the Ruby version for either locally or globally in rbenv. In this case, we specify it globally.
Confirm the installed version.
ruby -vInstall a library for gem installation.
sudo apt install -y ruby2.7-devSetup Redmine
Install Redmine (V5.0)
Download the latest version of Redmine from the redmine.org site using wget and extract files.
wget https://www.redmine.org/releases/redmine-5.0.2.tar.gz
cd /opt
sudo tar xvf ~/redmine-5.0.2.tar.gz
Create a link to a normalized directory name (redmine) without version numbers.
sudo ln -s redmine-5.0.2 redmineChange the file owner.
sudo chown -R redmine:redmine redmine/Install Redmine (V4.1)
Download the latest version of Redmine from the redmine.org site using wget and extract files.
wget https://www.redmine.org/releases/redmine-4.2.7.tar.gz
cd /opt
sudo tar xvf ~/redmine-4.2.7.tar.gz
Create a link to a normalized directory name (redmine) without version numbers.
sudo ln -s redmine-4.2.7 redmineCreate a directory and change the file owner.
sudo mkdir -p redmine/tmp/pdfsudo chown -R redmine:redmine redmine/Define Database Connection
Define the database connection in redmine/config/database.yml.
Create a database.yml from an example file.
sudo cp redmine/config/database.yml.example redmine/config/database.ymlThe above file has definitions for the MySQL connection. Override the following items for the production environment.
- username: redmine
- password: the password you specified during MySQL setup
production:
  adapter: mysql2
  database: redmine
  host: localhost
  username: redmine
  password: "<password>"
  encoding: utf8mb4
database.yml has development and test environment definitions. You can ignore them unless you are developing a part of Redmine or a plug-in.
Install Gems
Install gems specified in Gemfile, excluding for development and test environment.
cd /opt/redmine
bundle config set --local without 'development test'
bundle install
Create Session Store Secret
Create the session store secret used to protect from a session hijack.
RAILS_ENV=production bundle exec rake generate_secret_tokenInitialize Database
Create a schema and load the default data.
RAILS_ENV=production bundle exec rake db:migrate
RAILS_ENV=production bundle exec rake redmine:load_default_data
Run Redmine with Puma
Install Puma
Start Redmine server using puma.
Create Gemfile.local file.
cd /opt/redmine
sudo vim Gemfile.local
Define the following in the Gemfile.local file.
gem 'puma'Install puma gem.
bundle installThe following message is displayed. Gemfile has the puma definition for the test environment, and the bundle reports it as duplication. In this case, we are not installing a test environment so that we can ignore the message.
Your Gemfile lists the gem puma (>= 0) more than once.
You should probably keep only one of them.
Remove any duplicate entries and specify the gem only once.
While it's not a problem now, it could cause errors if you change the version of one of them later.
Start the Web server.
bundle exec puma -e productionAccess the Redmine server in a Web browser.
http://<Redmine Server Address>:9292Login to Redmine.
- User ID: admin
- Password: admin
Support CORS
You do not need CORS to use Redmine from a Web browser. CORS is required when a Web application accesses Redmine API.
We use Rack CORS Middleware to support CORS.
Edit Gemfile.local file.
cd /opt/redmine
sudo vim Gemfile.local
Add rack-cors gem.
gem 'rack-cors'Install the gem.
bundle installCreate config/initializer/cors.rb file.
sudo vim config/initializers/cors.rbDefine the following:
Rails.application.config.middleware.insert_before 0, Rack::Cors do
  allow do
    origins '*'
    resource '*', headers: :any, methods: [:get, :post, :patch, :put, :options]
  end
end
Support HTTPS
Reference: Puma: A Ruby Web Server Built For Parallelism | Binding TCP Socket
Support HTTPS using a self-signed certificate. If you have a CA-signed certificate, you can use it as well.
Create a private key and a certificate signing request.
cd ~
openssl genrsa -out private.key 2048
openssl req -new -key private.key -out request.csr
Generate a certificate.
openssl x509 -in request.csr -out certificate.crt -req -signkey private.key -days 365Start the Web server.
cd /opt/redmine
bundle exec puma -b 'ssl://0.0.0.0:9393?key=/home/redmine/private.key&cert=/home/redmine/certificate.crt' -e production
Access the Redmine server in a Web browser.
https://<Redmine Server Address>:9393Start as Ubuntu Service
Register the Redmine server as an Ubuntu service and start it at OS boot up.
Create a shell file to start the Redmine server.
cd ~
vim start_redmine.sh
Write the following:
#!/bin/sh

cd /opt/redmine
/home/redmine/.rbenv/shims/bundle exec puma -e production
Modify to executable.
chmod +x start_redmine.shCreate a service definition file.
sudo vim /lib/systemd/system/redmine.serviceWrite the following:
[Unit]
Description=Start Redmine Server
After=network.target

[Service]
Type=simple
ExecStart=/home/redmine/start_redmine.sh
Restart=always

[Install]
WantedBy=multi-user.target
Register the service.
sudo systemctl enable redmineStart the service.
sudo systemctl start redmineCommands for Service
- Start: sudo systemctl start redmine
- Stop: sudo systemctl stop redmine
- Restart: sudo systemctl restart redmine
- View Latest Logs: sudo journalctl -unit=redmine -e
- Watch Log: sudo journalctl -unit=redmine -f