

- 1.Preface
- 2.Guide Map
- 3.Administrator's Guide
- 4.Project Manager's Guide
- 4.1.Account Authorization
- 4.2.Settings
- 4.3.Sync With Redmine
- 4.4.View Gantt Chart
- 4.5.Edit Gantt Chart
- 4.6.Limitations
- 5.Project Member's Guide
- 5.1.Account Link
- 5.2.Sync On Card
- 5.3.Sort List By Priority
- 5.4.Report Time
- 5.5.View Gantt Chart
- 6.System Requirement
1.Preface
Menu Access
You may access the RedSync menus from a Board menu as follows:

Depending on the configuration, you will find all or part of those menus.
Icons
The following icons are displayed on the screens if applicable.
- ⛔Disabled since you selected JSONP for the interface with Redmine
2.Guide Map
The following shows the types of users and their tasks.
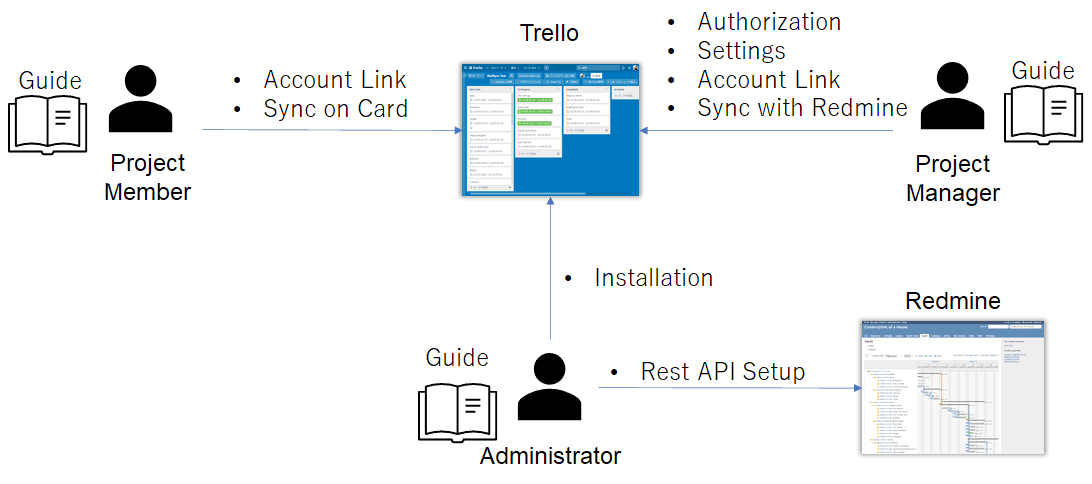
User’s guides are provided for each user type as follows:
- Administrator’s Gude
- Project Manager’s Guide
- Project Member’s Guide
3.Administrator's Guide
Redmine Configuration
RedSync requires specific Redmine settings to integrate with Trello.
HTTPS
The redmine server must support the HTTPS protocol.
CORS
CORS (Cross-Origin Resource Sharing) is a protocol for accessing a server (Redmine) from a script (RedSync) in a Web browser loaded from another server. In a typical installation, Redmine does not support CORS; hence, you must apply additional configuration to Redmine (Refer to this article).
You can integrate RedSync with Redmine even if your Redmine server cannot be configured to support CORS. Refer to the following section.
Integration Types
CORS
Using CORS, you can update a Redmine issue directly from a Trello card.
JSONP
JSONP can be used when the Redmine server does not have CORS configured. However, it does not allow updating a Redmine issue from a Trello card. JSONP must be enabled in the Redmine settings.
RedSync Proxy
RedSync Proxy can also be used when the Redmine server does not have CORS configured. Like CORS, it allows updating a Redmine issue from a Trello card. See more details in the following section.
RedSync Proxy
RedSync Proxy enables the integration between Trello and Redmine without CORS support.
RedSync Proxy is an intermediate server running on AWS. Hence, your Redmine should be accessible from the Internet. If your Redmine is available only on your Intranet, RedSync Proxy cannot access it.
RedSync Proxy logs the access to Redmine. It includes the server name, path, and parameters included in the URL. However, it does not include any data exchanged between Trello and Redmine.
Use of RedSync Proxy may cause a performance decrease due to network latency, etc. We recommend using CORS if possible.
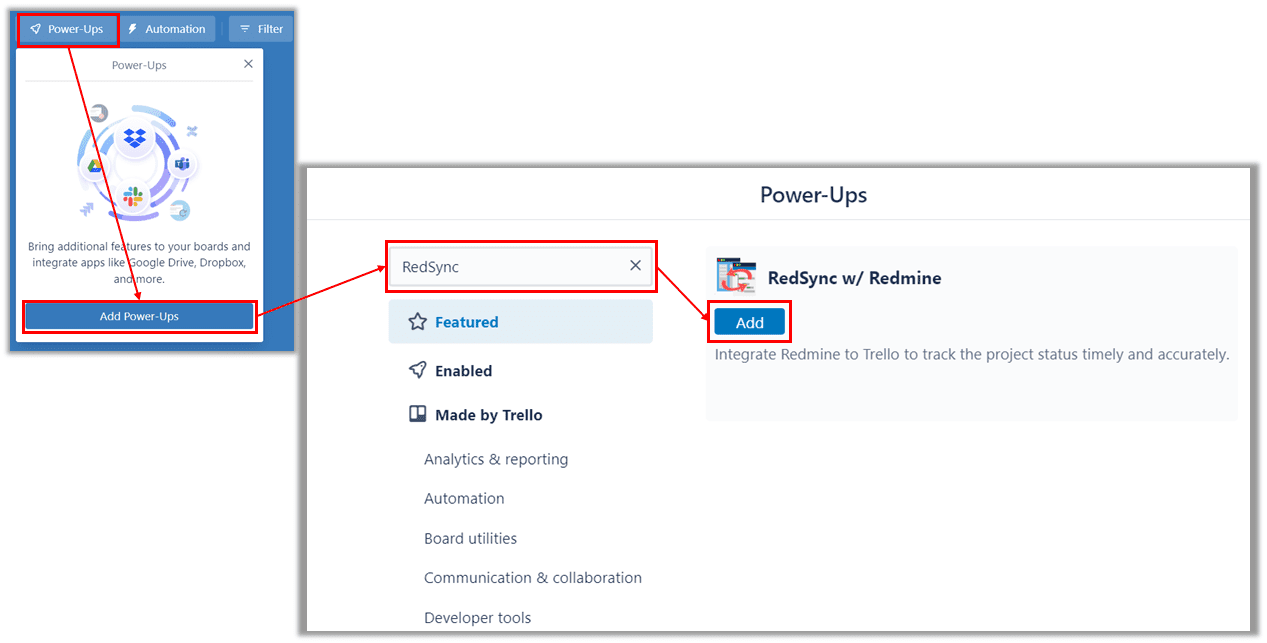
Installation
You can install RedSync Power-Up from the menu as follows:
Menu -> Power-Ups -> Add Power-Ups
RedSync adds the Account Link board menu as follows:

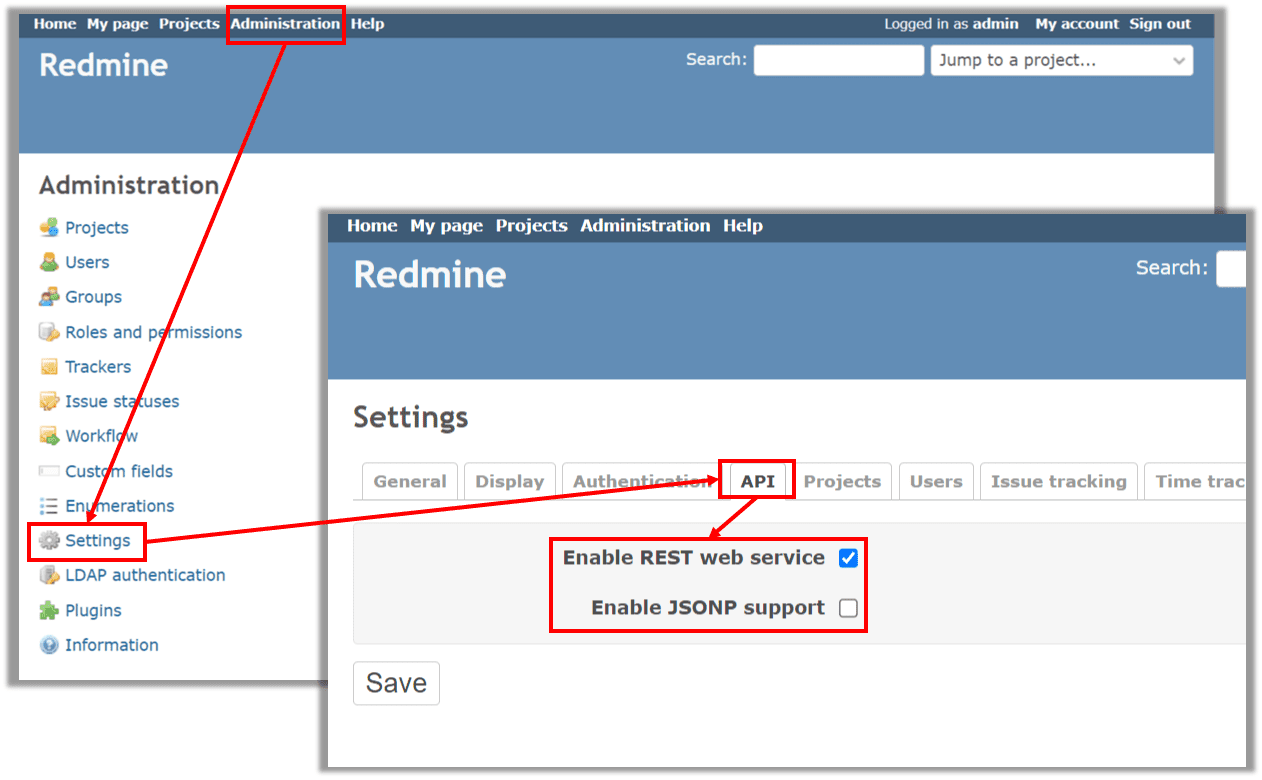
Redmine REST Web Service
You need to enable the Redmine REST Web service as follows:
Administration -> Settings -> API
Enable API based on the integration type:
- CORS: Enable REST web service
- JSONP: Enable REST web service + JSONP
You must enable the REST web service to protect the interface with the API Key. - RedSync Proxy: Enable REST web service
4.Project Manager's Guide
Operations described in this section require that you have:
- Admin permission to the Board on which RedSync has been installed.
4.1.Account Authorization
You need to authorize RedSync as follows:
Menu -> Power-Ups -> RedSync Settings -> Authorize account
  -> Authorize -> Allow
4.2.Settings
You can start the Settings of RedSync as follows:
Menu -> Power-Ups -> RedSync Settings -> Edit Power-Up settings
RedSync opens the Settings window. You can select specific settings by clicking a tab at the top of the window.
Redmine Server Settings
Make the settings to access the Redmine server.
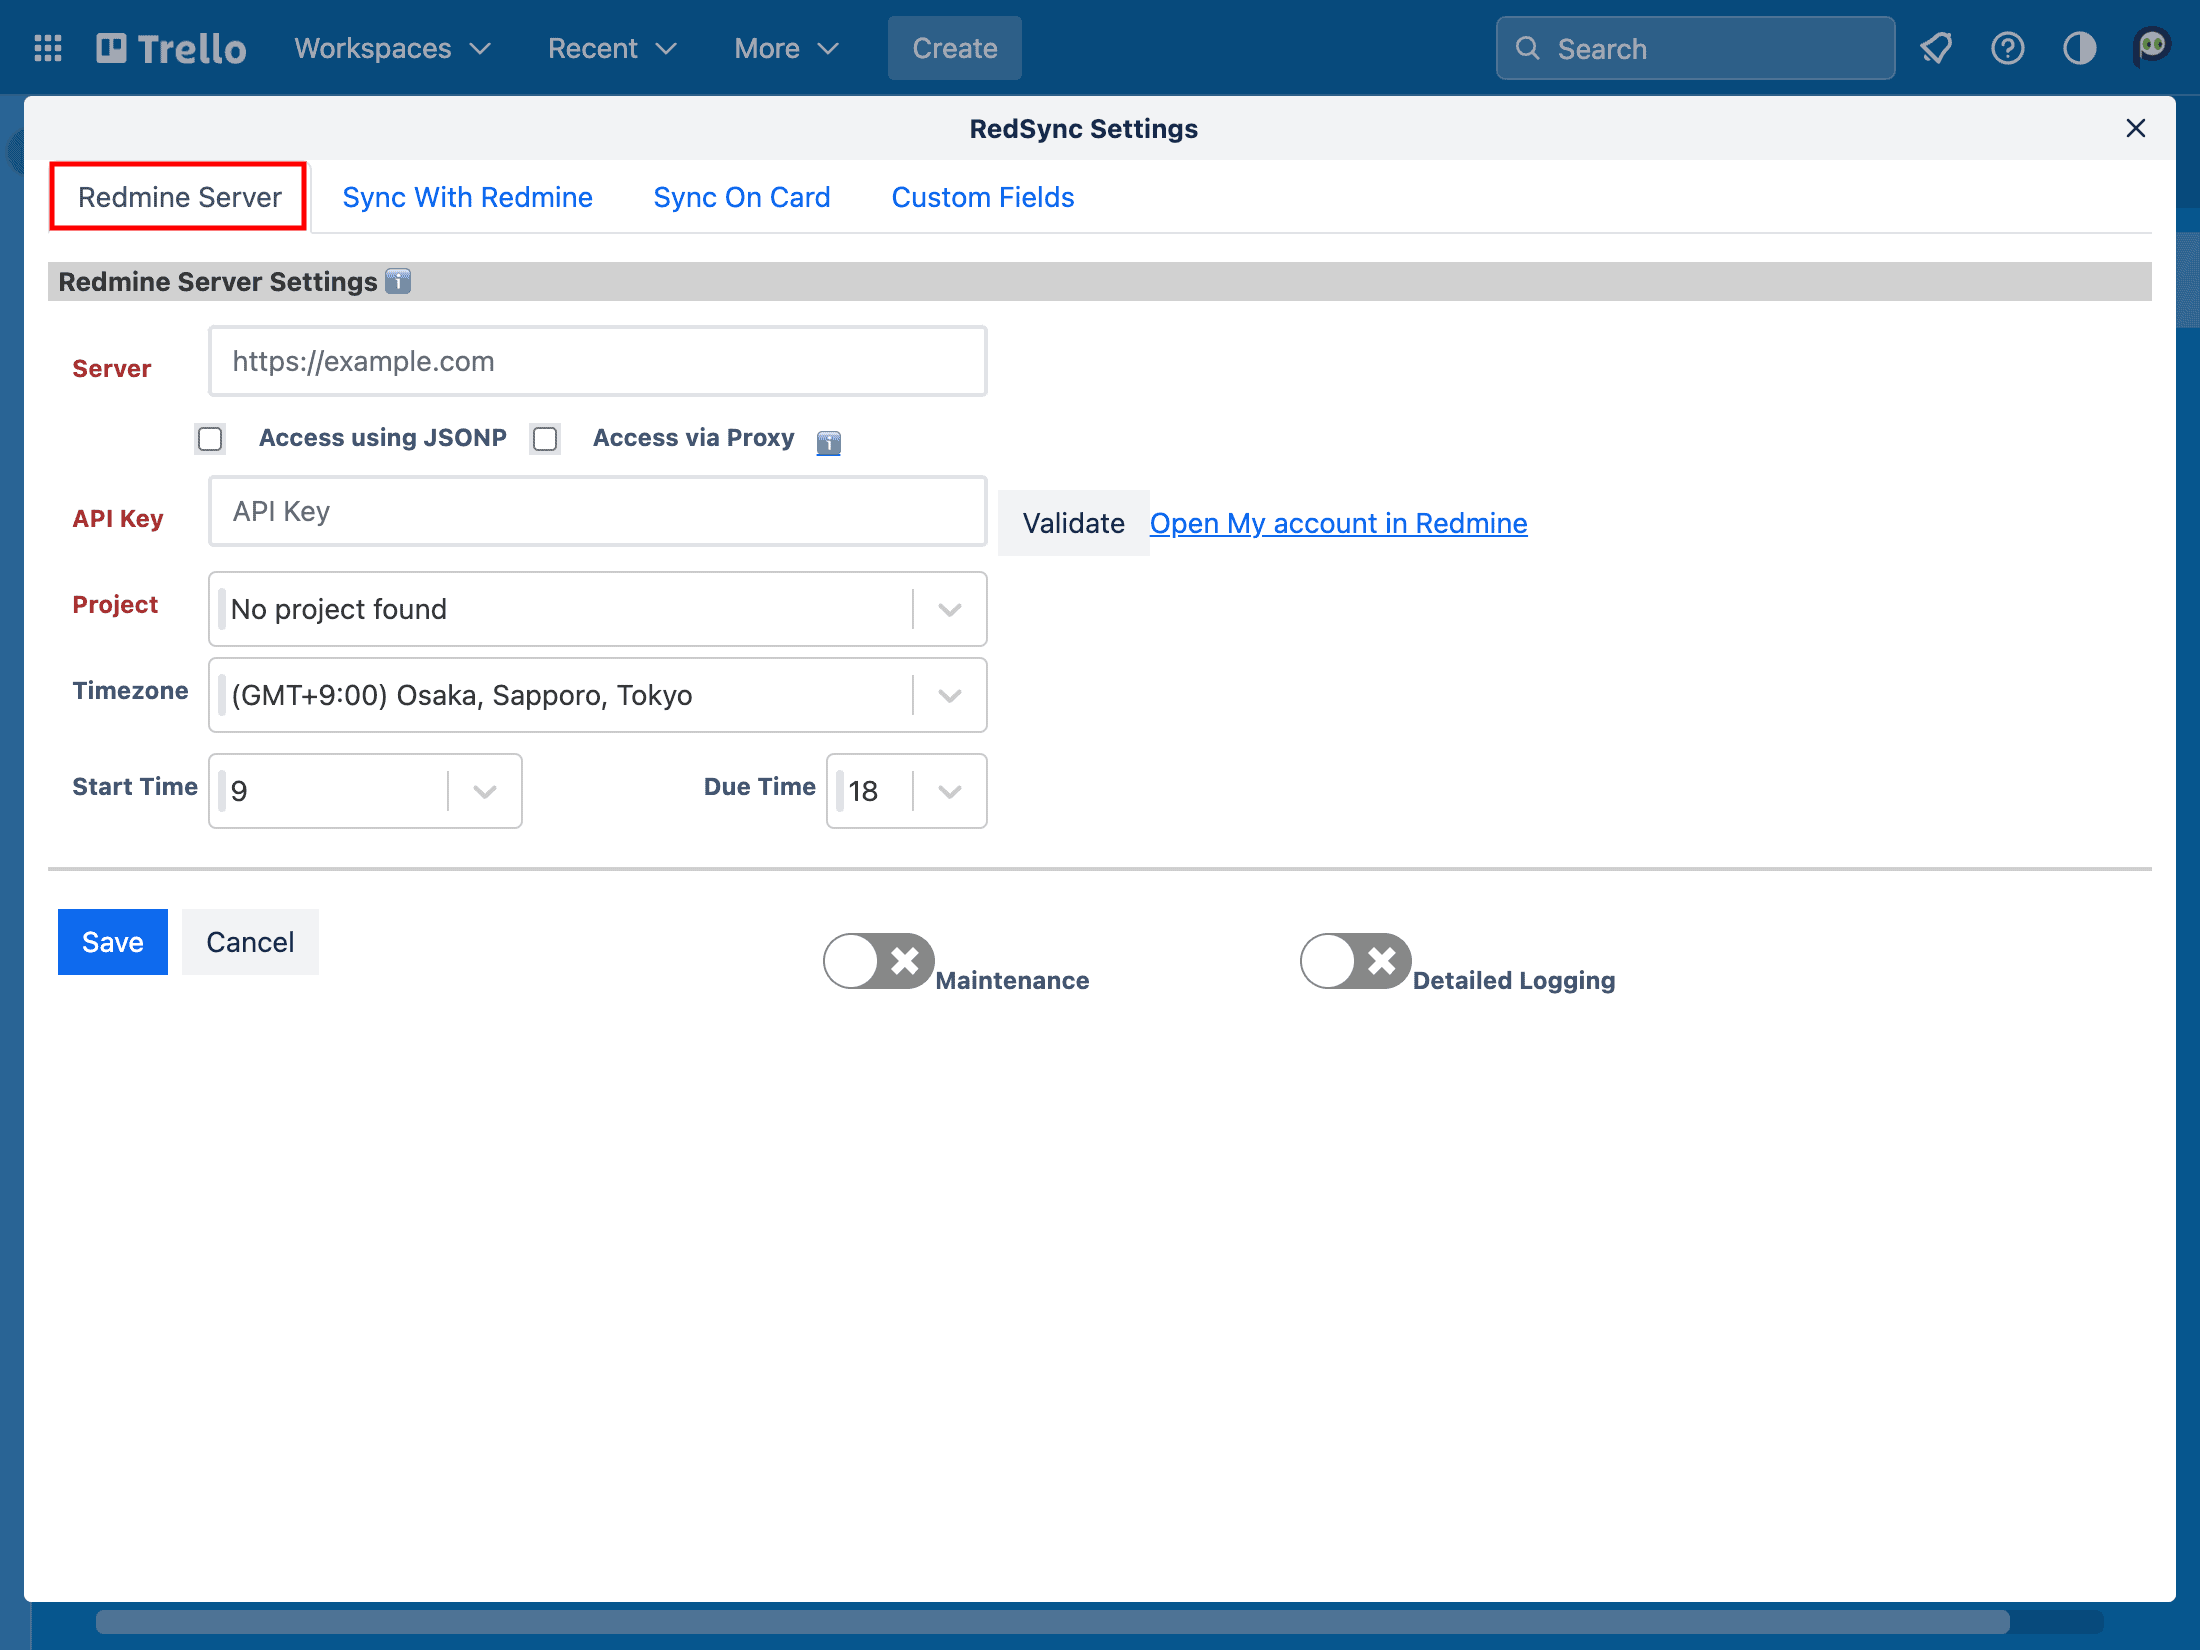
Server
Specify the URL of the Redmine server (HTTPS required).
Access with JSONP
RedSync accesses Redmine with JSONP API without CORS. However, the update from a Trello card to a Redmine issue is not supported. RedSync disables the setting items related to it and displays a ⛔ icon.
Access via Proxy
RedSync accesses Redmine via RedSync Proxy without CORS. It supports updating from a Trello card to a Redmine issue. Note that CORS should have priority because it provides better performance.
API Key
Specify the Redmine API Key.
RedSync uses the API Key to synchronize Trello cards and Redmine issues in the Sync with Redmine operation, which is described later. The API Key user should have the privilege to update Issues (e.g., be assigned to the project as a developer or a manager).
By clicking the Validation button, RedSync displays the user name of the API Key for confirmation.
You can get the API Key from Redmine.
Refer to How To Get Redmine API Key
Project
Select a project to be connected with Trello.
When trying to select a project, a Network Error may occur. A common cause of a Network Error is that the Redmine server does not support CORS. In this case, try enabling Access via Proxy. Enabling Access via Proxy allows access to Redmine servers that do not support CORS.
However, a Network Error can also occur for other reasons, such as an incorrect URL or the server being shut down.
Edit*
Click to unlock the above fields.
* Displayed conditionally. Once the server and project are determined, RedSync locks their fields. You have to unlock them by clicking the Edit button to change them.
When you change the project, RedSync archives the currently connected Trello cards or moves them to the specified List, if any, then creates new Trello cards from Redmine issues in the newly selected project.
When you change the Redmine server (and the project), you have to archive all the currently connected Trello cards beforehand because there may be Redmine issues that coincidentally have the same ID on the new Redmine server.
Timezone
Select a timezone for the Redmine server.
Start Time
Select the time of the Issue’s start date.
Due Time
Select the time of the Issue’s due date.
Redmine does not have a timezone for start and due dates. RedSync uses the above timezone to convert Redmine’s start and due dates to Trello’s start and due dates with time.
Sync with Redmine Settings
Make the settings for the Sync with Redmine operation.
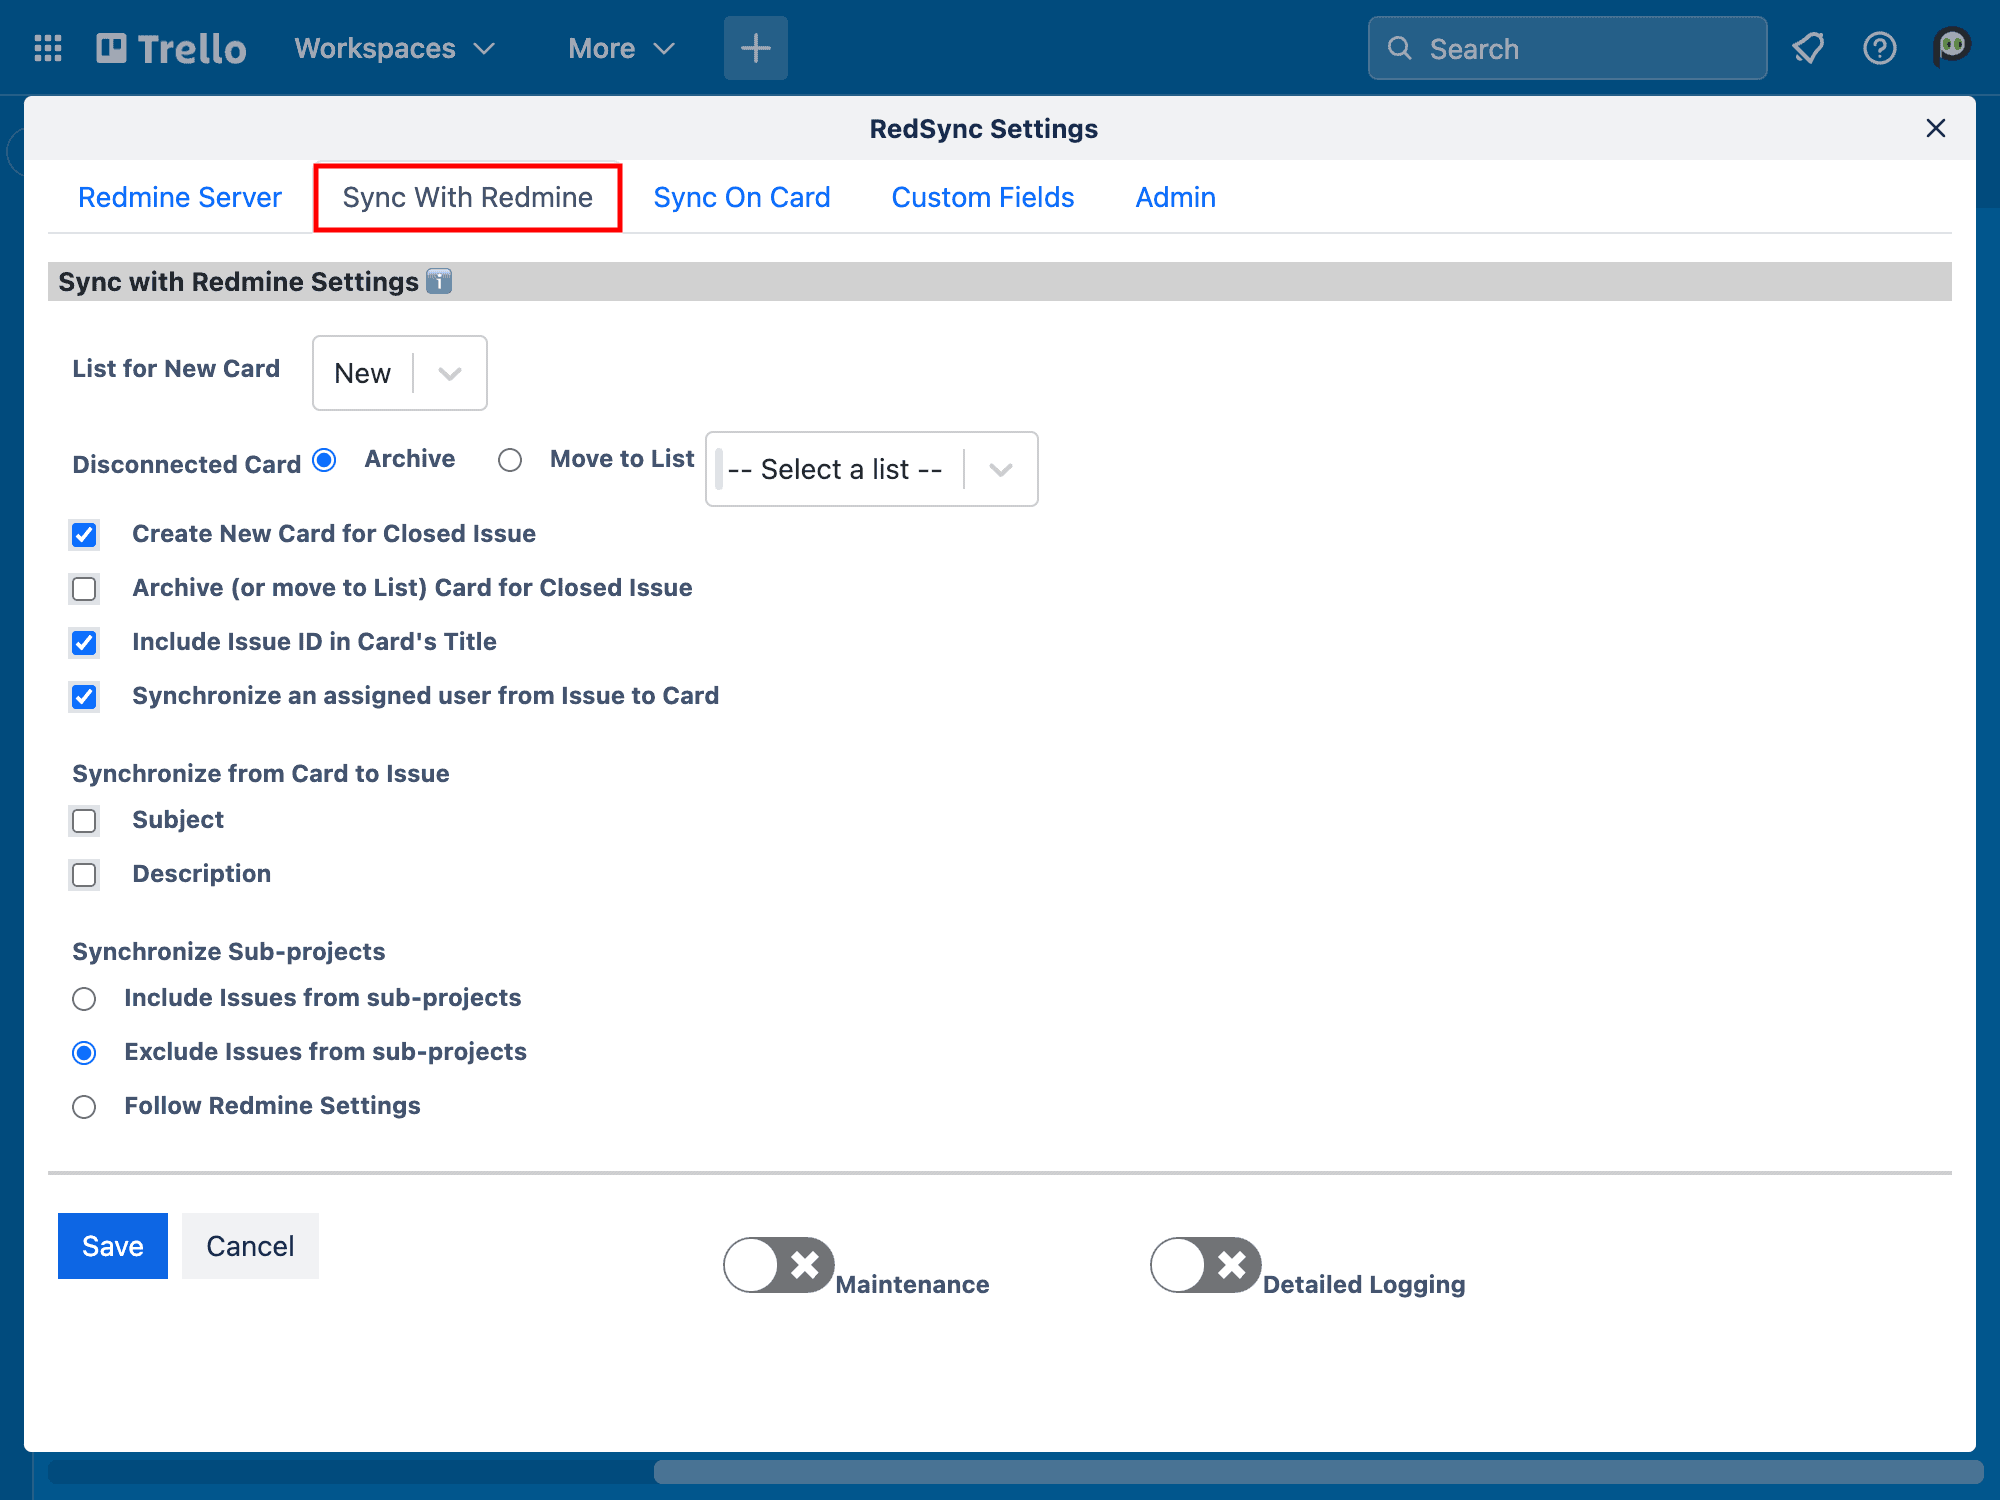
List for New Card
Select a List on which RedSync will create a new Trello card. After the creation, you can move it to any List.
Disconnected Card
If a Trello card has no connected Redmine issue or the connected Redmine issue is private, RedSync considers the Trello card disconnected. In such a case, you can ask RedSync for one of the following options:
Archive: If checked, RedSync archives the disconnected Trello card.
Move to List: If checked, RedSync moves the Trello card to the specified List. Later, you can archive those Trello cards from the list menu.
RedSync provides a tool to delete archived Trello cards.
Refer to the Archive Manager.
Create New Card for Closed Issue
If checked, RedSync creates a Trello card for a closed Redmine issue. Otherwise, RedSync ignores the closed Redmine issue.
Archive (or move to List) Card for Closed Issue
If checked, RedSync archives (or moves) a Trello card for a closed Redmine issue (to List).
Include Issue ID in Card’s Title
If checked, RedSync includes a Redmine issue ID as a prefix in a Trello card’s title. This is an exclusive setting for synchronizing the subject from a Trello card to a Redmine issue, as described below.
Synchronize an assigned user from Issue to Card
If checked, a Redmine issue assignee will be synchronized as a Trello card member.
Note that this synchronization will always be additive only. A Redmine issue can have only one assignee, while a Trello card can specify multiple members. RedSync cannot determine if the assignee has been removed from the Trello card members.
Synchronize from Card to Issue
- Subject
- Description
If checked, RedSync synchronizes the item from a Trello card to a Redmine issue.
If not checked, RedSync synchronizes it in the opposite direction. In both cases, RedSync overwrites any changes on the other side.
Synchronize Sub-projects
Specify if Redmine issues from sub-projects should be included.
- Include Issues from sub-projects
- Exclude Issues from sub-projects
- Follow Redmine Settings
If you configure Redmine to “Display sub-projects issues on the main project by default” in Settings, RedSync synchronizes issues from sub-projects.
Sync On Card Settings
Make the settings for the Sync On Card operation.
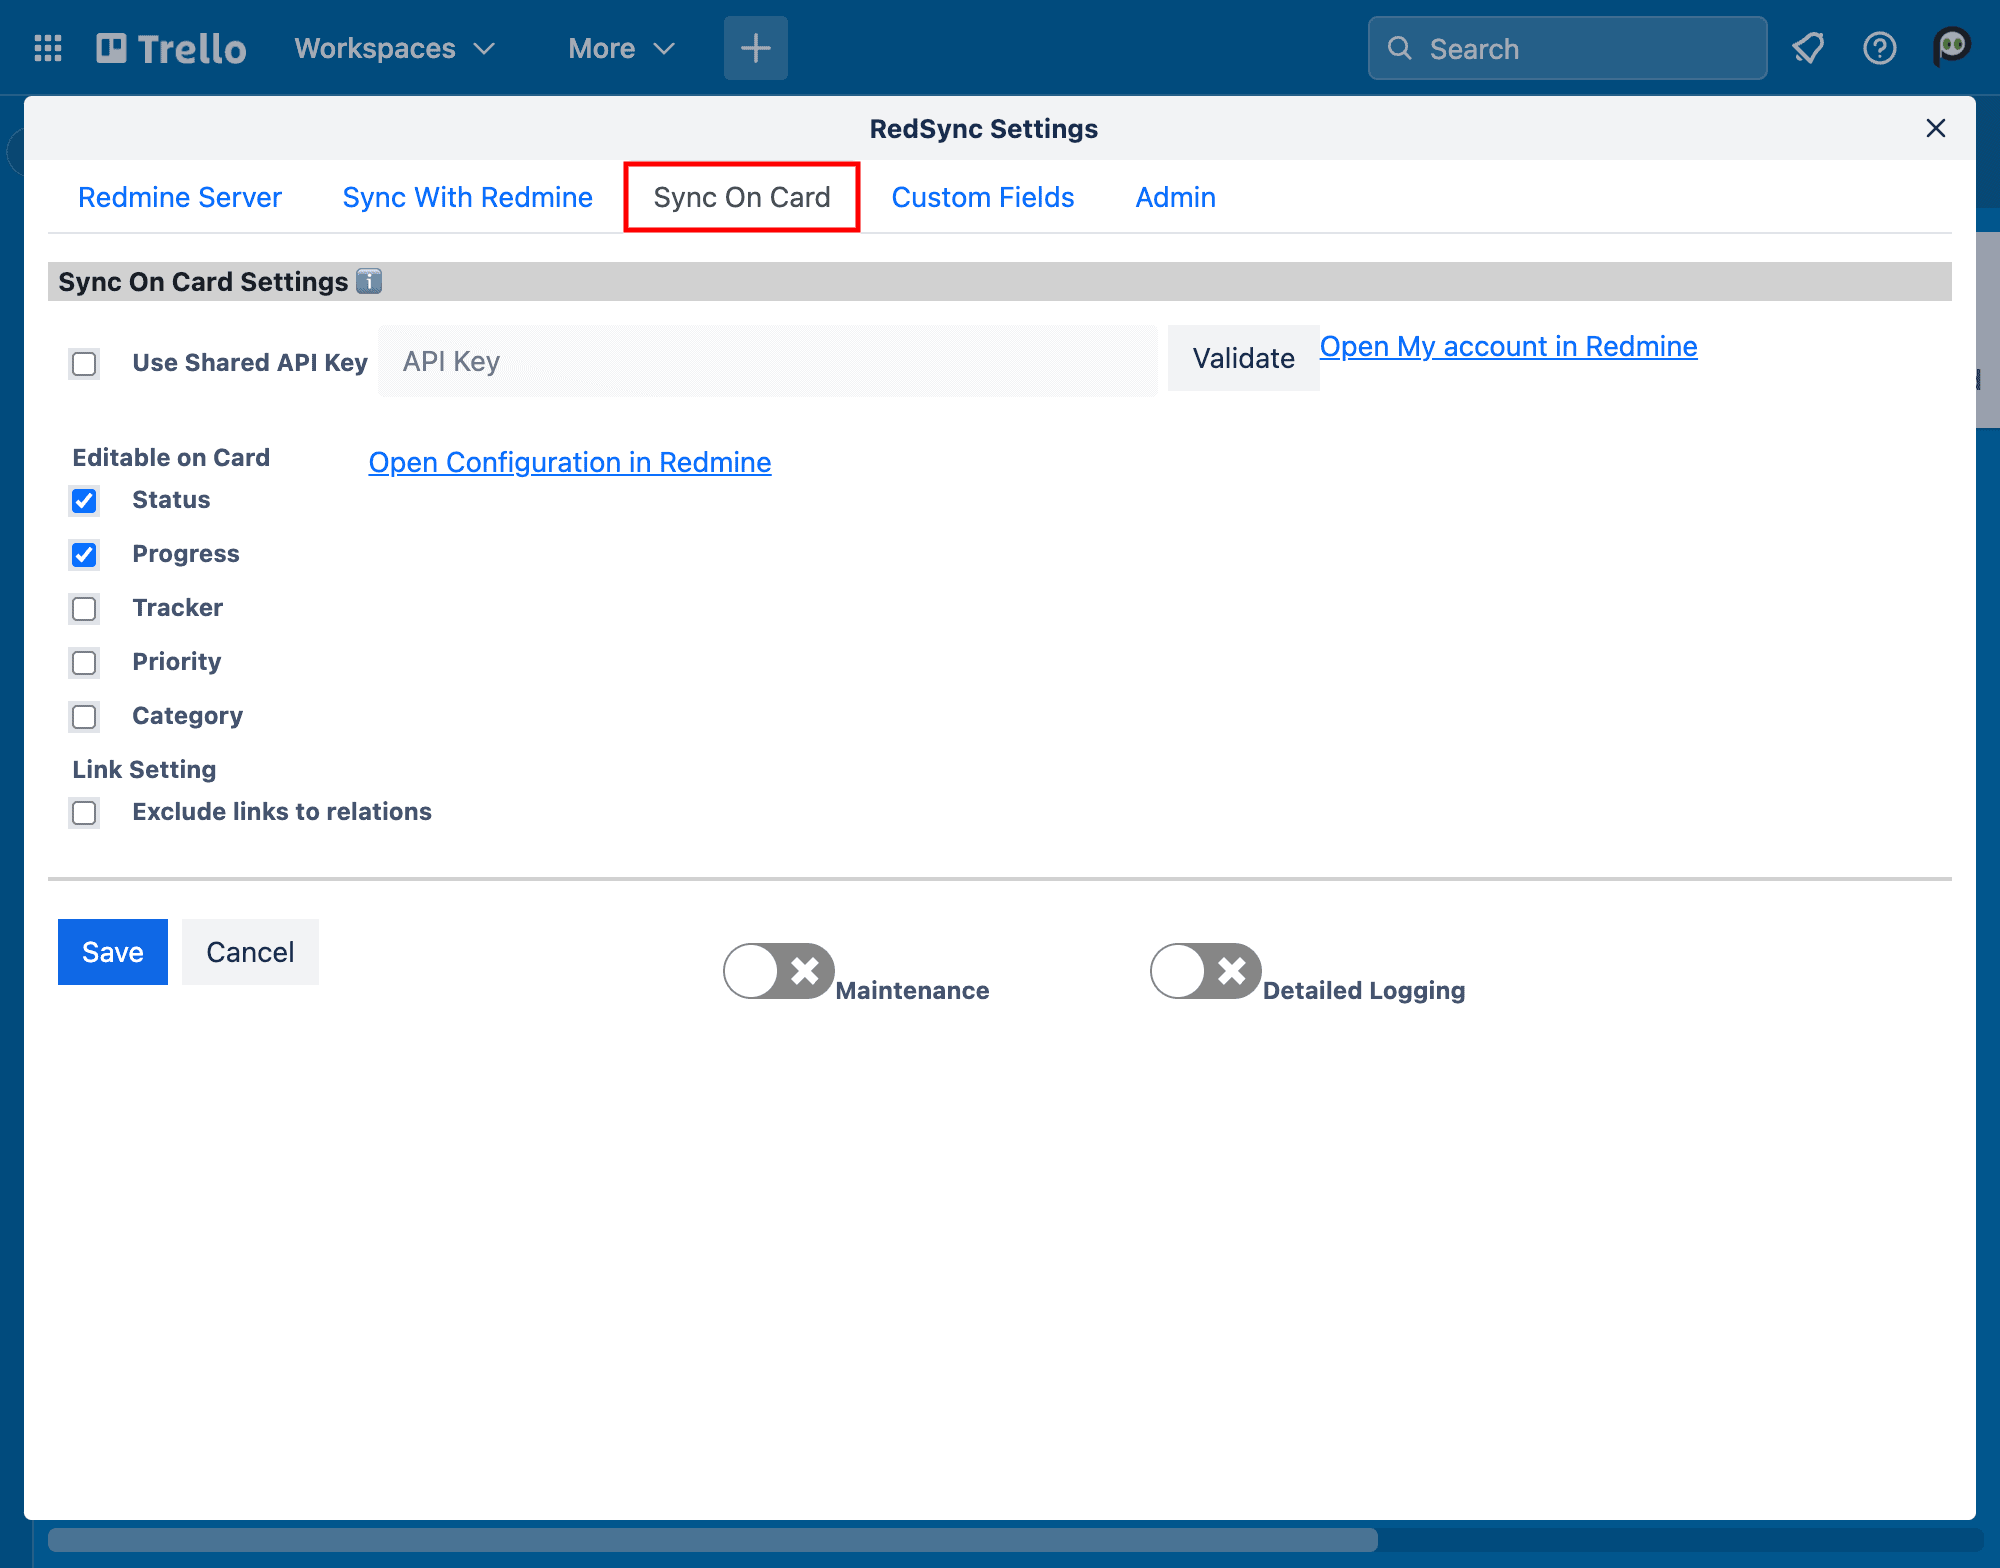
Shared API Key (Optional)
Specify the API Key from Redmine.
RedSync uses the Shared API Key to access Redmine when the Account Link has no API Key. Use of the Shared API Key is optional.
See the following for details.
How To Get Redmine API Key
Indivisudal API Key vs. Shared API Key
Editable on Card
If checked, the item is editable on a Trello card. Otherwise, it is read-only.
- Status
- Progress
- Tracker
- Priority
- Category
Redmine’s workflow, roles, and permissions also protect those items. Even if an item is editable in this setting, Redmine may reject the update.
Link Settings
Specify whether to display links to related issues on a Trello card. These links will be stored as card data, so there is a limit (here) to the number of links allowed. If the limit is exceeded, you can avoid it by not including links on the Trello card.
If checked, links to the related issues will not be displayed on the Trello card.
- Do not include links to related issues
Custom Field Settings
Make the settings to synchronize the custom fields between a Redmine issue and a Trello card.
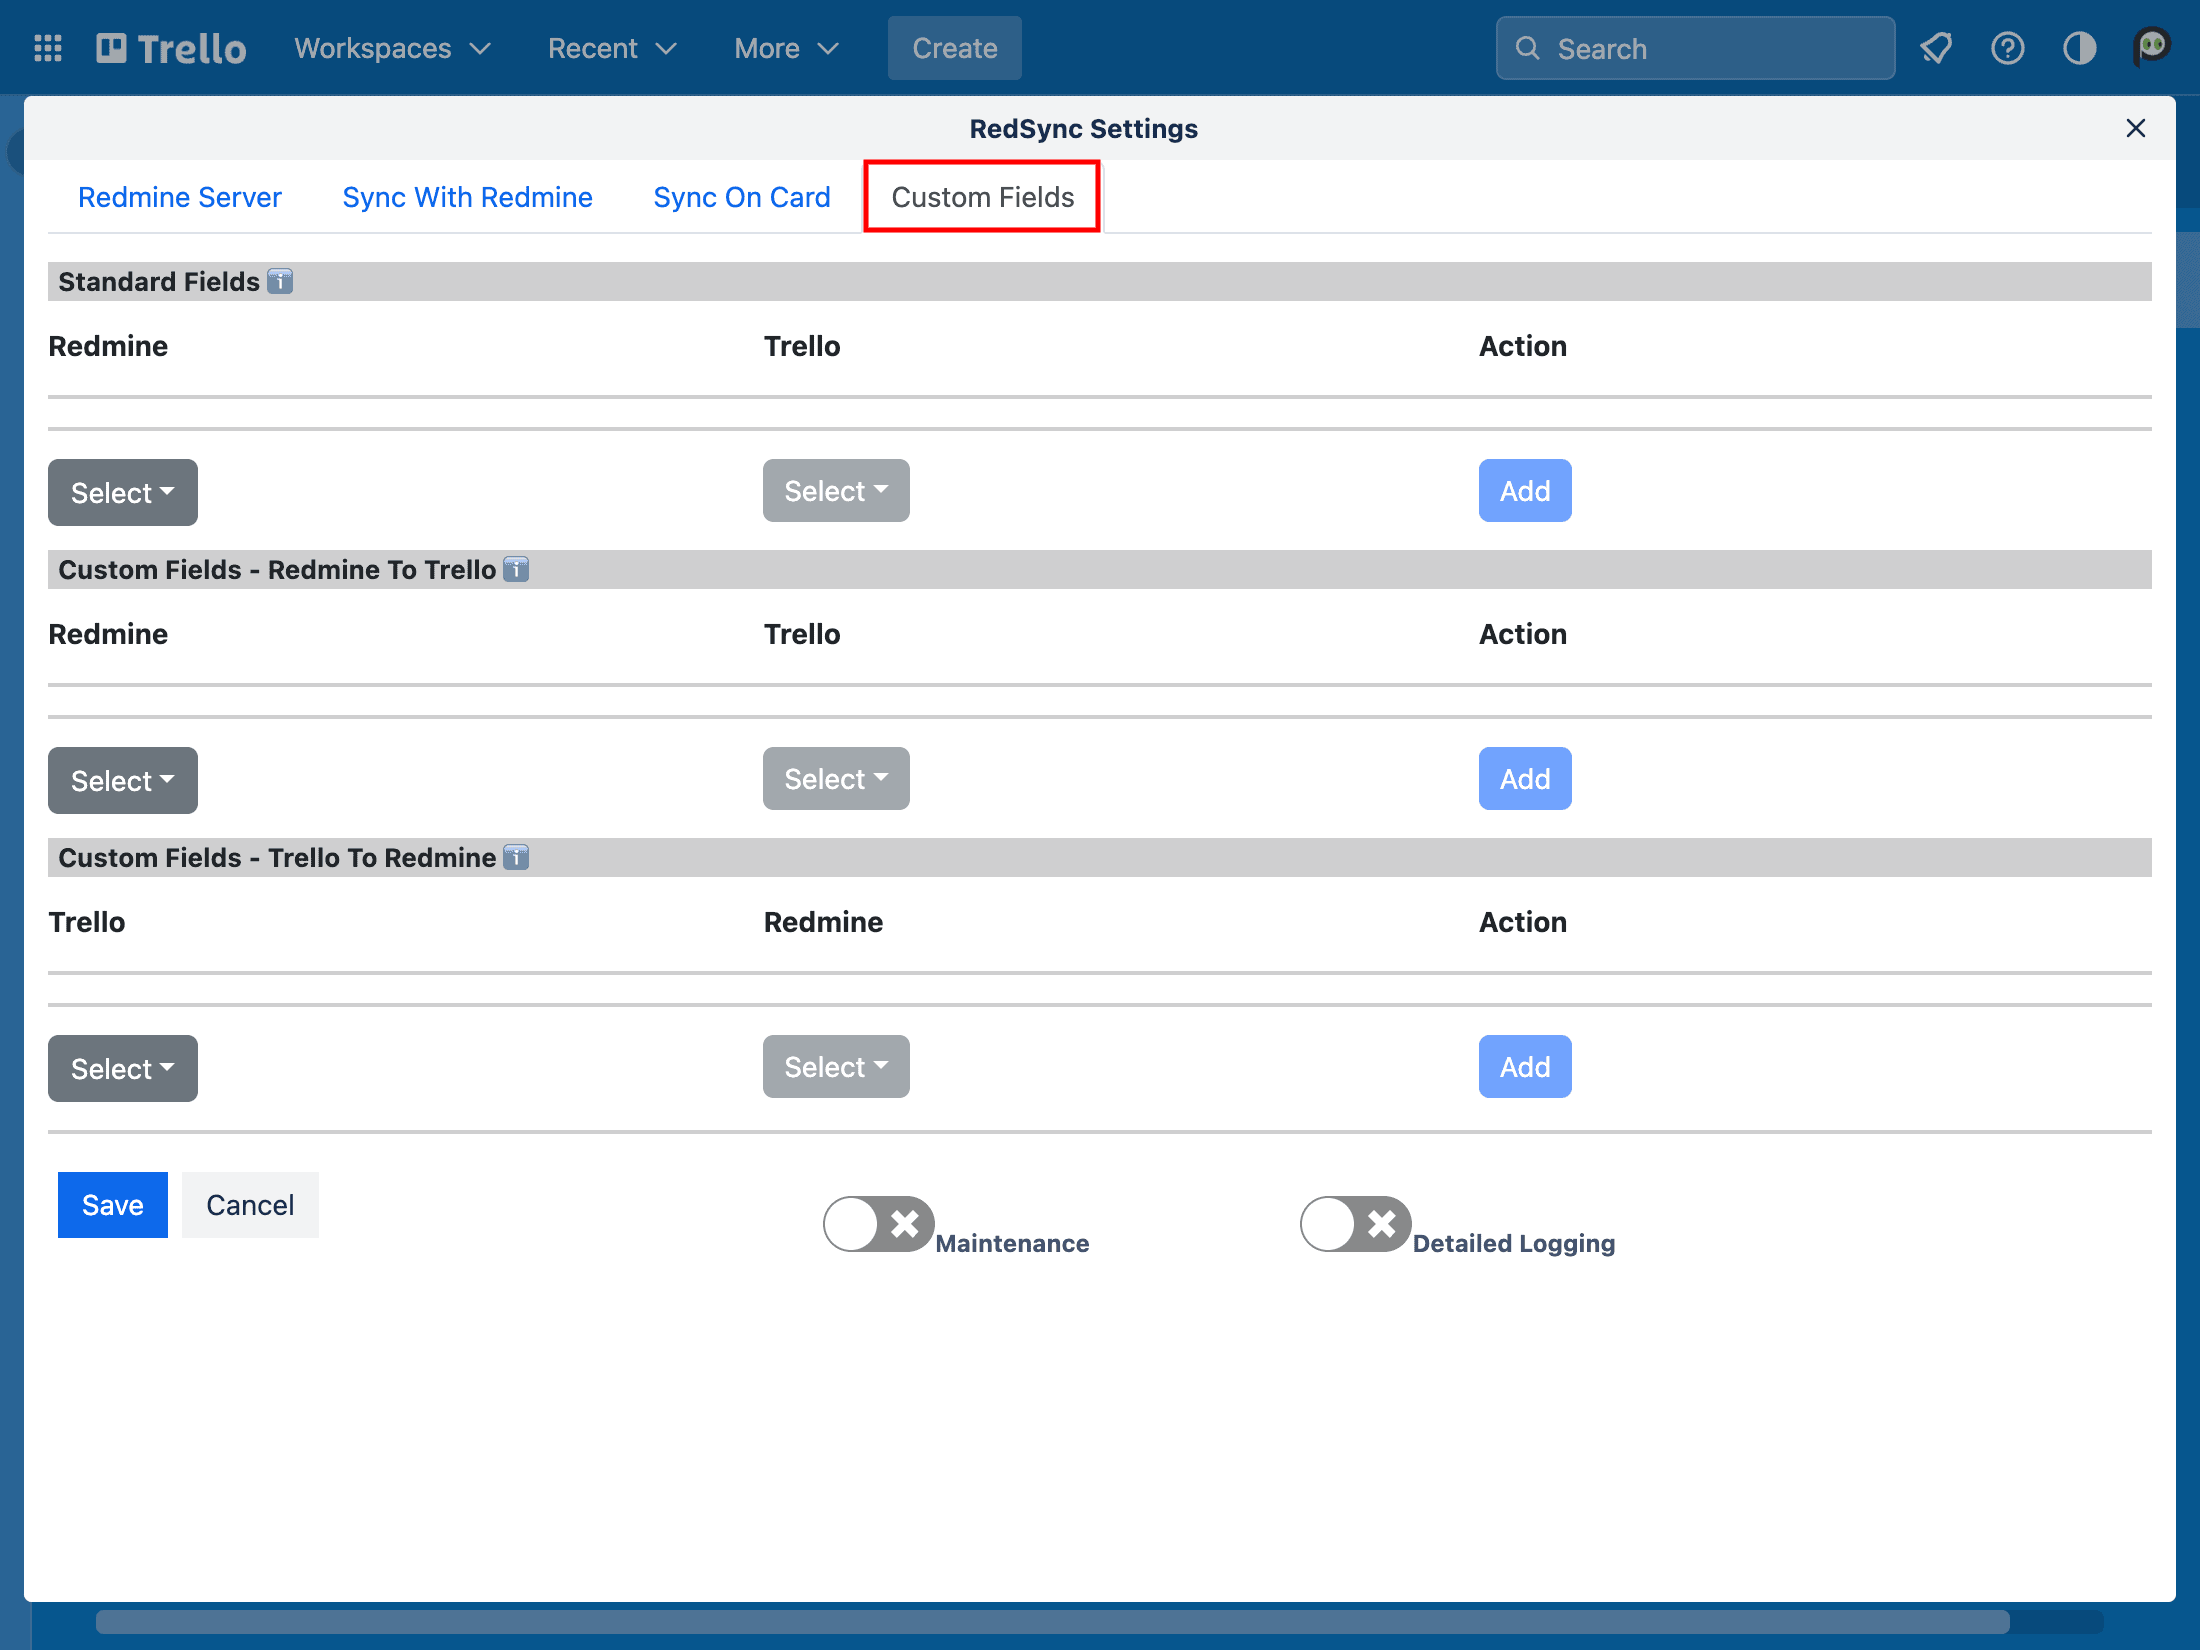
Standard Fields
Make the settings for synchronizing from Standard Fields defined in a Redmine issue to Custom Fields defined in a Trello card.
| Redmine’s Standard Fields | Types of Trello’s Custom Fields |
| project status tracker progress priority category id (issue number) assignee | Text |
RedSync shows you the Standard Fields in the Redmine Data section of a Trello card. However, Trello does not recognize the Redmine Data section; hence, you can not use a Standard Field to filter Trello cards, trigger a workflow (Butler), or show a Standard Field on the List. By mapping a Standard Field to a Custom Field, you can use it for those operations.
Custom Fields – Redmine to Trello
Make the synchronization settings from Redmine’s custom fields to Trello’s custom fields.
| Types of Redmine’s Custom Fields | Types of Trello’s Custom Fields |
| Link | Text |
| User | Text |
| List | Text |
| Key Value | Text |
| Long Text | Text |
| Text | Text |
| Bool | Text | Checkbox |
| Date | Text | Date |
| File | Text |
| Float | Text | Number |
| Integer | Text | Number |
| Version | N/A |
RedSync shows all custom fields associated with Redmine issues in the dropdown list to select. The dropdown list may contain custom fields unrelated to the current project; hence, please avoid selecting those custom fields.
Custom Fields – Trello to Redmine
Make the synchronization settings from Trello’s custom fields to Redmine’s custom fields.
| Types of Trello’s Custom Fields | Types of Redmine’s Custom Fields |
| Text | Text |
| Dropdown | Text |
| Number | Text |
| Checkbox | Text | Bool |
| Date | Text | Date |
RedSync shows all custom fields associated with Issues in the dropdown list to select. The dropdown list may contain custom fields unrelated to the current project; hence, please avoid selecting those custom fields.
Admin Settings
Allow other Board admins to execute Sync with Redmine
If checked, anyone with the Admin privilege can perform the Sync with Redmine operation. If not, only the person who made these settings can perform the Sync with Redmine operation.
Allow other Board admins to edit Gantt chart
If checked, anyone with the Admin privilege can edit the Gantt chart. If not, only the person who made these settings can do so.
4.3.Sync With Redmine
You can initiate the Sync with Redmine operation as follows:
Menu -> Sync with Redmine

RedSync performs the synchronization and shows the in-progress status.
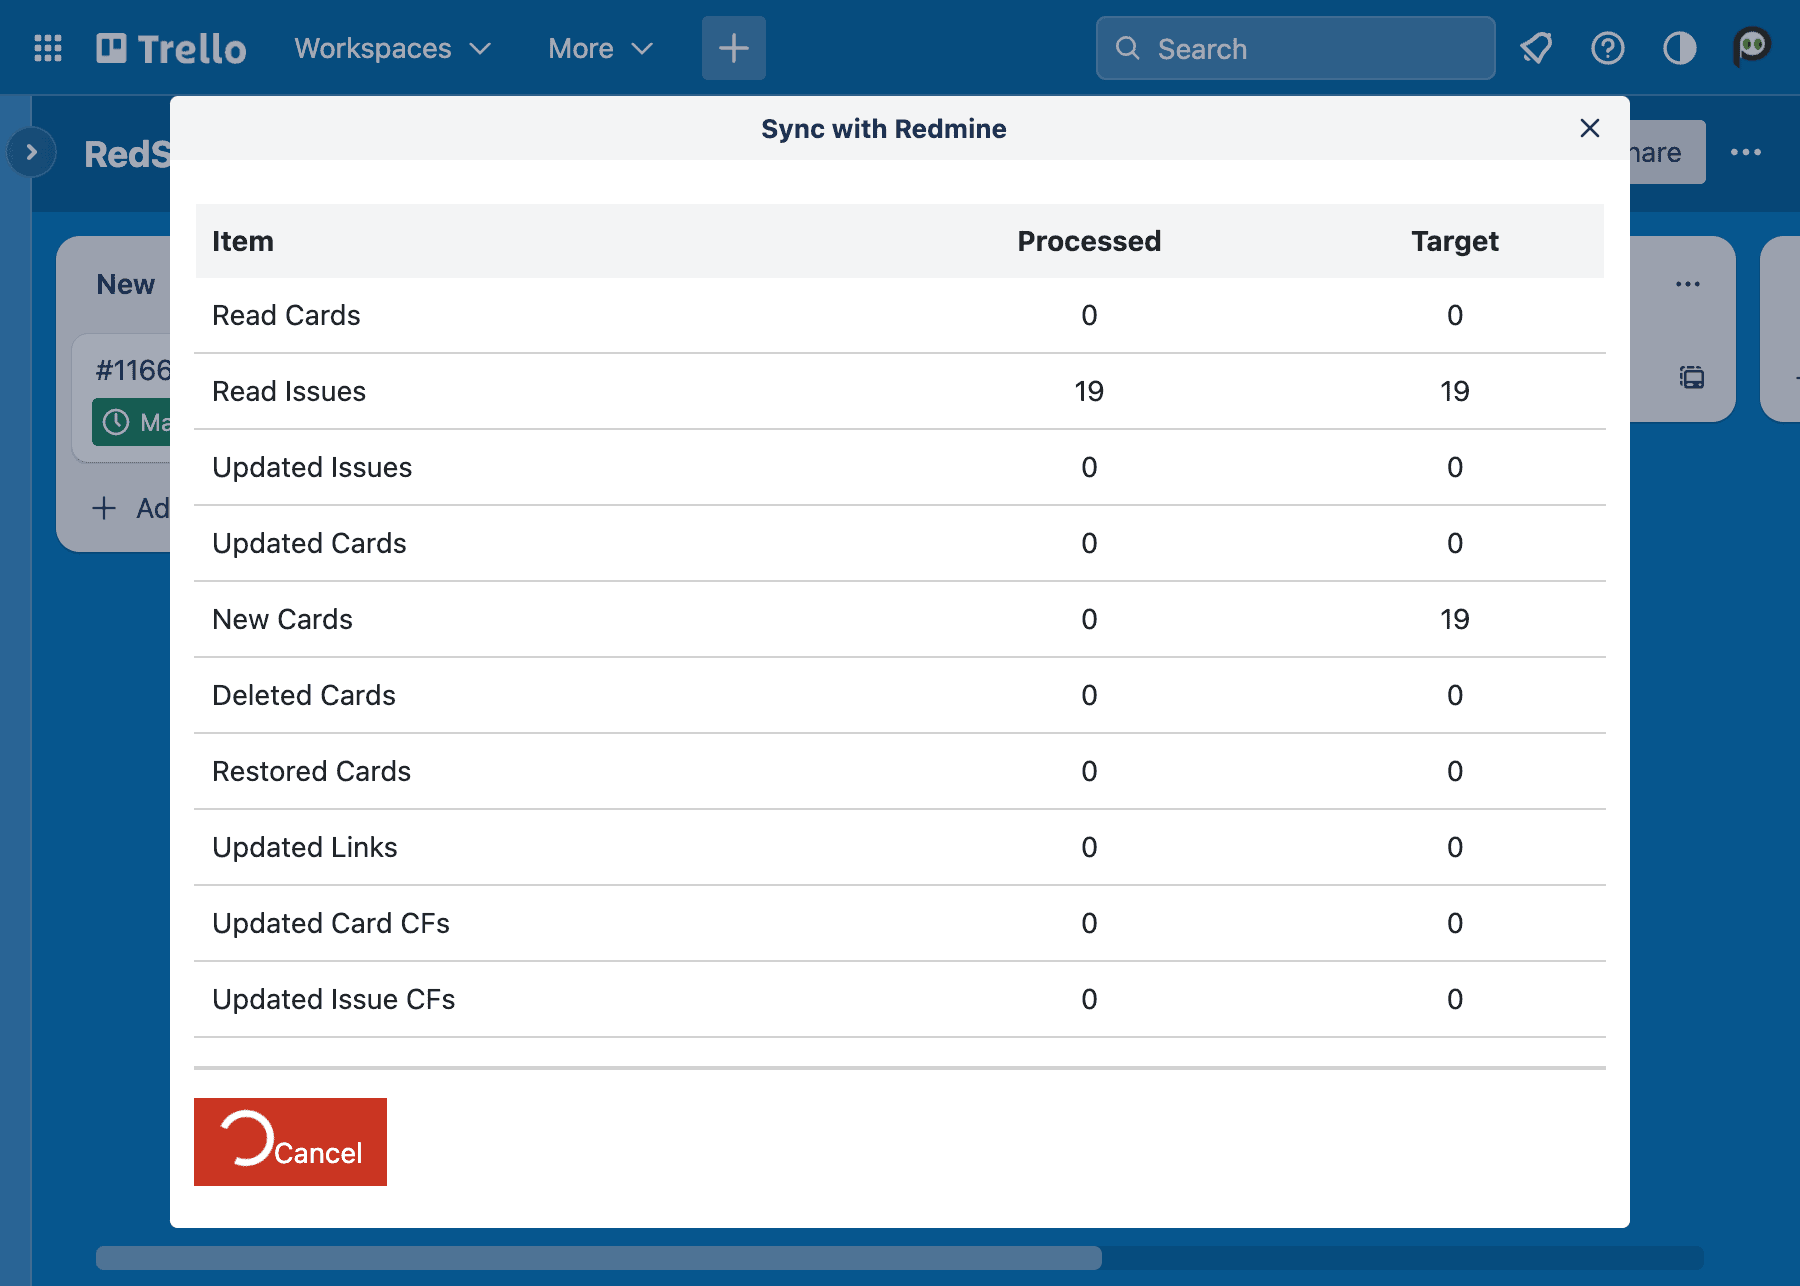
During the synchronization, RedSync performs the following operations:
- Create a new Trello card if Redmine has a new issue.
- Archive a Trello card if the connected Redmine issue is missing (probably deleted).
- Move the Trello card to the specified List if Move to List is checked in the Settings.
- Start Date
- Always sync from a Redmine issue to a Trello card.
- Due Date
- Always sync from a Redmine issue to a Trello card
- Subject / Description
- Sync from a Redmine issue to a Trello card when:
- Synchronize from Card to Issue on Sync with Redmine is checked in the Settings.
- Sync from a Trello card to a Redmine issue when:
- Synchronize from Card to Issue on Sync with Redmine is not checked in the Settings.
- Sync from a Redmine issue to a Trello card when:
- Members
- Synchronize Assigned User is checked in the Sync with Redmine, the assignee of a Redmine issue will be added as a member of a Trello card.
You can perform this operation when:
- You are an administrator of the Board, and
- You made the Settings, or Allow other administrators to execute Sync with Redmine is checked in the Settings.
- If you are another administrator who did not make Settings, you have registered your API Key via Account Link.
Suppose you are not the same person who made the Settings. RedSyncnc warns that if you and another person execute synchronizations simultaneously, the synchronization may result in inconsistencies between Trello cards and Redmine issues. You can continue the operation if you are sure there is no simultaneous synchronization.
See also Sync with Redmine vs. Sync on Card
4.5.Edit Gantt Chart
A board administrator can edit the Gantt chart. If you have multiple administrators, you have to set a guideline to avoid multiple administrators editing the Gantt chart simultaneously. If they edit the Gantt chart at the same time, it may cause inconsistency between the editing result and its appearance.
To start editing, click the Lock / Unlock Schedule icon to unlock after opening the Gantt chart from the board menu.
Add Issue
Right-click on the project bar to add the first issue.
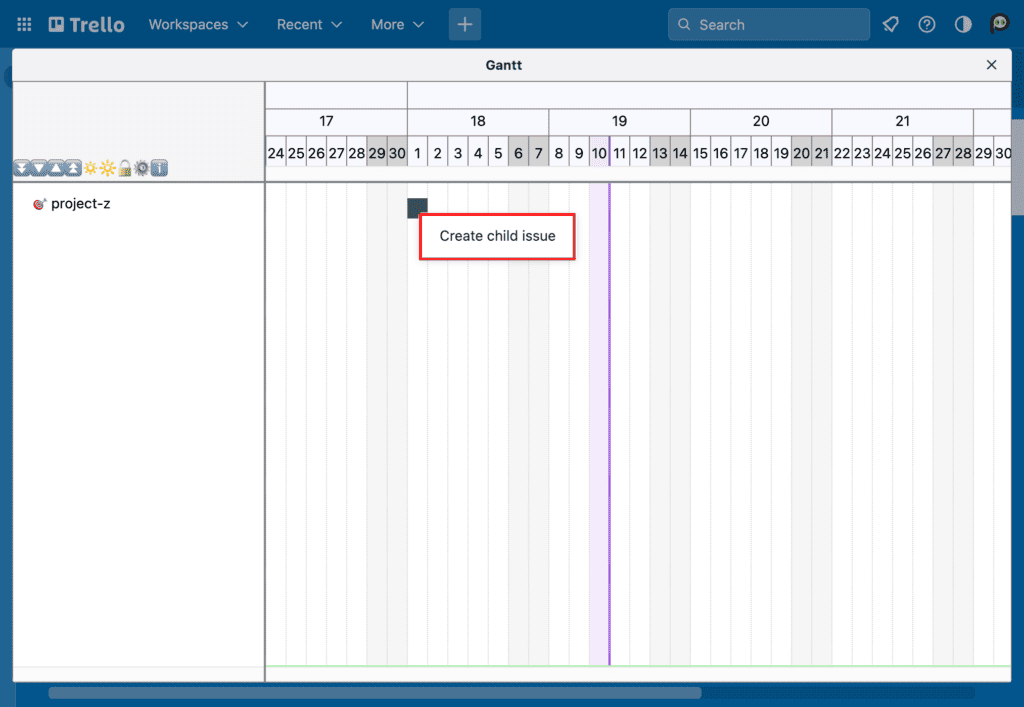
Click the Create child issue popup menu. RedSync shows the New Child Issue dialog.

Enter items to the New Child Issue dialog. Click the Save button when finished.
Right-click an issue bar to add the second and subsequent issue.
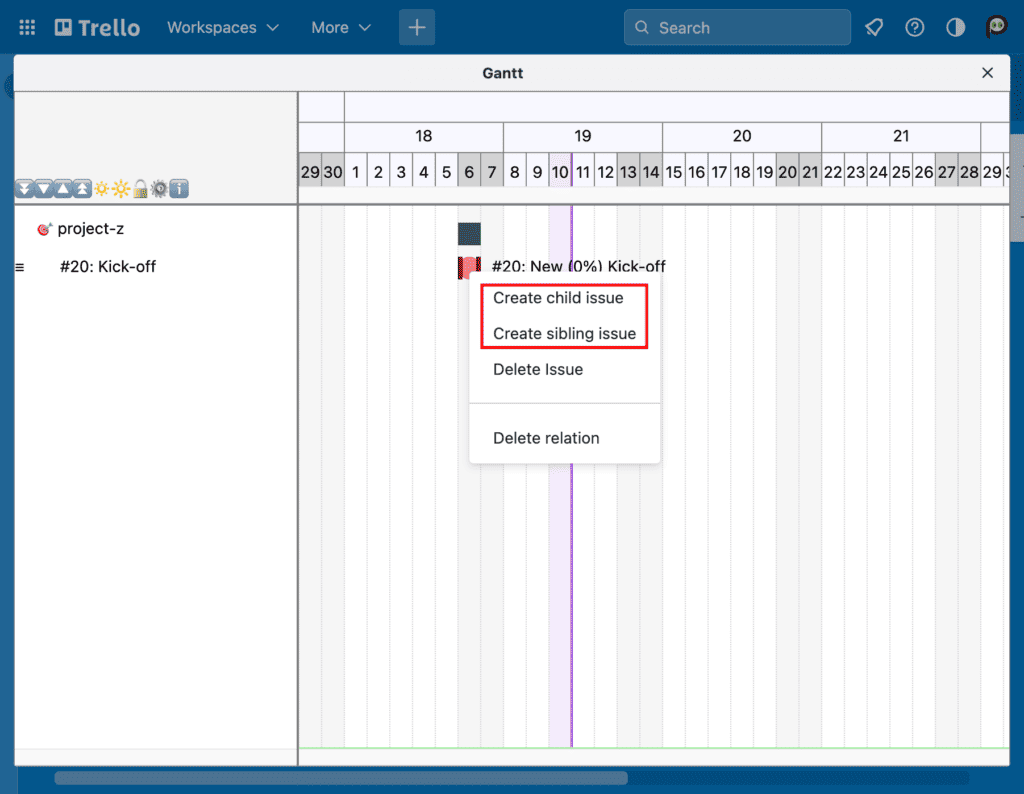
Click the Create child issue or the Create sibling issue. If you click the Create child issue, an issue is created as a child of the current issue. If you click the Create sibling issue, an issue is created at the same level as the current issue.
Delete Issue
Right-click on an issue bar to delete the issue.
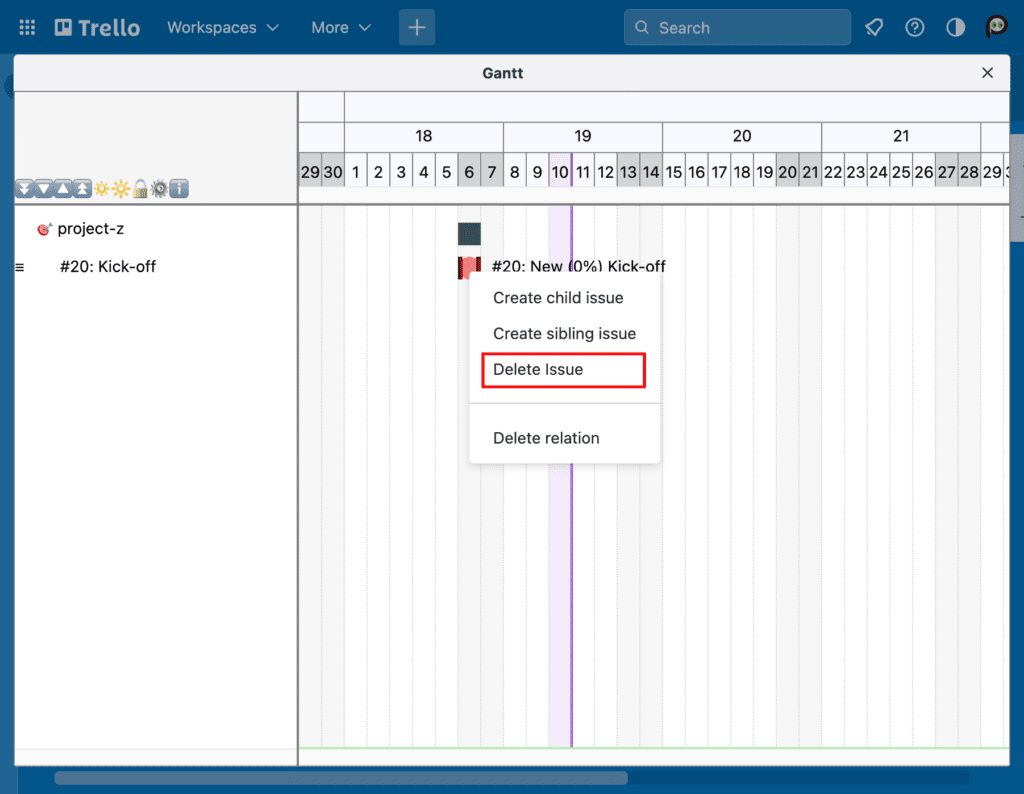
Click the Delete issue, and RedSync displays the confirmation dialog box.
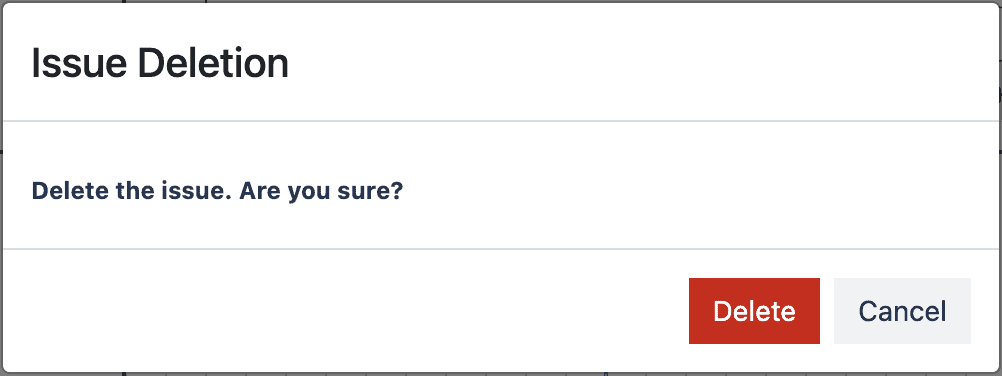
Click the Delete button.
Change Issue’s Schedule
Drag the right or left edge of an issue bar to change the issue’s start date or due date respectively.
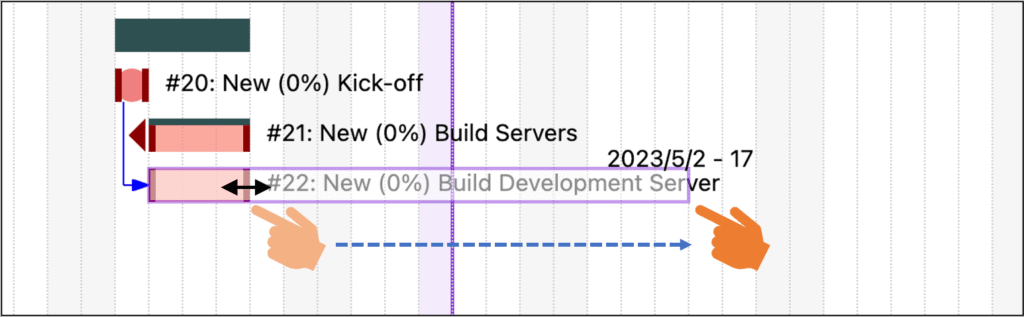
Drag an issue bar to change the issue’s schedule keeping the same duration.
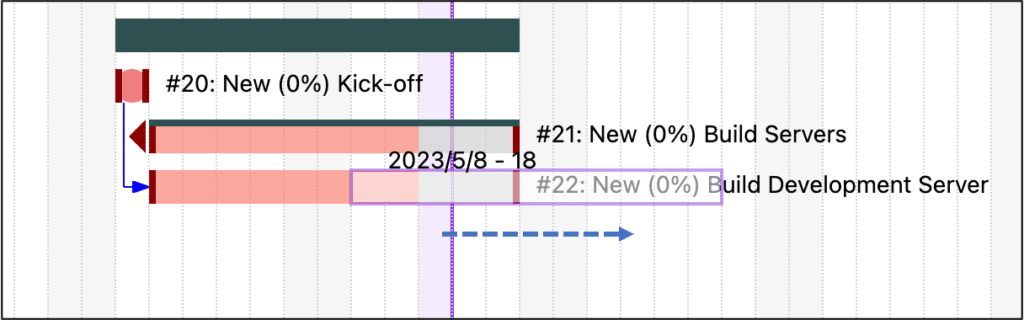
Restrictions on Changing Schedule
If an issue has a preceding issue, there are restrictions on changing its schedule based on Redmine’s behaviors.
- You cannot set the start date of the issue before the earliest starting date.
- You can set the start date of the issue after the earliest starting date. However, if you moved the preceding issue, the start date is forcedly set to the earliest starting date.
Earliest Starting Date – If there is a delay in relation to the preceding issue, it will be the first business day after the due date of the preceding issue, adding the number of days of delay. If there is no delay, it will be the first business day after the due date of the preceding issue.
Regardless of the preceding issue’s existence,
- If you drag an entire issue, the start and due dates are adjusted to avoid overlapping with weekends.
- If you drag the start date of an issue on the weekend, the weekend will not be included in the working days of the issue.
- If you drag the due date of an issue on the weekend, one day will be added to the working days of the issue.
Change of Delay Setting
To change the delay setting for a preceding issue, press the ALT key (Option key for Mac) while dragging either the entire issue or the left edge (start date).
The delay will be removed if the modified start date falls immediately after the preceding issue. Otherwise, the delay will be updated.
If there are multiple preceding issues, all issues’ delays will be reassessed. If you want to change the delay for a specific issue only, you can remove the connection from the popup menu and create it again.
Change Issue’s Parent
Drag an issue on the issue tree and drop it on another issue which is a new parent. Hold a mouse button on the issue node to grab the issue.
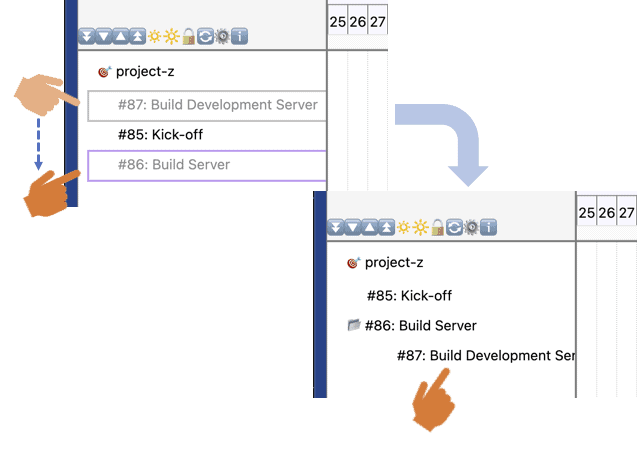
When the Gantt chart is loaded, issues are ordered by their start dates. After changing the parent, the order of issues may be disordered. You can reorder them by clicking the Reorder icon (?) or right-clicking the right-hand canvas’s white space (no bars).
Add Connection between Issues
To add a connection, move the mouse pointer to the outside of the origin issue bar. RedSync shows a triangle as a starting point of connection. Click it.
Move the mouse pointer to an issue to be connected. Click on it. RedSync shows a dialog to input parameters for the connection.
If you select the Preceding as a relation type, RedSync asks you a delay days. If you left it blank, the following issue starts on the working day immediately after the preceding issue.

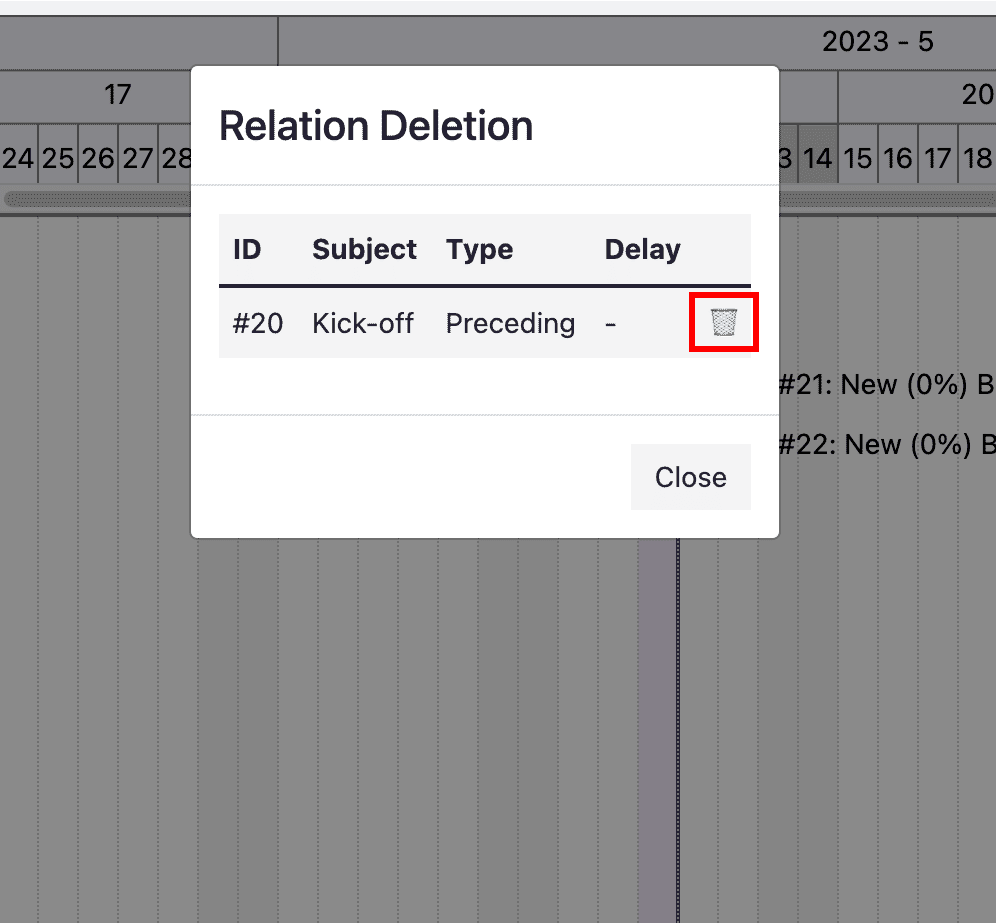
Delete Connection
Right-click the destination issue bar (connected line end with an arrow) of the connection to be deleted.
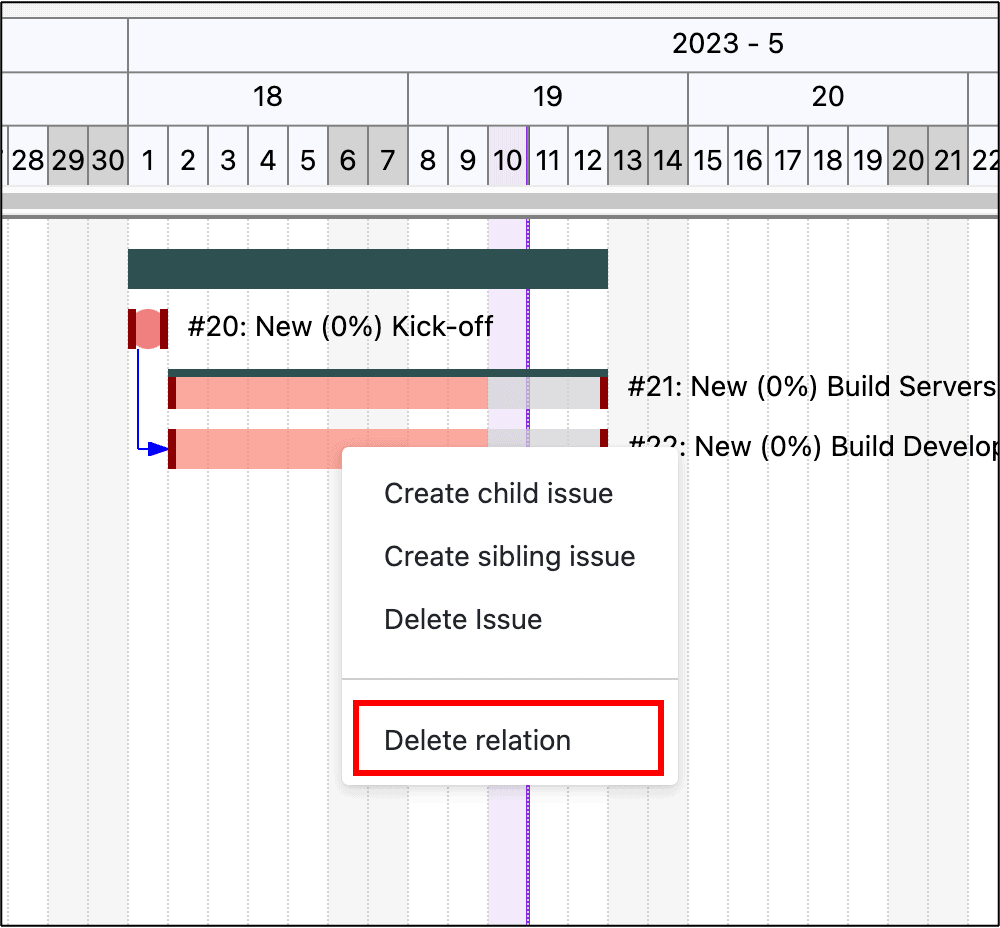
Click the Delete relation.
RedSync shows you the list of connections. Click the garbage can icon.
4.6.Limitations
Number of Cards
The number of Cards per Board is limited to 5,000 (as of this writing in April 2022). If you have more than 5,000 Issues in the Redmine project, the Sync with Redmine operation may fail. In such a case, please consider the following:
- Make the settings not to create a Card for the closed Issue and archive the Card when the connected Issue is closed
- Divide the project into subprojects, and sync each subproject to a different Board
Number of Links
An Issue can have links to related Issues. The number of links per Issue is limited to about 30.
If you have more than 30 links in your project settings, you can disable showing the links in a Card. Otherwise, Sync with Redmine operation may fail.
5.Project Member's Guide
5.1.Account Link
You have to register your API Key for the Redmine account. If you do not have an account on Redmine, you can skip this (but please confirm it with your project manager).
Menu -> Account Link
RedSync displays a dialog to input the API Key. You can get the API Key from your Redmine account.
Refer to How To Get Redmine API Key.
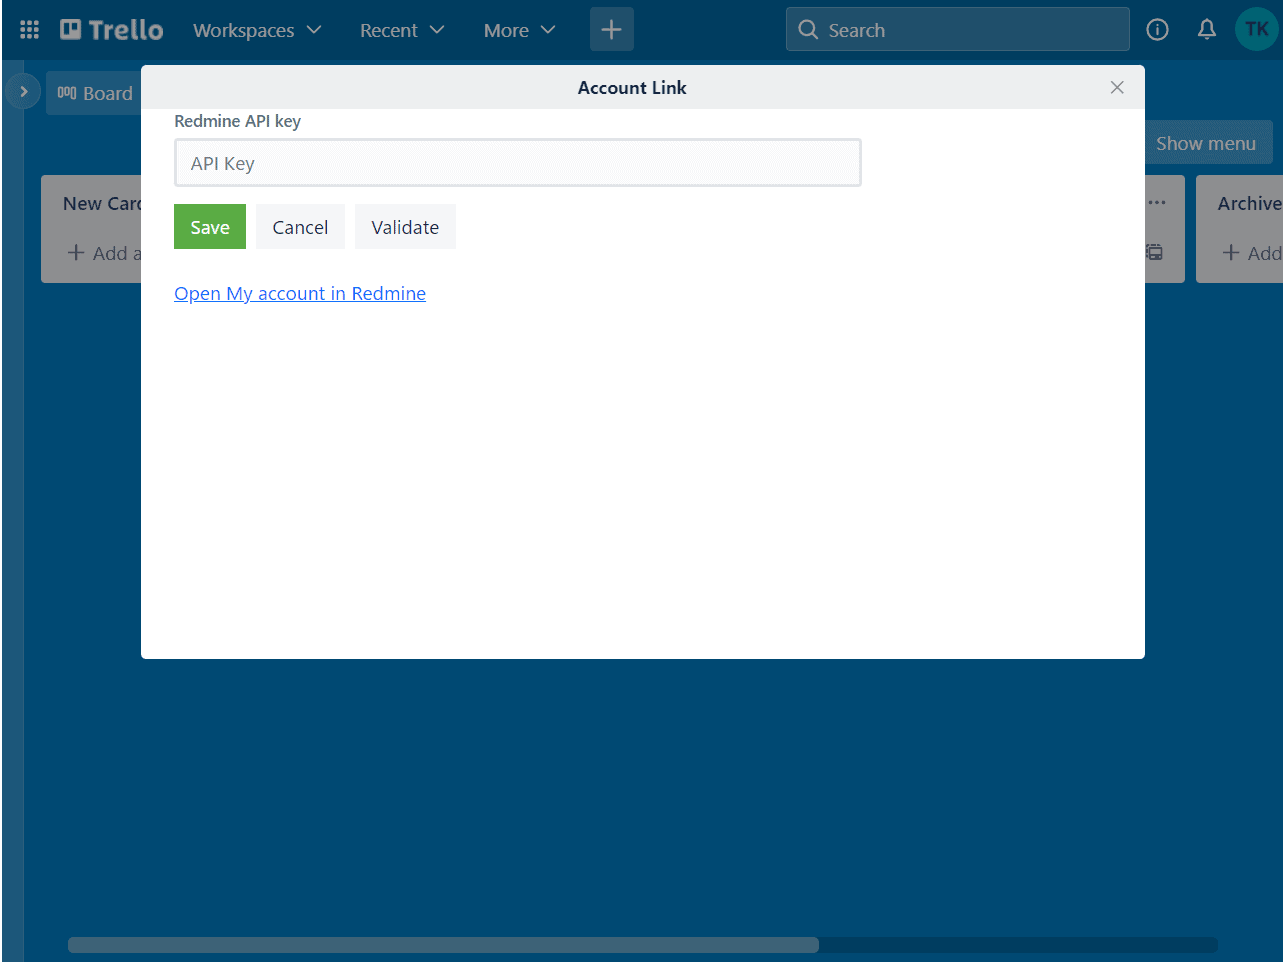
Validate your API Key by clicking the Validate button. RedSync shows the user name associated with the API Key.
5.2.Sync On Card
When you open a Trello card, RedSync shows the Redmine Data section, which contains data RedSync retrieves from a Redmine issue.
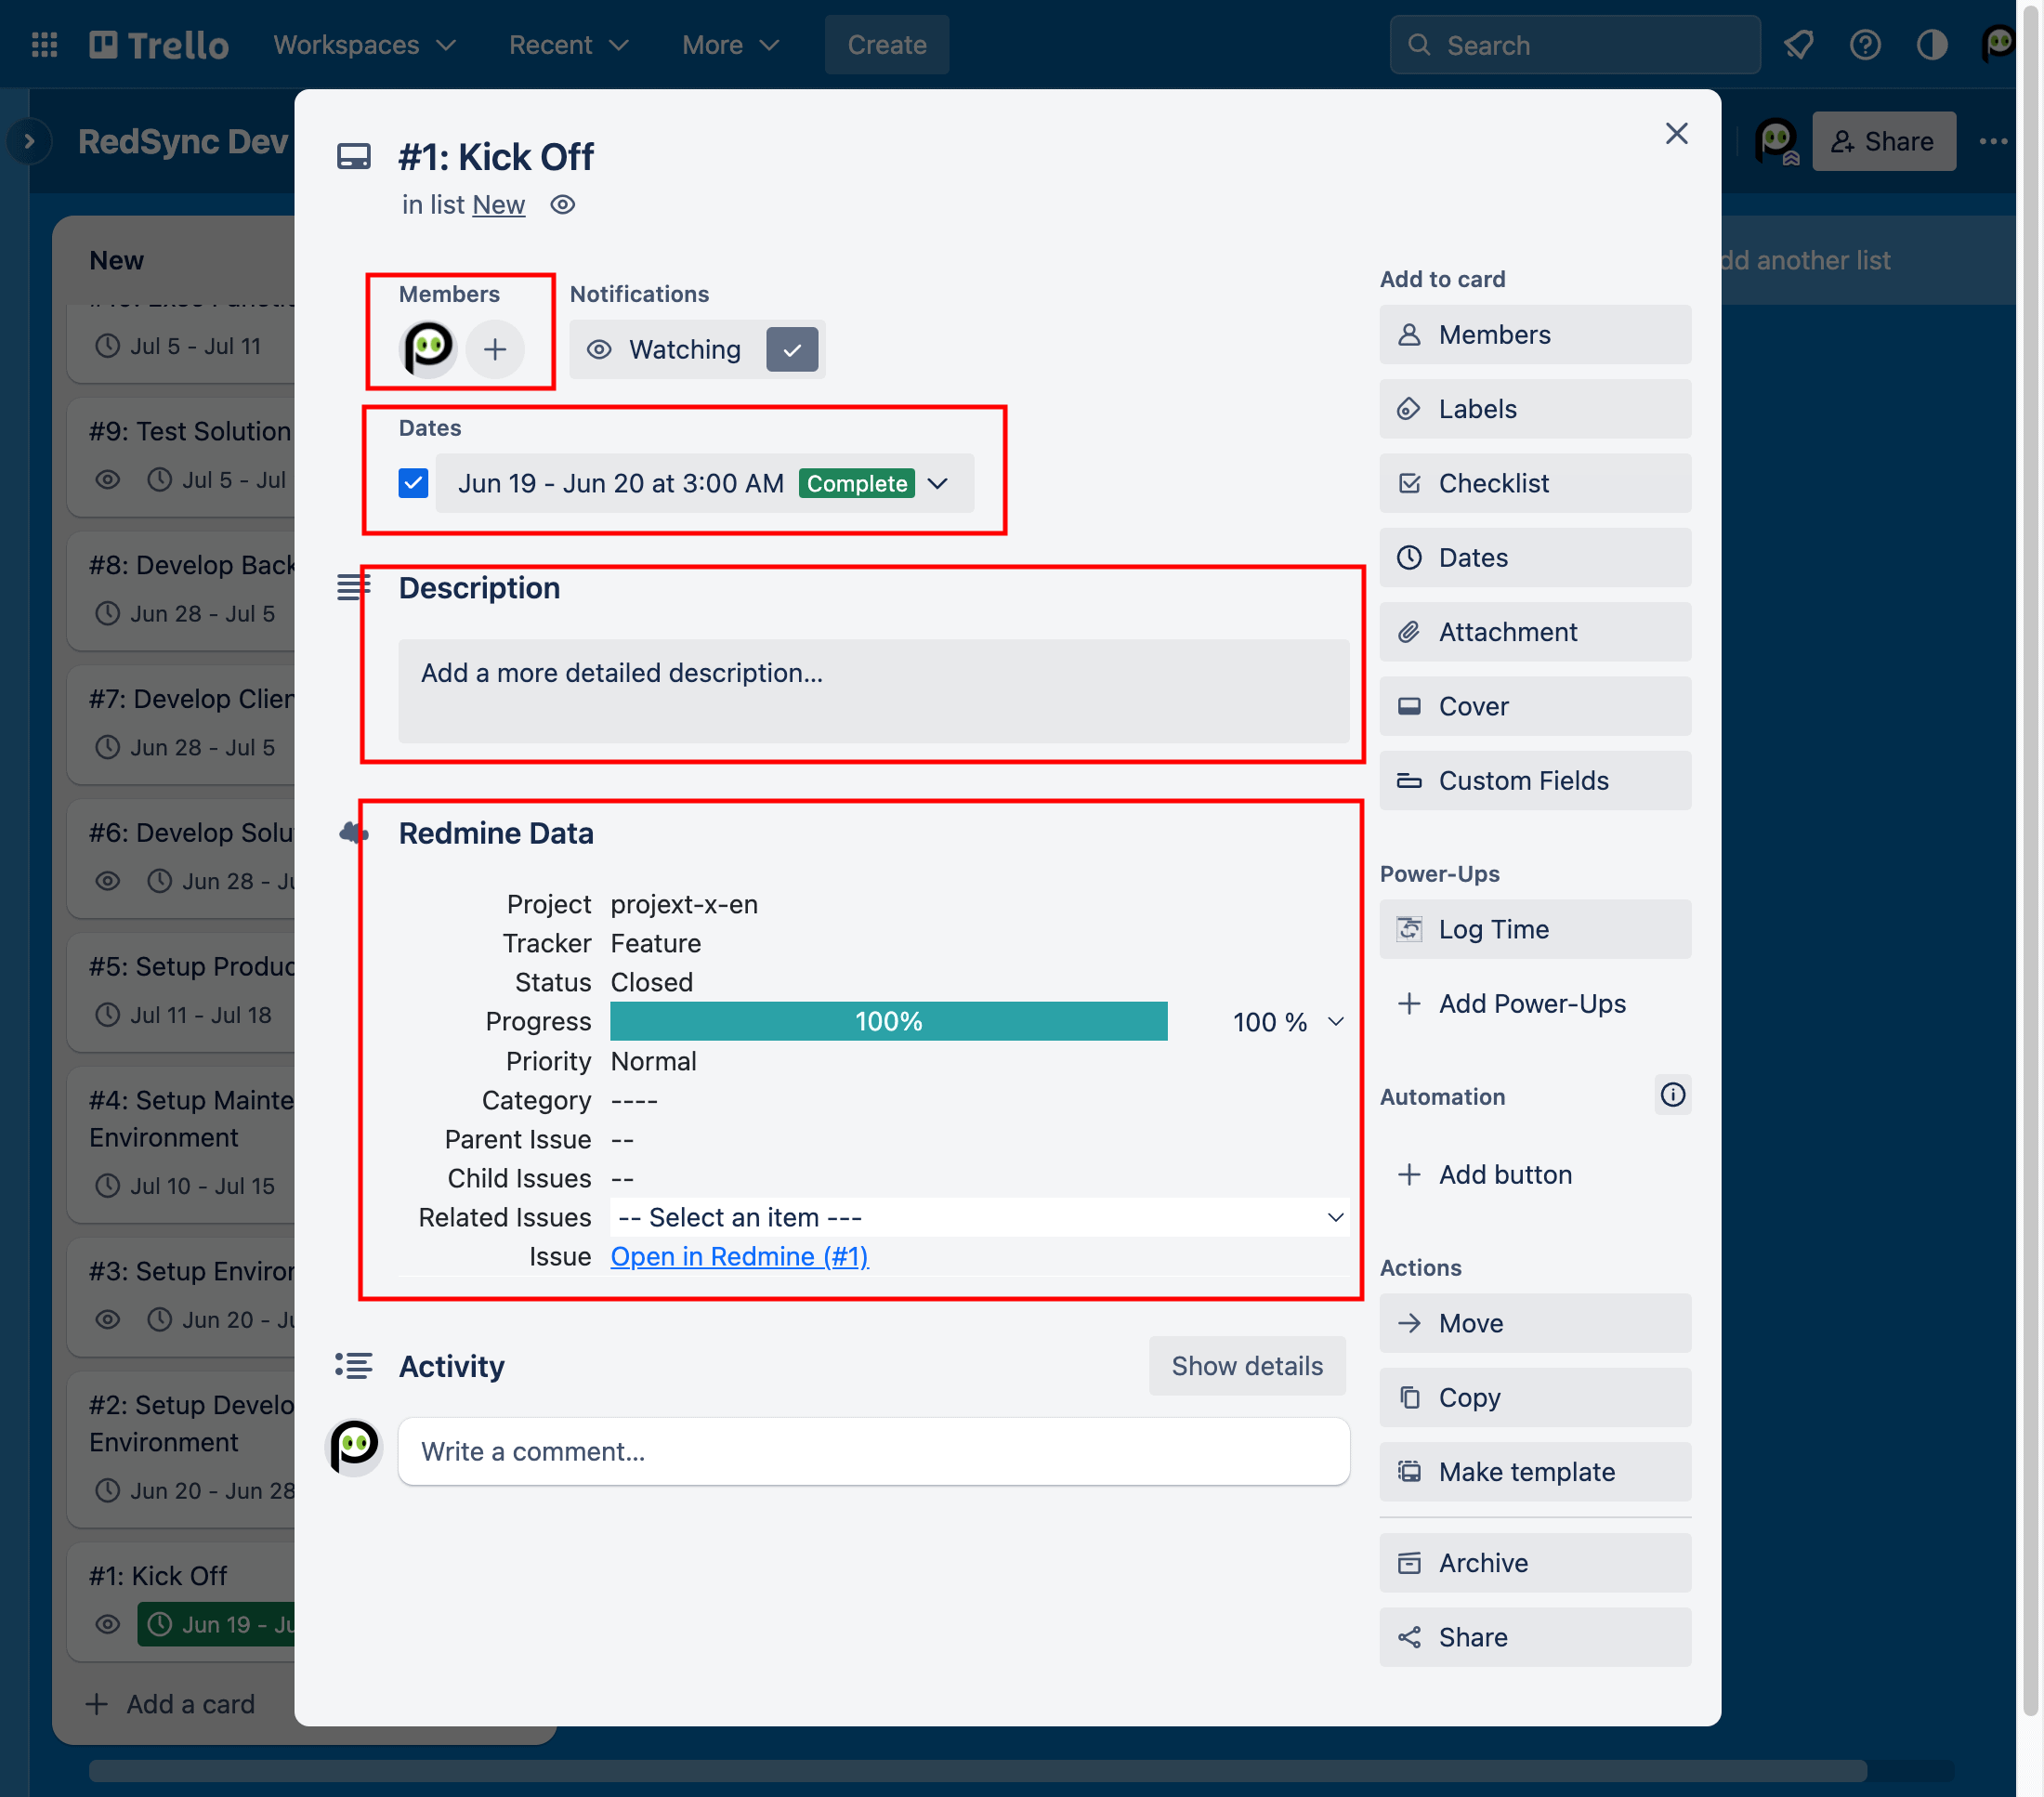
It contains the following data items:
- Project
- Tracker
- Status
- Progress
- Priority
- Category
Depending on the Settings, some items are editable, and you can update them. However, Redmine’s workflow, roles, and permissions associated with the API Key protect those items. Hence, when you update those items, you may notice their value does not change.
The section also includes the following links:
- Parent Issue – Open the parent Trello card if any
- Child Issues – Open the child Trello card if any
- Related Issues – Open the related Trello card if any
- Issue – Open the connected Redmine issue
You can also update the following fields on the Trello card, but RedSync may overwrite them in the Sync with Redmine operation, depending on the Settings.
- Subject – Synchronized from a Trello card to a Redmine issue or vice versa
- Description – Synchronized from a Trello card to a Redmine issue or vice versa
- Start Date – Always overwritten with the start date in a Redmine issue
- Due Date – Always overwritten with the due date in a Redmine issue
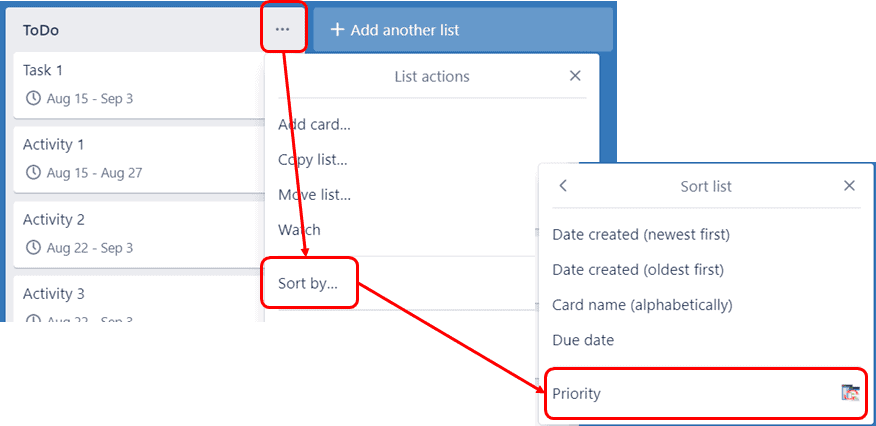
5.3.Sort List By Priority
You can sort the Cards on a List by Priority.
5.4.Report Time
You can log working time to a Redmine issue via a Trello card.
Click Log Time on the Card menu to report working time.
RedSync displays the following dialog.
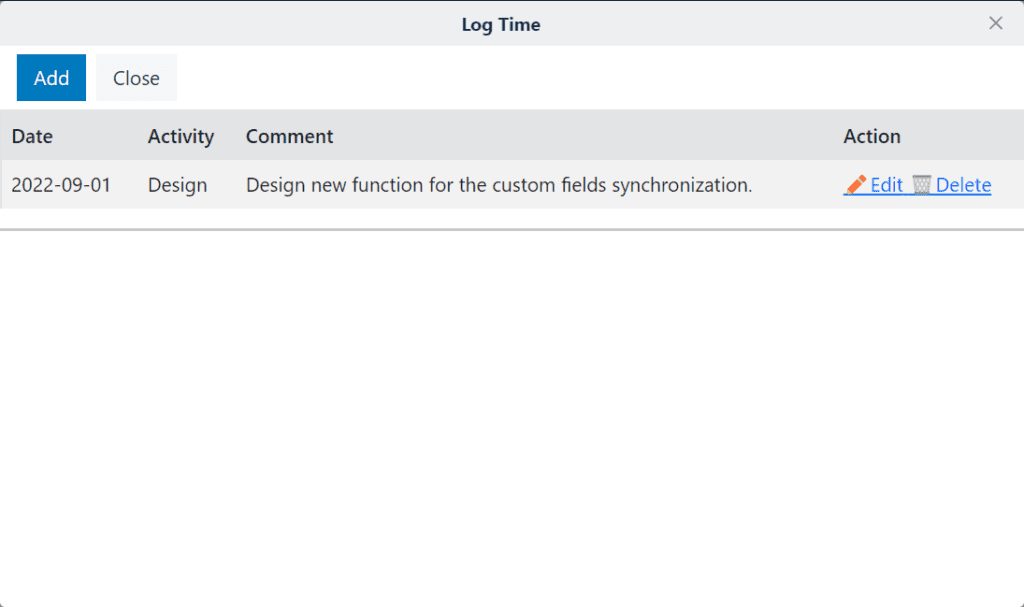
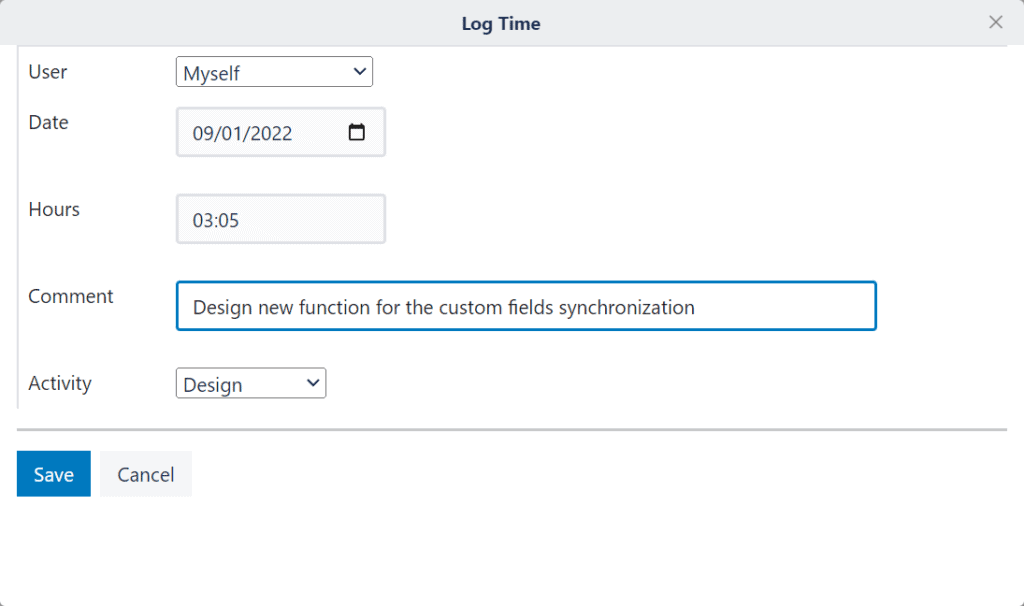
Click Edit, then RedSync displays the following dialog to edit the log time.
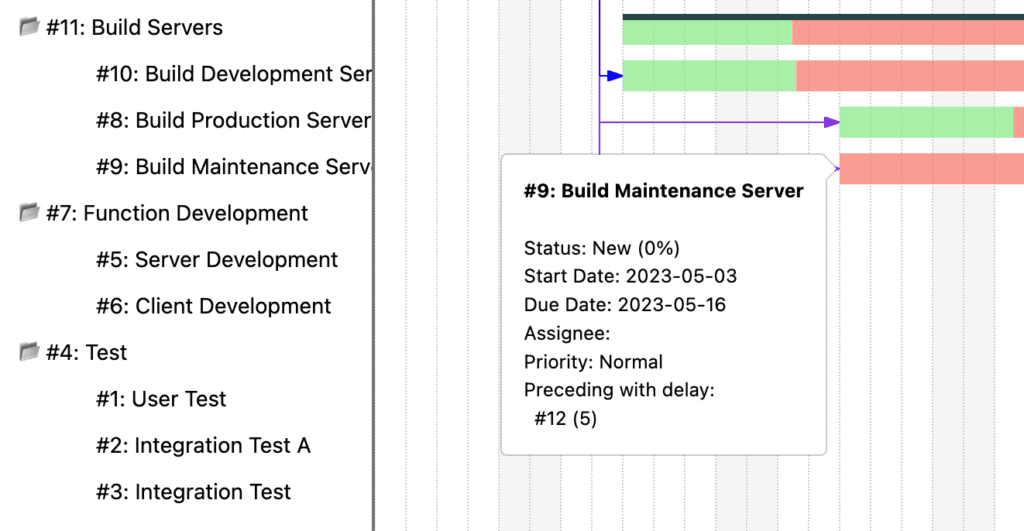
5.5.View Gantt Chart
A project manager and members can view the Gantt chart from the board menu.
Menu > Gantt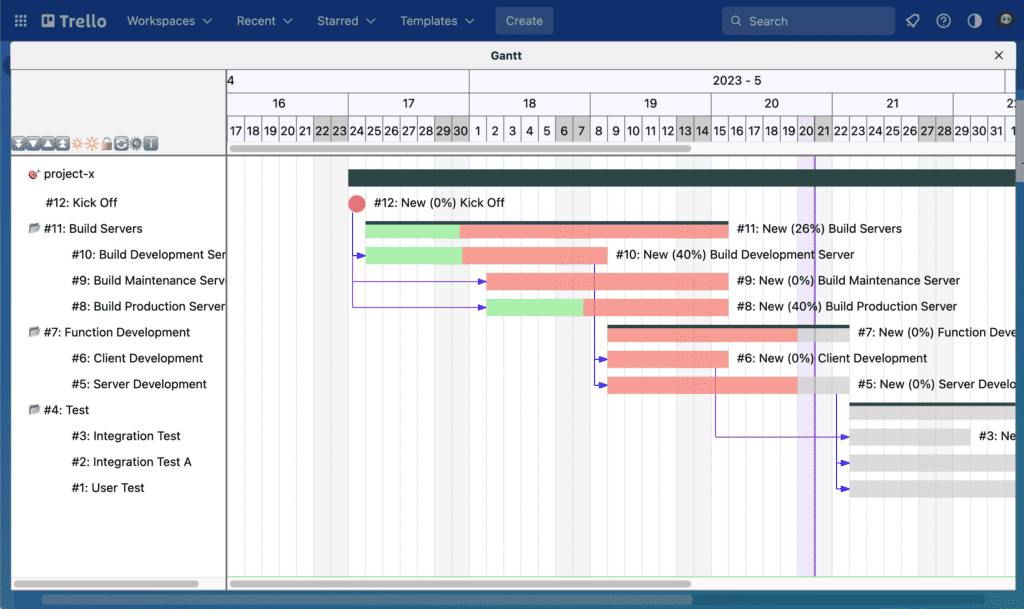
Move the mouse pointer to ℹ️, and the description of icons and connections is displayed.
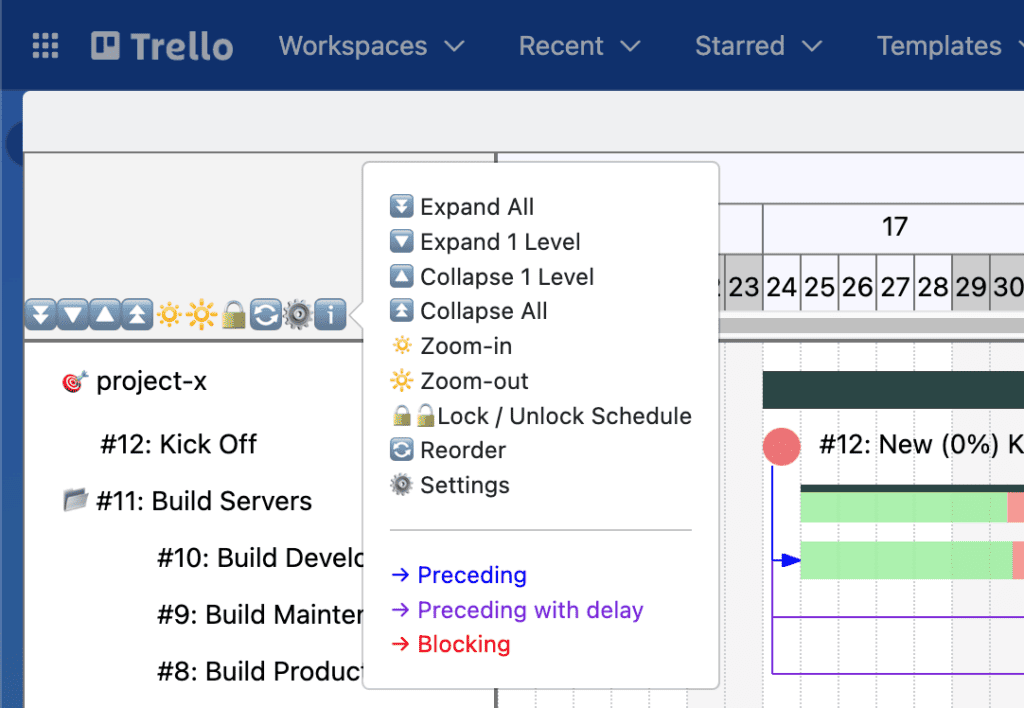
The Lock/ Unlock Schedule locks the schedule. In order to edit the Gantt chart, you must unlock the schedule.
The Zoom-out and Zoom-in icons change the calendar duration.
Move the mouse pointer on an issue bar, and the issue details are displayed.
6.System Requirement
Redmine
Versions: 5.0, 5.1, 6.0, 6.1
Protocol:
- HTTPS
- CORS (Cross-Origin Resource Sharing) (Optional) (Check Here)
The Redmine server should be accessible from the user’s browser (not necessary to use Redmine UI, but RedSync should be able to access the Redmine server from the browser).
Please also refer to the following articles for HTTPS and CORS configuration.
Browser
Tested with Chrome, Firefox, Safari, Edge
7.Support
We provide RedSync power-up on an “as-is” basis with Q&A support only.
Please submit any questions or defects to the Github:
We welcome your feedback and feature suggestions. Please submit them to the Github as well.
8.Appendix
8.1.Errors and Actions
This section is under construction.
| The List for a new Card is not specified in the Settings. |
RedSync creates a new Card on the List when you make a new Issue on Redmine. You need to create a List, if it does not exist, and then specify the List in the Settings.
|
| The List for the removed Card is not specified in the Settings. |
RedSync moves a card to a List when you delete the associated Issue on Redmine. You need to create a List, if it does not exist, and then specify the List in the Settings.
|
| The List for a new card has been archived. Please specify an alternative List in the Settings. |
You have asked RedSync to archive a Card to a List when you delete the associated Issue on Redmine. But the List is archived. You have to specify another List.
|
| An error occurred in creating plugin data for the Card. Please try again after closing and reopening the browser if possible. Please delete the following card if it was created. |
| RedSync failed to create a Card when you added an issue to Redmine. |
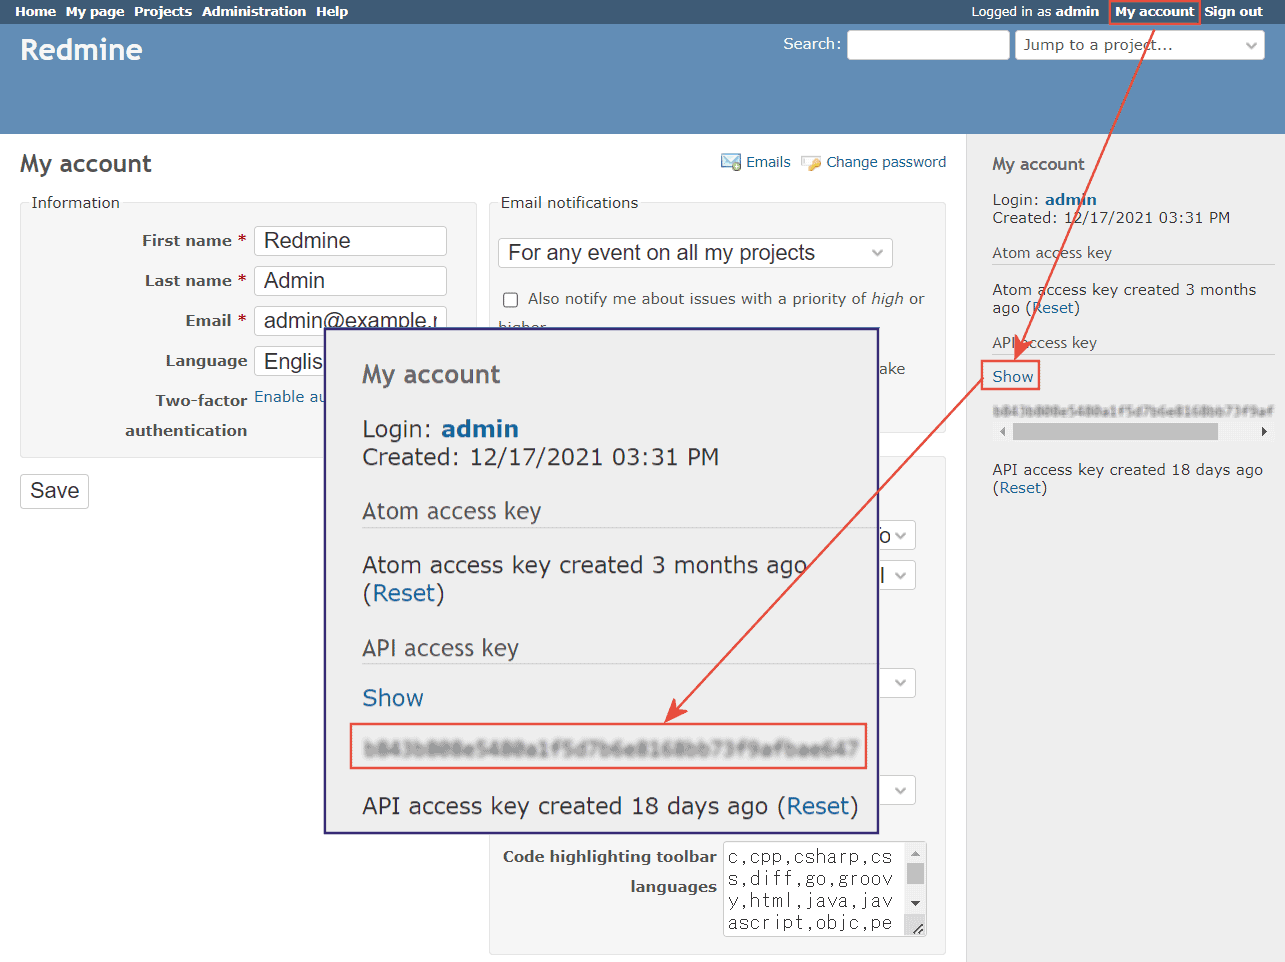
8.2.How To Get Redmine API Key
You can get the API Key as follows:
My Account -> Access Key -> Show
8.4.Archive Manager
You do not need to delete the archived Cards in general. Trello provides enough capacity for holding the archived Cards. However, you may want to delete them if you want to make sure they are not restored.
Archive Manager allows you to delete the archived Cards altogether.
You can enable Archive Manager as follows:
Menu -> Power-Ups -> RedSync Settings -> Edit Power-Up settings
At the bottom of the Setting window, there are two option switches.

Turn on the Maintenance switch, then RedSync shows the Archive Manager board menu.

8.5.Sync with Redmine vs. Sync on Card
RedSync synchronizes Trello Card with Redmine Issue by either Sync with Redmine or Sync on Card operation as follows:
| Item | Sync with Redmine | Sync on Card |
| Card | ||
| Card Creation | X | |
| Card Archiving | X | |
| Card Fields | ||
| Schedule | X | |
| Completion Flag | X | |
| Name | X | |
| Description | X | |
| Redmine Data (on Card) | ||
| Tracker | X | |
| Status | X | |
| Progress | X | |
| Priority | X | |
| Category | X | |
| Parent | X | |
| Children | X | |
| Relations | X | |
Sync with Remine is a batch operation and triggered by the user, while Sync on Card is a real-time operation and activated by just opening a Card.