
This guide explains the operations available to board Administrators.
Card Operations
Stepra adds a [Workflow] section to cards and, if the user is a board Administrator, displays the [Administrator Menu].
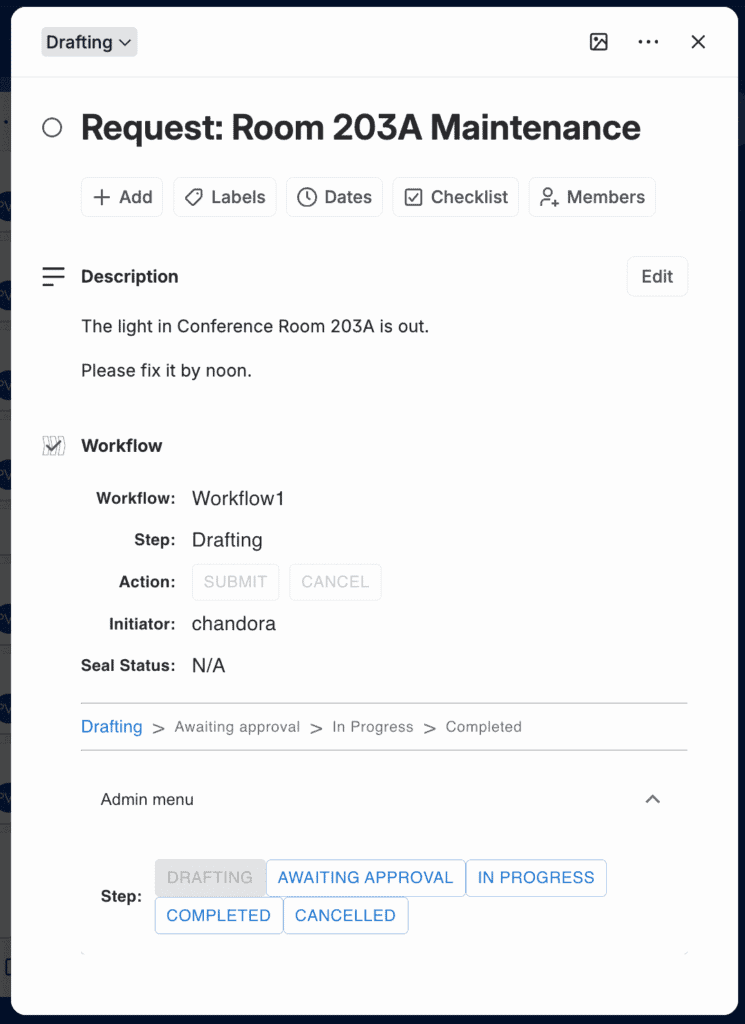
[Administrator Menu/Steps]
Clicking [Administrator Menu] displays the [Steps]. By clicking a step, you can directly change the current step.
You can also force a card whose step is “Undefined” to change to any step.
Power-Up Settings
From the board’s Power-Ups menu, open Stepra’s “Edit Power-Up Settings” screen to configure the various settings.
Only board Administrators can configure these settings.
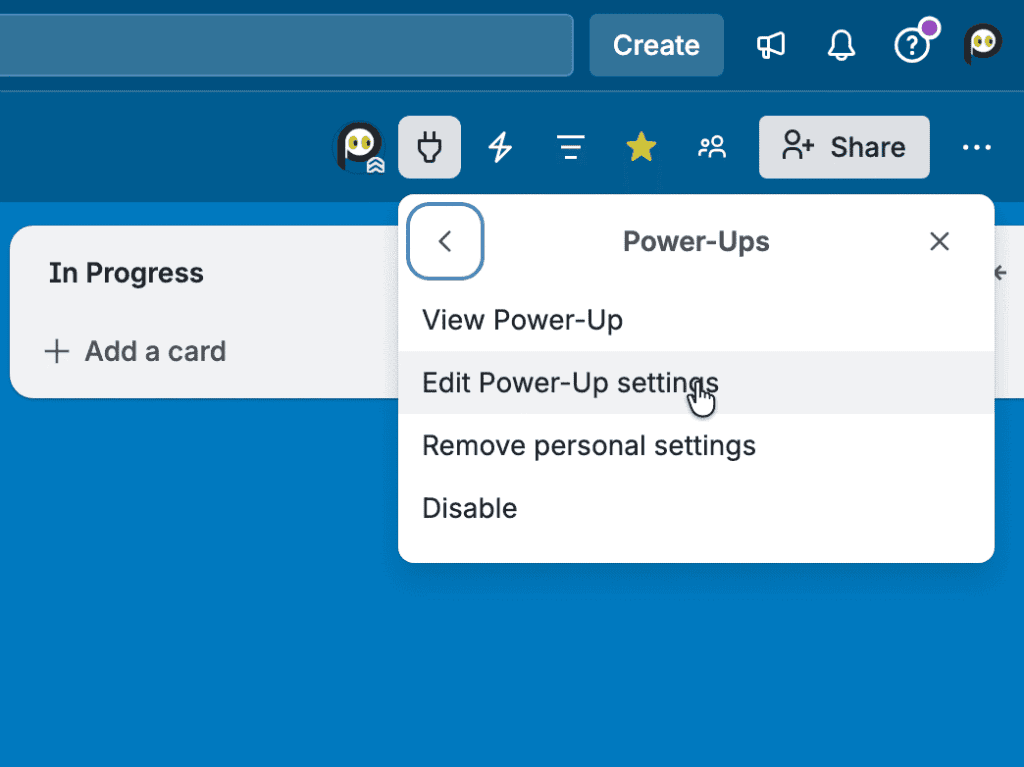
When there are multiple Administrators
If multiple Administrators change the settings at the same time, they may overwrite each other’s changes. Be careful not to make changes simultaneously. We recommend designating a single Administrator to make changes.
Save frequently
The “Edit Power-Up Settings” screen may close if you accidentally click outside of it. In this case, the settings you are editing will not be saved. For this reason, we recommend clicking “Save” frequently while editing. This is due to Trello’s specifications and cannot be controlled by the Power-Up.
Getting Started with Settings
In “Edit Power-Up Settings,” you switch between tabs to select what to configure. The following sections describe the settings for each tab.

Organization Tab (Pro Plan)
Define organizations and their members.
Organizations can have a hierarchical structure. Organization definitions are referenced when a Manager is specified as the approver in a workflow “Transition” definition, described later.
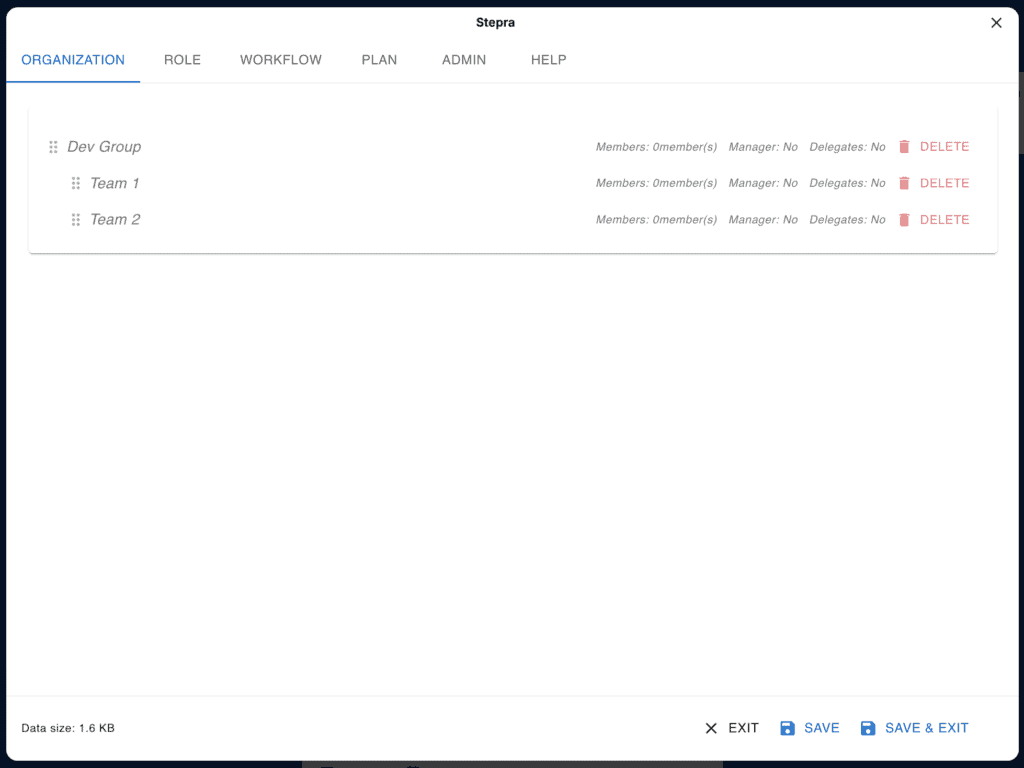
■ Adding an Organization
To define the first organization, click the [Add Organization] button. To define additional organizations, right-click the parent organization and click the [Add Sub-organization] menu.
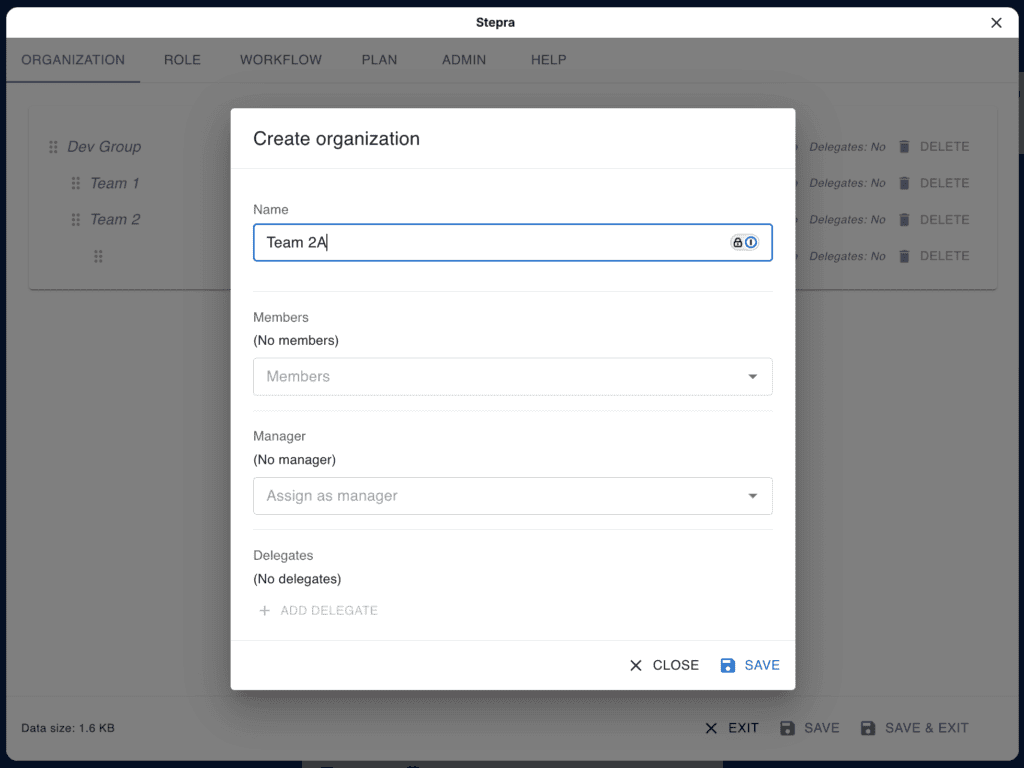
[Name]
Enter the name of the organization.
[Members]
Specify the members who belong to the organization. You can select from the board’s members. If you select a member of another organization, you will be asked whether to move them to this organization.
[Manager]
Specify the Manager from among the members.
[Delegates]
Specify delegates for the Manager. The following members can act as delegates:
- The Manager of the parent organization
- Managers of the immediate sub-organizations
- Members of the same organization
Specify a delegation period for each delegate. You can also specify multiple delegates.
■ Editing an Organization
Click an organization in the organization tree to open the edit screen. The items you can change are the same as in “Adding an Organization.”
■ Deleting an Organization
Click the [Delete] button in the organization tree to delete an organization. If sub-organizations are defined, they will be deleted as well.
Roles Tab (Pro Plan)
Define roles and their members.
Role definitions are referenced when a role is specified as the approver in a workflow “Transition” definition, described later.
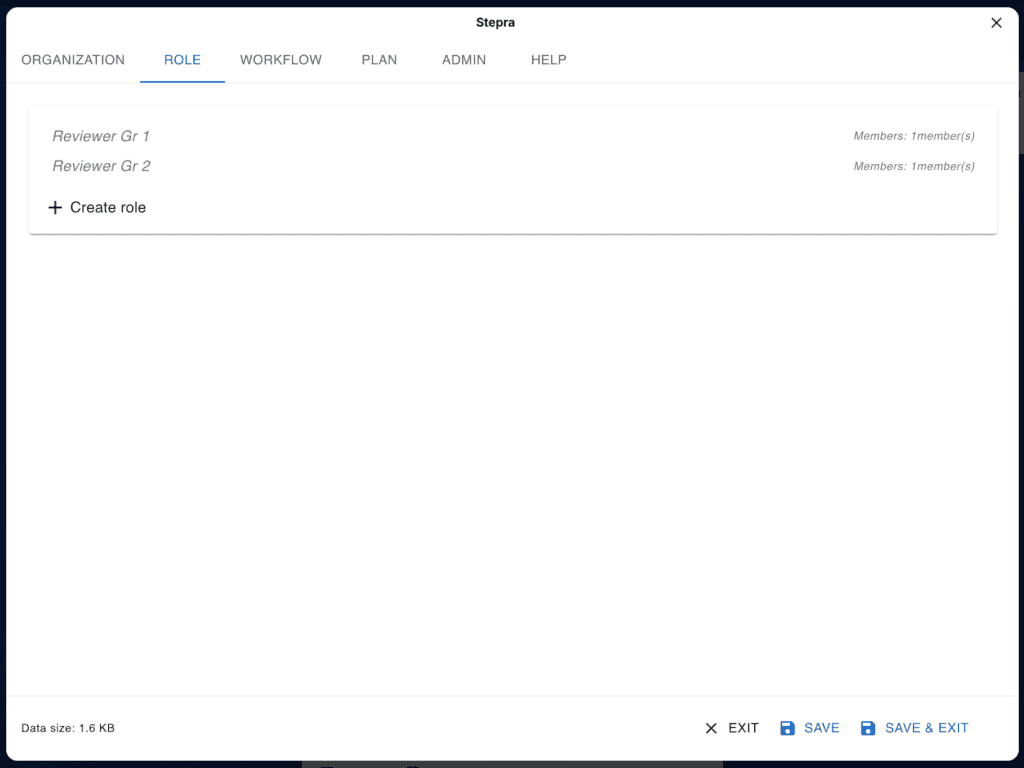
■ Adding a Role
To define the first role, click the [Add Role] button.
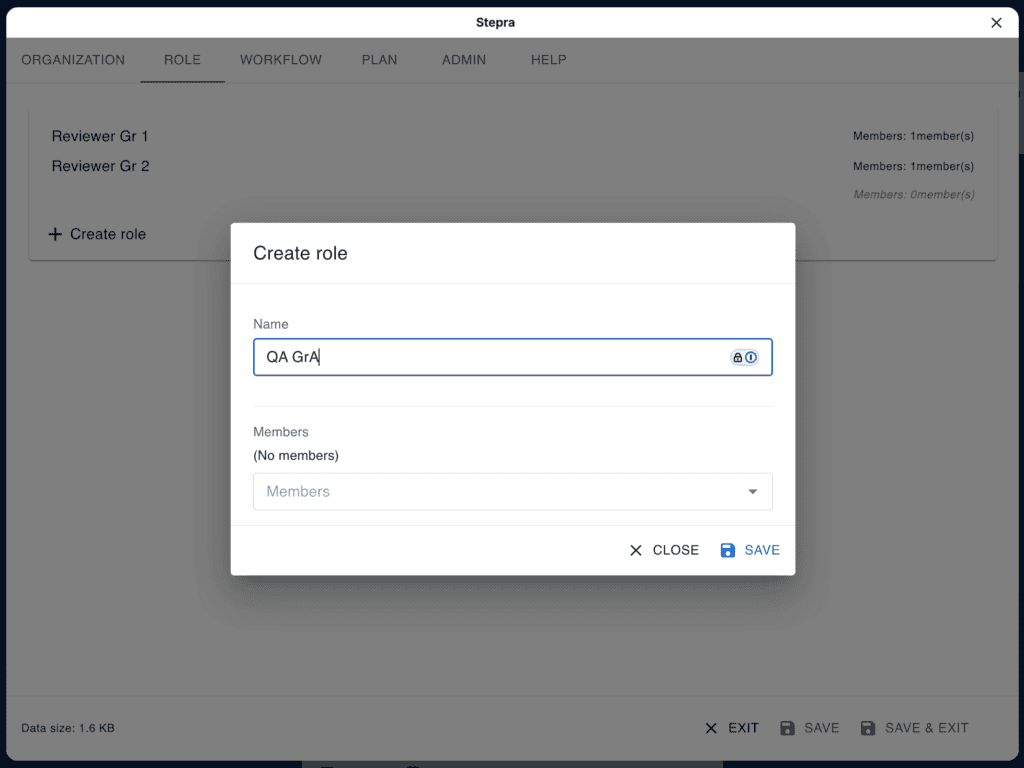
[Name]
Enter the name of the role.
[Members]
Specify the members who belong to the role. You can select from the board’s members.
■ Editing a Role
Click a role in the role list to open the edit screen. The items you can change are the same as in “Adding a Role.”
■ Deleting a Role
Click the [Delete] button in the role list to delete a role.
Workflow Tab
In the Workflow tab, you define workflows.
■ Workflow Menu
This menu is displayed at the top of the tab.

[Workflow to Edit]
Select the workflow to edit from the list.
[Rename Workflow]
Click to enter a workflow name.
[Delete Workflow]
Click to delete the workflow. On the Free Plan, an empty workflow is set in its place. On the Pro Plan, deleting the last workflow sets an empty workflow in its place.
Pro Plan and Free Plan
Workflow Definitions
On the Pro Plan, you can define multiple workflows. When initializing a card, you specify which workflow to apply. On the Free Plan, you can define only one workflow.
If you switch to the Free Plan after defining multiple workflows on the Pro Plan, you can select one workflow to enable. Disabled workflows are retained for existing cards that use them. However, they cannot be applied to new cards, and actions cannot be performed on existing cards that use them.
Stepra saves workflow definitions in the internal storage provided by Trello. This internal storage is limited to a maximum of 8KB. For this reason, the number of workflows you can define varies depending on the number of steps, transitions, and actions, the length of their names, the number of approvers, and so on.
The size of the workflow definitions is displayed at the bottom of the [Edit Power-Up Settings] dialog. Use this size as a guide when making adjustments. The example workflow definitions used in this Administrator Guide use approximately 1–1.5KB per workflow. In this case, you can define 5–7 workflows.
Approver Settings
On the Pro Plan, you can select [Individual], [Manager], [Role], or [Specified by Requester] as the approver in a [Transition] definition.
If you select an approver type other than [Individual] on the Pro Plan and then switch to the Free Plan, the approver setting becomes [Individual]. However, since no approver is specified, an error will occur when you try to perform an action on a card. Update the workflow definition to specify an appropriate approver.
Sealing the Description Field
On the Pro Plan, you can seal part of a card’s [Description] field. Once a seal is applied in a “Transition,” the seal is verified every time the card is opened, and a warning is displayed if the content has been changed since it was sealed.
The seal applies to the areas of the [Description] field enclosed in <seal></seal>. You can specify multiple areas.
<seal>
Content you want to protect from changes
</seal>
Workflow Definition Tab
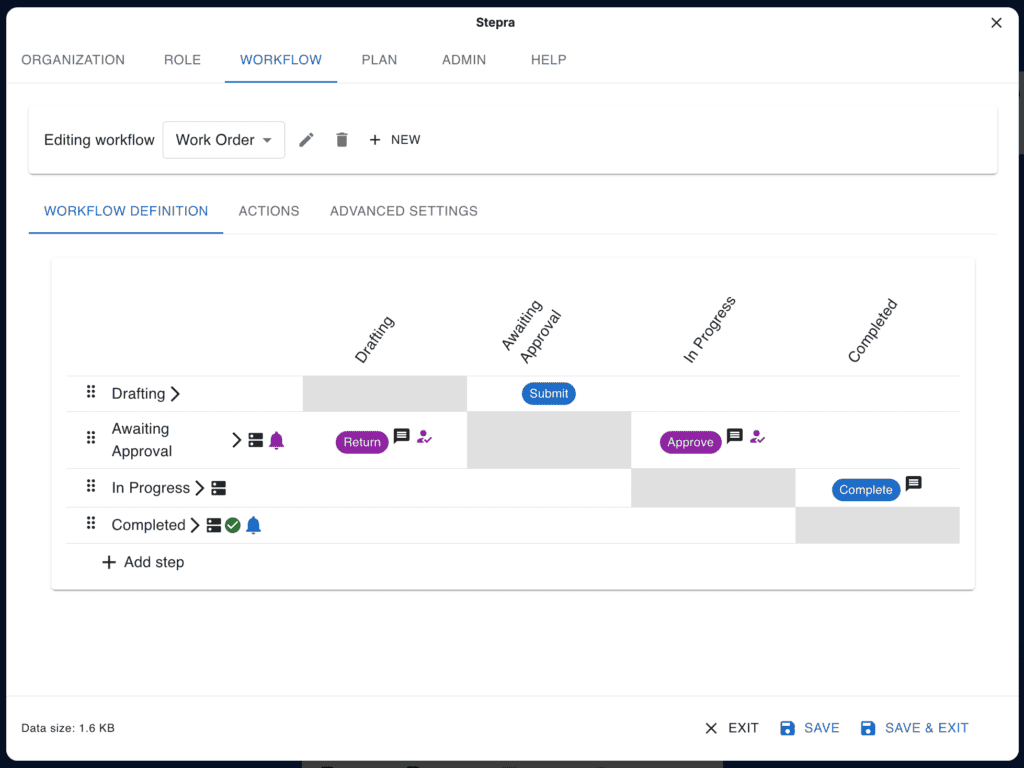
A workflow is defined by “Steps,” which represent work states, and “Transitions,” which represent movement between steps. An example workflow definition is shown below. The leftmost column represents the “source step,” and the top row represents the “destination step.” Each cell defines the action that triggers the transition.
For example, when you “Submit” a card in “Drafting,” it moves to “Awaiting Approval.”
■ Adding a Step
Click the [Add Step] button to add a step to the table. An edit screen appears where you can enter the step details.
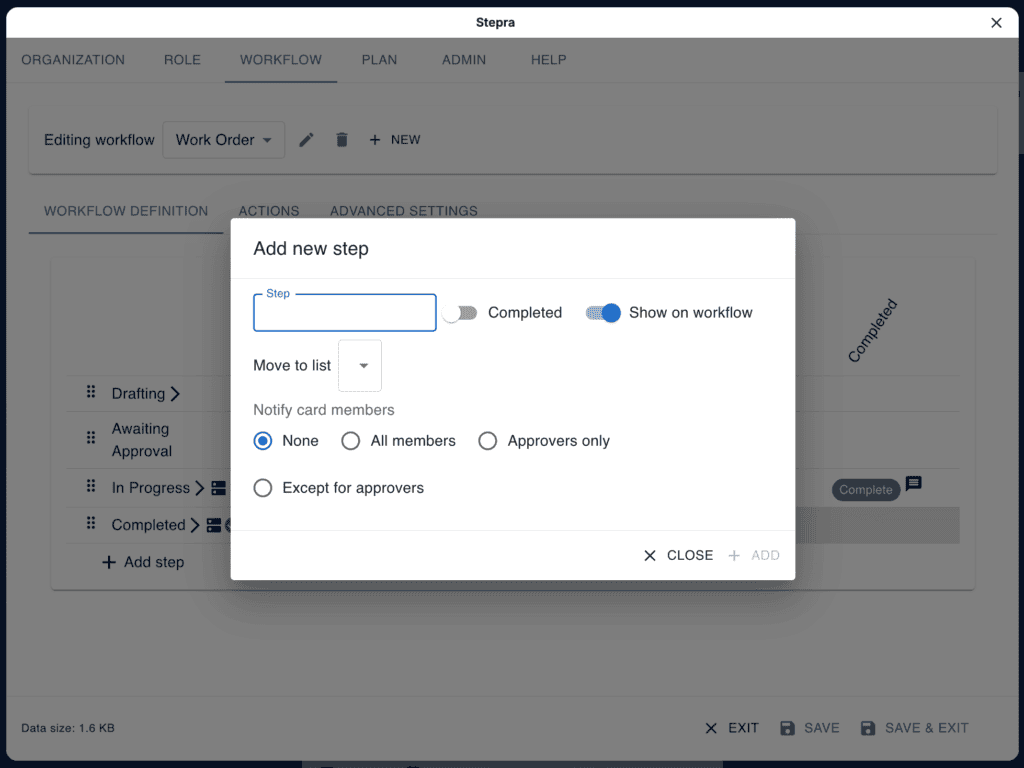
[Step]
Enter the name of the step.
[Completed State]
If checked, the card is marked as complete when it reaches this step.
[Show in Workflow]
If checked, this step is shown in the workflow on the card. The card displays the workflow and the step it is currently in. Special steps such as “Canceled” can be excluded from the workflow display on the card by unchecking this option.
[Move to List]
Moves the card to the specified list.
[Prompt Card Members for Action]
Notifies card members of the step change and prompts them to take action. Select from the following options:
- None
- Everyone
- Approvers only
- Non-approvers only
If none of the transitions defined for the step include an action by an “approver,” selecting “Approvers only” or “Non-approvers only” has the same result as selecting “None” or “Everyone,” respectively.
■ Editing a Step
Click a step in the table to open the edit screen. The items you can change are the same as in “Adding a Step.”
■ Deleting a Step
Click a step in the table to open the edit screen. Click the [Delete] button to delete the step.
If transitions that use the step have already been defined, those transitions are deleted as well.
If the step is already in use by a card (that is, the card’s current state is that step), deleting the step changes the card’s step to “Undefined.”
■ Adding a Transition
Click a cell in the table to add a transition. The row is the source step and the column is the destination step.
Clicking a blank cell lets you define a new transition. An edit screen appears where you can enter the transition details.
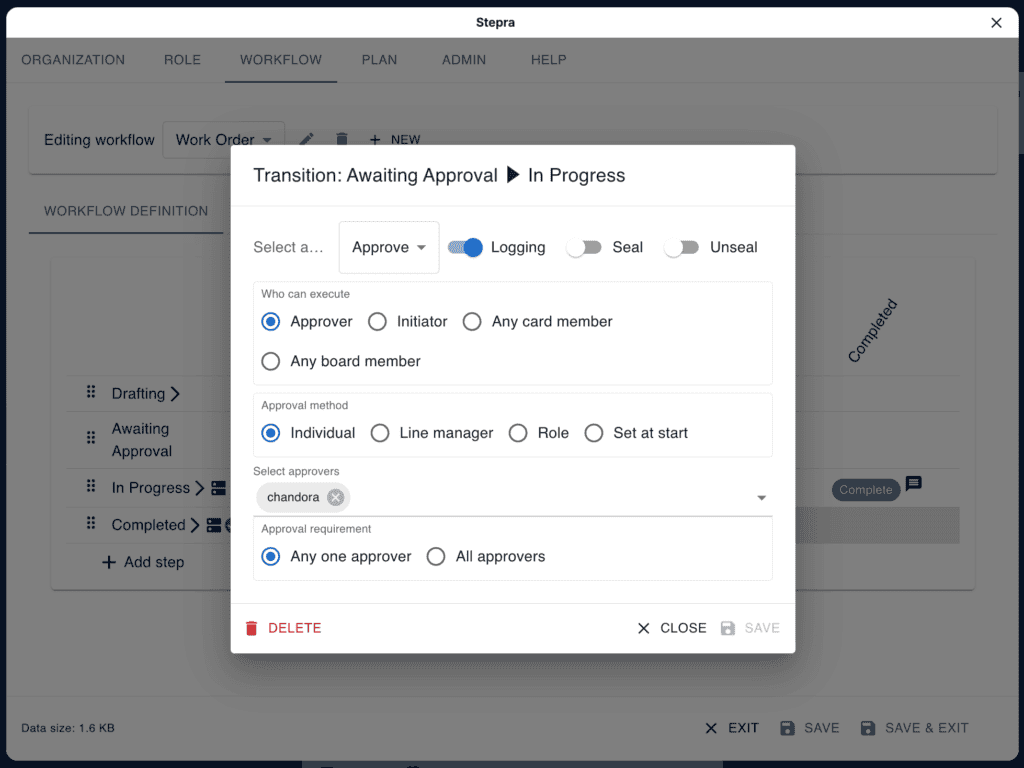
[Select Action]
Select an action from the list. You can also create a new action.
[Log]
If checked, the action and transition are logged in the card’s [Comments and activity].
[Seal] (Pro Plan)
If checked, part of the card’s “Description” field is sealed so that subsequent changes can be detected.
[Unseal] (Pro Plan)
If checked, the seal is removed and subsequent changes are no longer detected.
[Approvers only/Individual]
If checked, only users registered as approvers can perform this action.
[Approvers only/Manager] (Pro Plan)
If checked, only the requester’s Managers (up to the first, second, or third level in the organization hierarchy) can perform this action.
[Users | Approvers]
Displayed when [Approvers only/Individual] is selected. Select approvers from the users and add them to the approvers.
[First-level Manager | Second-level Manager | Third-level Manager]
Displayed when [Approvers only/Manager] is selected. Specify the hierarchy level relative to the requester.
[Action]
Displayed when “Create Action” is selected in [Select Action]. Enter the name of the action to create.
■ Editing a Transition
Click a cell where a transition is defined to open the transition edit screen. The items you can change are the same as in “Adding a Transition.”
■ Deleting a Transition
Click a cell where a transition is defined to open the transition edit screen. Click the [Delete] button to delete the transition.
Actions Tab
In the Actions tab, you define the actions that trigger transitions.
Actions can be defined together with a workflow, or on their own as described here.
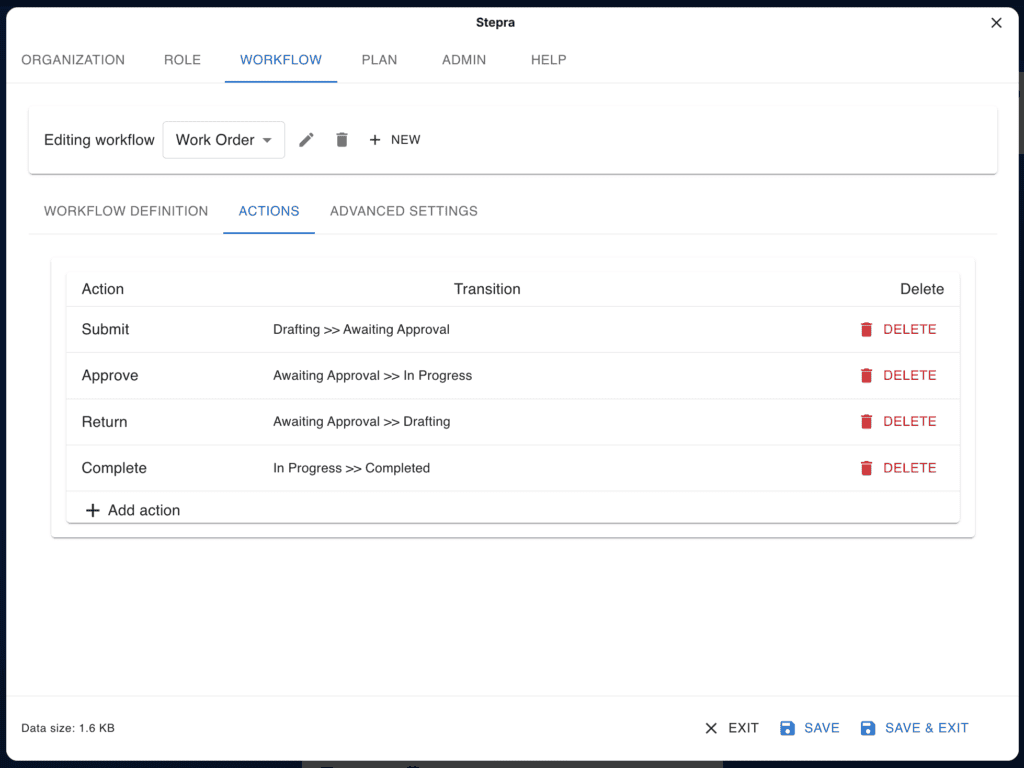
■ Adding an Action
Click the [Add Action] button to add an action to the list. An edit screen appears where you can enter the action name.
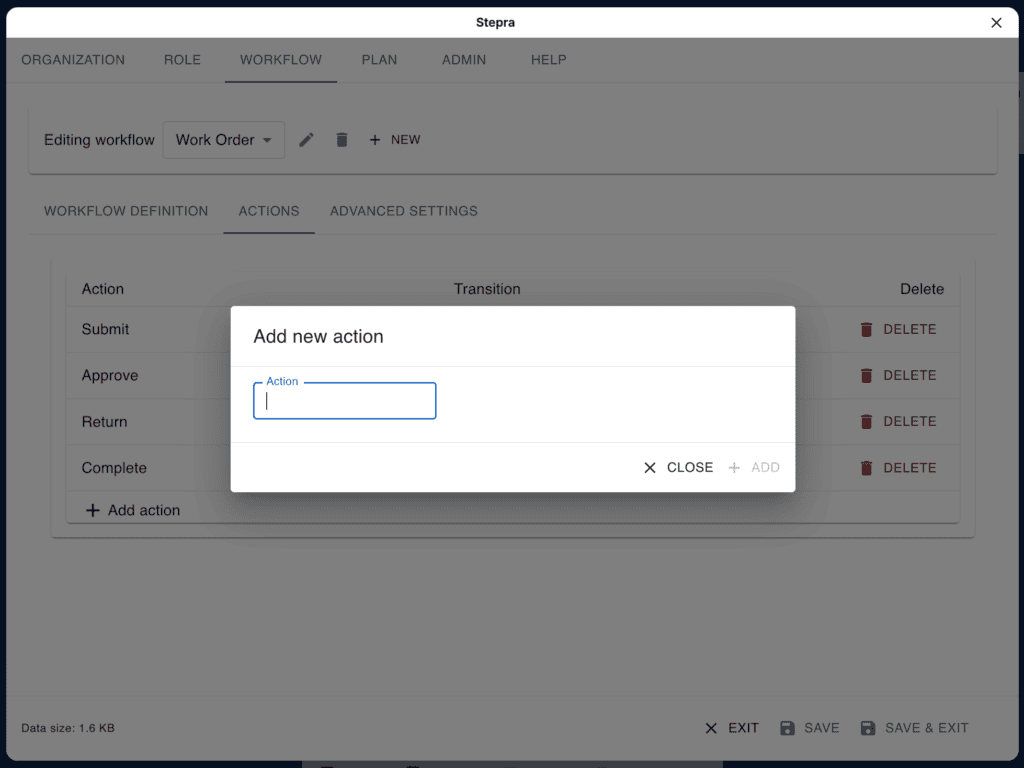
[Action]
Enter the name of the action.
■ Editing an Action
Click an action in the list to open the action edit screen. The items you can change are the same as in “Adding an Action.”
■ Deleting an Action
Click an action in the list to open the action edit screen, then click the [Delete] button to delete the action. Alternatively, click the [Delete] button directly in the list to delete the action.
If transitions that use the action have already been defined, deleting the action also deletes those transitions.
Advanced Settings Tab
In the Advanced Settings tab, you can configure various settings.
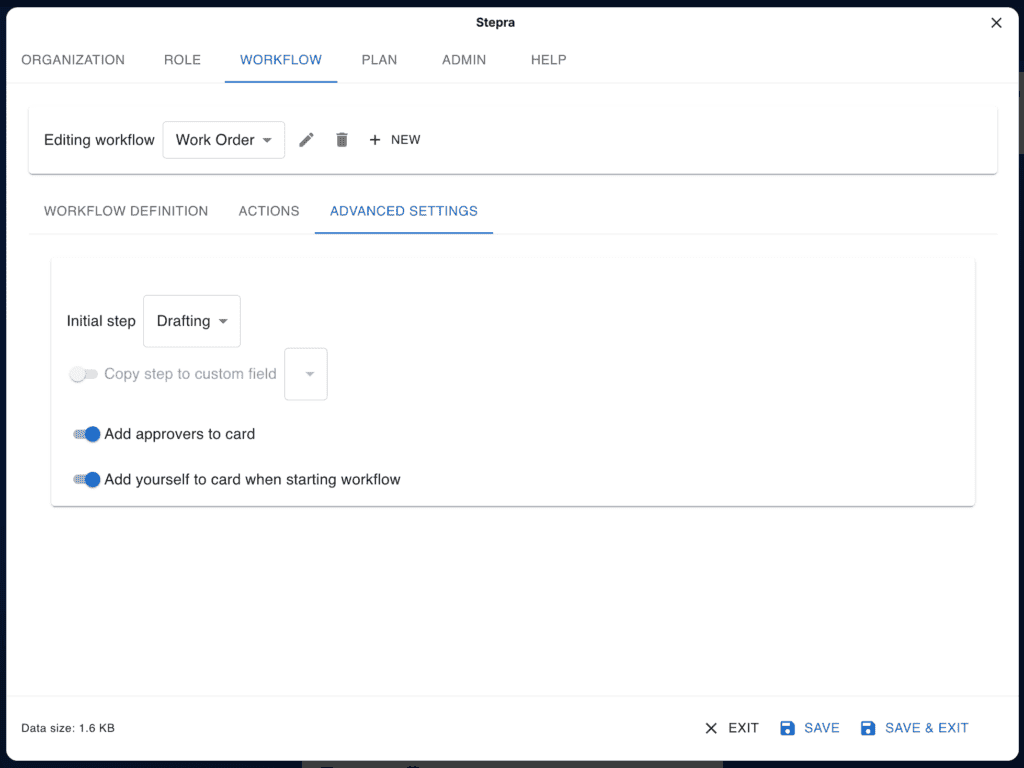
[Initial Step]
Select the initial step to set when the [Start Workflow] button is clicked on a card after it has been created.
[Copy Step to Custom Field]
If checked, the card’s step is copied to a custom field whenever the card transitions to a new step. Select the custom field to copy to. The custom field must be created on the board in advance.
[Add Approvers to Card]
If checked, when the card transitions to a step that requires an action by an approver (e.g., “Awaiting Approval”), the approvers defined in the “Transition” are added as card members.
Actions can be performed by users who are not card members. However, only card members are prompted for action. To prompt approvers for action, the approvers must be added as card members. This can be done manually in advance, or automatically using this option.
[Add Yourself to Card When Starting Workflow]
If checked, you are added as a member of the card when you start the workflow. Being a card member lets you follow changes made to the card.
[Allow Actions Only for Card Members]
If checked, only card members can perform actions. Because anyone can operate on a card, users unrelated to the workflow might perform an action by mistake. Allowing actions only for card members prevents such mistakes.
This setting does not affect approval steps. Approvers in an approval step can perform actions even if they are not card members.
[Allow Actions Only for Requester]
If checked, only the user who started the card’s workflow can perform actions. Whether or not the user is a card member has no effect.
This setting does not affect approval steps. Approvers in an approval step can perform actions even if they are not the requester.
Plan Tab
In the Plan tab, you can check your Stepra plan. You can also upgrade to the Pro Plan if needed.
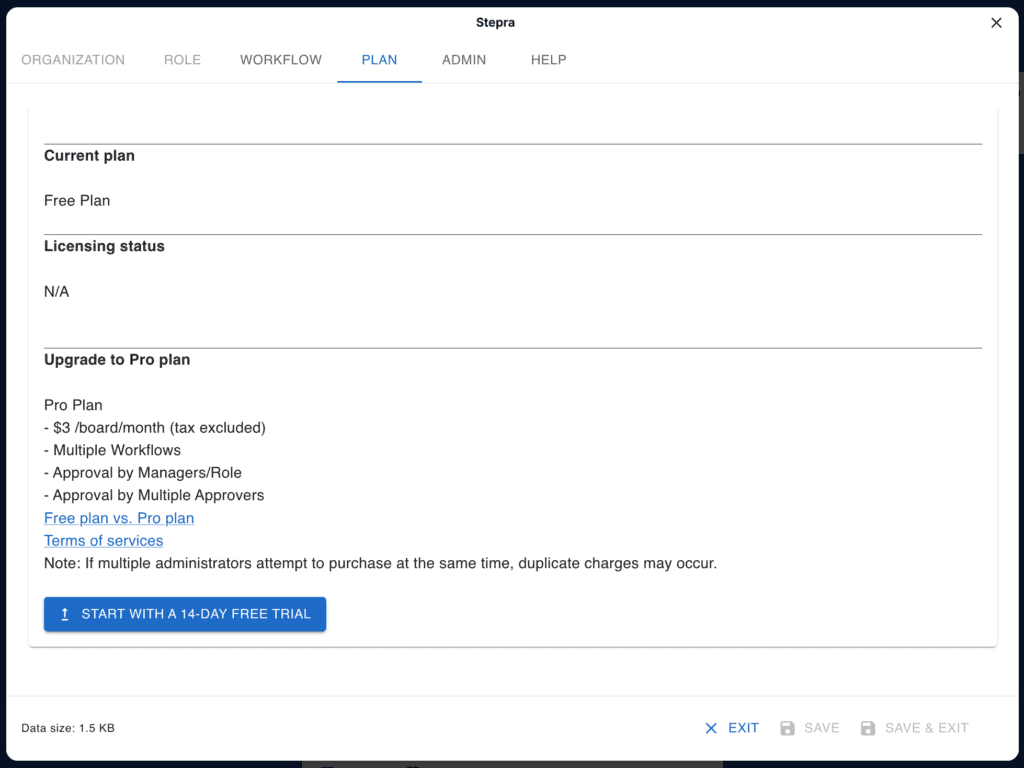
■ Current Plan
Displays your current plan.
- Free Plan
- Pro Plan
Note: If your Pro Plan expires, you will be moved to the Free Plan.
■License Status
If you have a currently valid license, its details are displayed. Even if you do not have a valid license, information about any license you obtained in the past is displayed.
■ Upgrading to the Pro Plan
If you are on the Free Plan, a button to subscribe to the Pro Plan is displayed. Subscriptions are handled on the Lemon Squeezy website. After you subscribe, Lemon Squeezy will email you a link to access your order. Please keep it, as you will need it to cancel your Pro Plan.
When you subscribe to the Pro Plan, Stepra links your license to the board ID. For this reason, be sure to subscribe to the Pro Plan from this screen.
Lemon Squeezy fees and taxes are added to the displayed price. You can check the final amount on the upgrade subscription screen (you can also cancel without subscribing).
Admin Tab
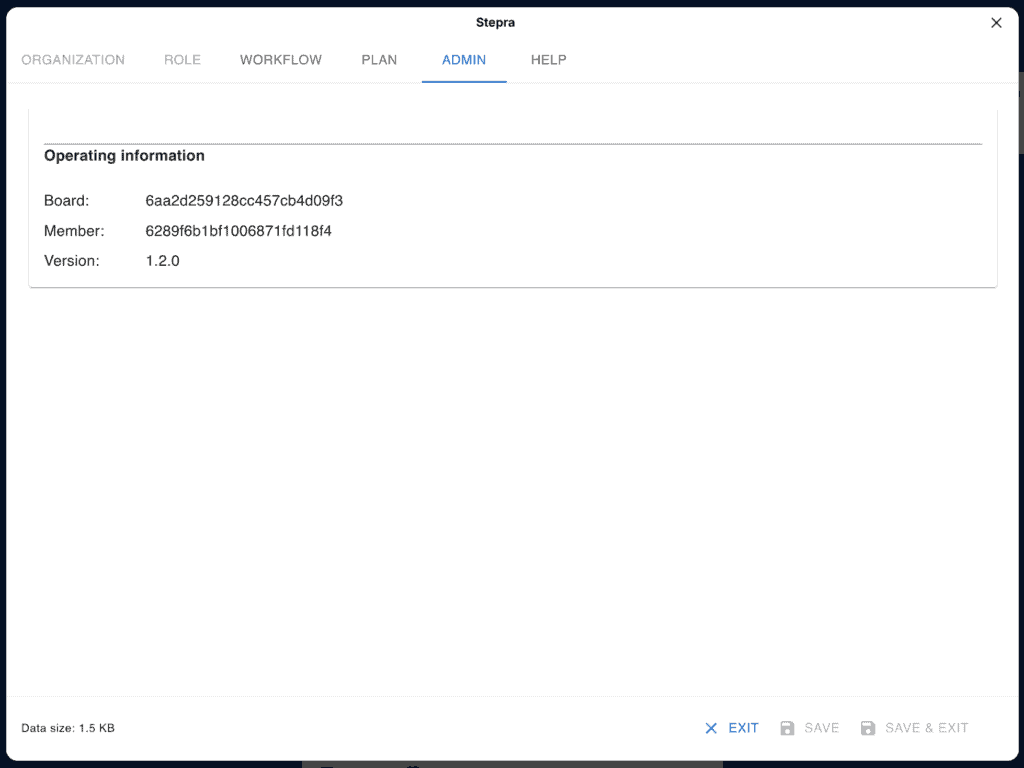
■ Environment
Displays information about the environment in which Stepra is running. Please include this information when reporting an issue. The IDs are Trello’s internal IDs.
[Board]
The ID of this board.
[Member]
Your member ID.
[Version]
The version of Stepra.